Conversion and Tracking
Legacy Screen
This is a legacy screen. It has been replaced by StoreFront Themes. Please visit StoreFront Conversion and Tracking.
This page is for the legacy shopping carts. New merchants and existing merchants who have migrated to StoreFronts should visit StoreFront Conversion and Tracking
Introduction
One of the most important aspects of your online business is the tracking of your visitors, your advertising campaigns, and your sales and purchases. There are literally hundreds of different products available in the marketplace to assist in these tasks. To help you quickly move forward in setting up your UltraCart account, we have created a special system that will automatically include the most popular tracking and conversion codes in a safe way on your receipt pages.
Getting Started
First, you need to navigate to the Conversion & Tracking tab
Main Menu → Configuration → (middle menu) Checkout → Screen Branding Themes → [Edit] → [Conversion and Tracking]
Once there, you will be shown a screen with several sections, which are described below.
Options
![]()
| Only display if payment processed | If checked, conversion & tracking information will only be displayed if the payment has been processed. Order such as check payment will not render the conversion code |
|---|---|
| Suppress buySAFE on this theme | If checked, buySAFE conversion code will not be allowed if the customer is checking out under this theme. |
| Override Continue Shopping URL | If specified, the Continue Shopping button on the cart table will go to this URL instead of the default URL. Enter the "Absolute" URL, for example, http://www.mydomain.com/thepageIwantthemtolandon.html |
| Override Catalog URL | If specified, the Continue Shopping button on the receipt will go to this URL instead of the default URL. Enter the "Absolute" URL, for example, http://www.mydomain.com/thepageIwantthem tolandon.html |
| Custom Thank-you URL | If specified, the customer will be sent to this URL, completely skipping the default UltraCart receipt page. Note regarding Custom Thank-you URL and firing of tracing pixels/scriptsImportant Note: Updated 11/14/2015 When the "Custom Thank You URL" is configured. UltraCart will actually load the UltraCart receipt page but it will appear as the "please wait...in progress" screen. This allows UltraCart to load any configured supported pixels or (custom tracking pixels/script configured in the "Conversion HTML" field of the "Other" section. |
| Display InstantSSL Trust Logo | If checked, the compatible trust logo/site seal will be displayed in the checkout screens. |
| Receipt Format | In the Drop down menu you'll have three options:
|
The Custom Thank You URL can contain any parameters you need. Many merchants add a key parameter to avoid false hits from search engines, etc.
The Custom Thank You URL supports substitution tokens also used by the Conversion Html section (below).
Try this out: https://www.mystore.com/custom-thank-you.html?email=[Email]&firstName=[BillingFirstName]
Supported Conversion Pixels
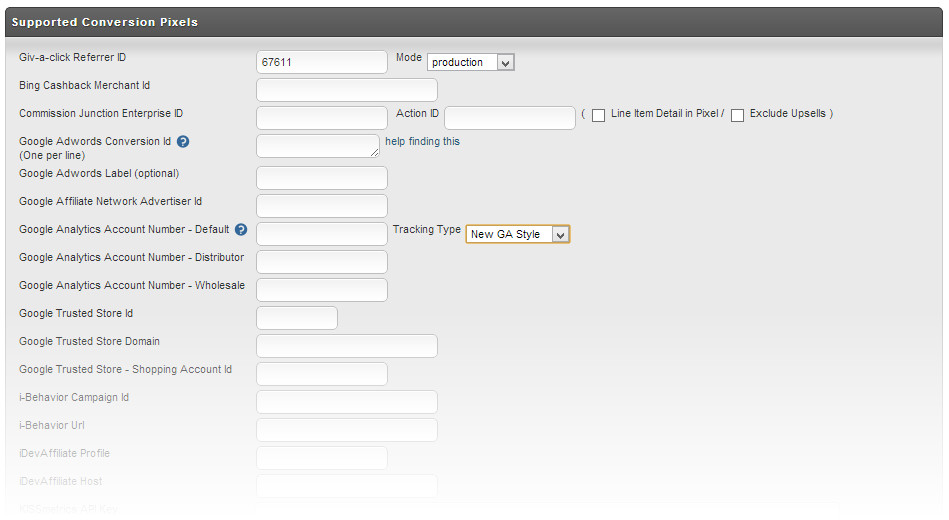
In the supported conversion pixels section, we have made things as easy as entering in your account information! Since each platform has different information to identify your site or product, you will need to enter in the information requested for each supported platform. For each platform you enter in configuration data, UltraCart will place the necessary HTML and JavaScript in the page, placing your account information in the correct location.
Note Regarding Google Analytic Integrations
The tracking type "E-commerce" is their "Universal Analytics" tracking script which works with their javascript library with additional ecommerce tracking.
What if I don't see my tracking pixel in supported section?
"Supported Pixels" is NOT the only option!
If you do not see the particular tracking pixel service you have in the "supported" section, continue down the page to the "Conversion HTML" field in the "Other" section of this page.
There you can configure the tracking pixel/tracking script code.
Other
The "Other" section is the location for you to place your own custom scripts that should be injected into the receipt page.
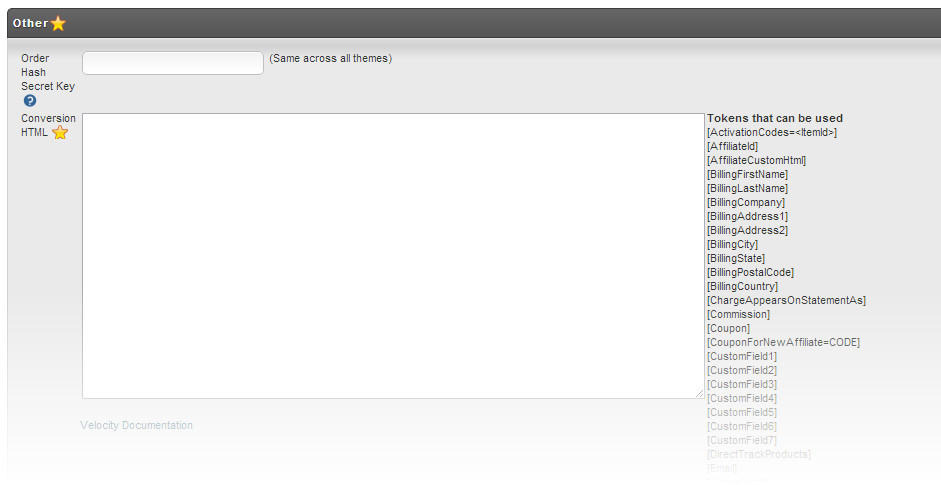
Order Hash Secret Key
The Order Hash Secret Key is used to insure that only UltraCart can submit a valid request to your conversion and tracking server. UltraCart will calculate an MD5 hash of order information, including this secret key, and provide it along with the request if required. Since this key is known only to you and UltraCart, you can verify the submission by calculating the same hash on your server. The formula for the hash is:
order hash = HEX(MD5(orderHashSecretKey + orderId + orderHashSecretKey)
So if you're going to validate a conversion using the order hash you need to pass at a minimum the order ID and order hash to your script. Your script needs to know the secret key, read the order id, calculate the order hash, and then compare it to the order hash passed in. If the calculated and passed order hashes match then the conversion information came from UltraCart.
Conversion HTML
If your desired conversion or tracking platform is not in the list of supported pixels, you can still include it on your receipt page! Simply copy and paste the conversion code provided to you by the platform provider. Typically, this code will contain instructions to place information, such as an order id, or an order total, in certain places in the code. Using the tags to the right of the text entry area, you can instruct UltraCart to automatically fill in the correct information. For example, if the pixel required the order id, tax amount and order total, you might use something like this:
<img src="https://www.myconversionplatform.com/convert.jsp?ORDER_ID=[OrderId]&TAX_AMOUNT=[Tax]&ORDER_TOTAL=[Total]">
UltraCart will then automatically change the specified tokens with the appropriate information:
<img src="https://www.myconversionplatform.com/convert.jsp?ORDER_ID=TEST-001234&TAX_AMOUNT=9.75&ORDER_TOTAL=109.75">
Order Tokens that can be used with tracking pixels and scripts
Tokens that can be used
[ActivationCodes=<ItemId>]
[AffiliateId]
[AffiliateSubId]
[AffiliateCustomHtml]
[BillingFirstName]
[BillingLastName]
[BillingCompany]
[BillingAddress1]
[BillingAddress2]
[BillingCity]
[BillingState]
[BillingPostalCode]
[BillingCountry]
[BillingDayPhone]
[BillingEveningPhone]
[ChargeAppearsOnStatementAs]
[Commission]
[Coupon]
[CouponForNewAffiliate=CODE]
[CurrentStage]
[CustomField1]
[CustomField2]
[CustomField3]
[CustomField4]
[CustomField5]
[CustomField6]
[CustomField7]
[DirectTrackProducts]
[Email]
[GrossProfit]
[IfPurchased=<ItemId>]<Conditionally Display>[/IfPurchased]
[IfPaymentMethod=<Method>]<Conditionally Displayed>[/IfPaymentMethod]
[IfShippingMethod=<Method>]<Conditionally Displayed>[/IfShippingMethod]
[OmnitureProducts]
[OrderId]
[OrderHash]
[PaymentMethod]
[PaymentProcessed]
[ProductIds]
[ProductQuantities]
[ProductCosts]
[ProductCostsWithoutDecimal]
[ProductDescriptions]
[ProductQuantity1] ... [ProductQuantity#]
[ShippingFirstName]
[ShippingLastName]
[ShippingCompany]
[ShippingAddress1]
[ShippingAddress2]
[ShippingCity]
[ShippingState]
[ShippingPostalCode]
[ShippingCountry]
[ShippingDayPhone]
[ShippingEveningPhone]
[Shipping]
[SubtotalAndShipping]
[Subtotal]
[SubtotalBeforeDiscount]
[SubtotalDiscount]
[Tax]
[Total]
[TotalQuantity]
Affiliate Network Pixels
UltraCart has advanced support for detecting traffic sent to your site from various affiliate networks and then firing only their conversion pixel on the receipt. If you wish to utilize this feature, you should read our tutorial on how to configure and test it.
Legacy Screen
This is a legacy screen. It has been replaced by StoreFront Themes.