Integrating with Checkout Screen Branding - Catalog
This information is for the legacy Catalog that has been replaced by UltraCart StoreFronts as of May 2015.
This information remains for long time merchants who may still be using a legacy catalog. Please see the StoreFronts User Guide for current catalog technology.
Screen branding is the process of making the checkout look like main website. A good screen branding implementation prevents the customer of noticing that they transitioned from the main website into the checkout. Ideally the branding will have almost all the same user interface elements of the main website so that the customer feels comfortable throughout the checkout.
Typically the screen branding is accomplished by saving a page from the main website (including supporting files) and chopping up the HTML into a header and footer. The graphics end up being uploaded to the screen branding graphics library. Depending upon the complexity of the site this can take a good bit of work, but it's necessary so that all the page assets can be served off an HTTPS server. The entire basic screen branding process is covered in the Screen Branding chapter of the UltraCart Reference Manual.
The catalog system, if the host is using a custom SSL certificate that matches the catalog hostname, makes the process easier by usage of templates from the catalog in the screen branding via the #ucTemplate directive. The matching SSL certificate is required because the graphics, CSS, and JavaScript referenced from the catalog must be served securely using HTTPS or else the browser will display a nasty warning message to the user.
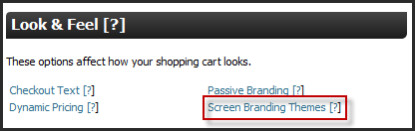
To configure template usage from the catalog within screen branding go to the Configuration Menu and click on "Screen Branding Themes" under the Look & Feel section as shown below.
On the first tab of the screen branding theme editor there is a field to select the catalog host to pull templates from as shown below.
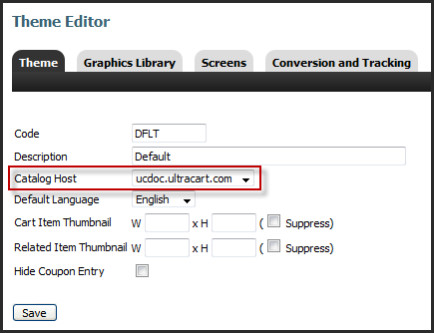
The "Catalog Host" field will only show if multiple catalog hosts are configured on an UltraCart account. If this field is not displayed then only a single catalog host is configured on the account.
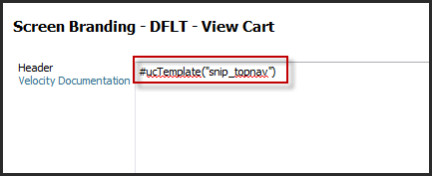
Next navigate over to the "Screens" tab and click "Edit" next to the View Cart screen. In the header, footer (or on some screens other HTML drop points), the #ucTemplate directive can be used. Below is an example of using the snip_topnav from the earlier example in this guide.
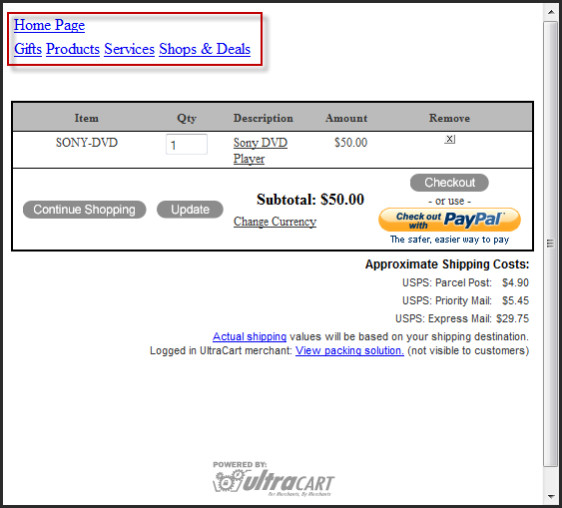
This simple directive will pull in the entire template from the catalog. Below is an example of the view cart page with a product in the cart. Notice the highlighted section at the top is the simple navigation template included from the catalog.
Usually the header and footer HTML in the screen branding will look similar to one of the high level group or item templates within a catalog. They will have outer HTML that includes snippet template with the #ucTemplate directive. Instead of rendering a listing of child groups or items the branding will sandwich the checkout content on the top and bottom. Remember that just like in screen branding, the checkout can accommodate customer content on all four sides with the proper use of tables.
Any velocity template coding in the screen branding HTML or an included template will have access to the same context variables just like the catalog. The "group" object will always be the root group of the catalog. UltraCart also injects one additional context variable named "pageTitle" that can be used in the <title> tag or other place on the page to tell the user what page of the checkout they are on. Velocity code can be used in the header/footer HTML fields of the screen branding and does not have to be in an included template.