Introduction
UltraCart automatically notifies your customers when their order has shipped. As a merchant, you can customize this Shipment Notification email using the StoreFront Transactional Email Editor. Each email uses dynamic tags to insert order-specific information into the message automatically.
This document explains how to access, edit, and configure the Shipment Notification template, including optional delivery settings and best practices.
Accessing and Editing the Template (New UI - StoreFront)
All current Visual Builder–enabled Storefront Themes include editable transactional email templates.
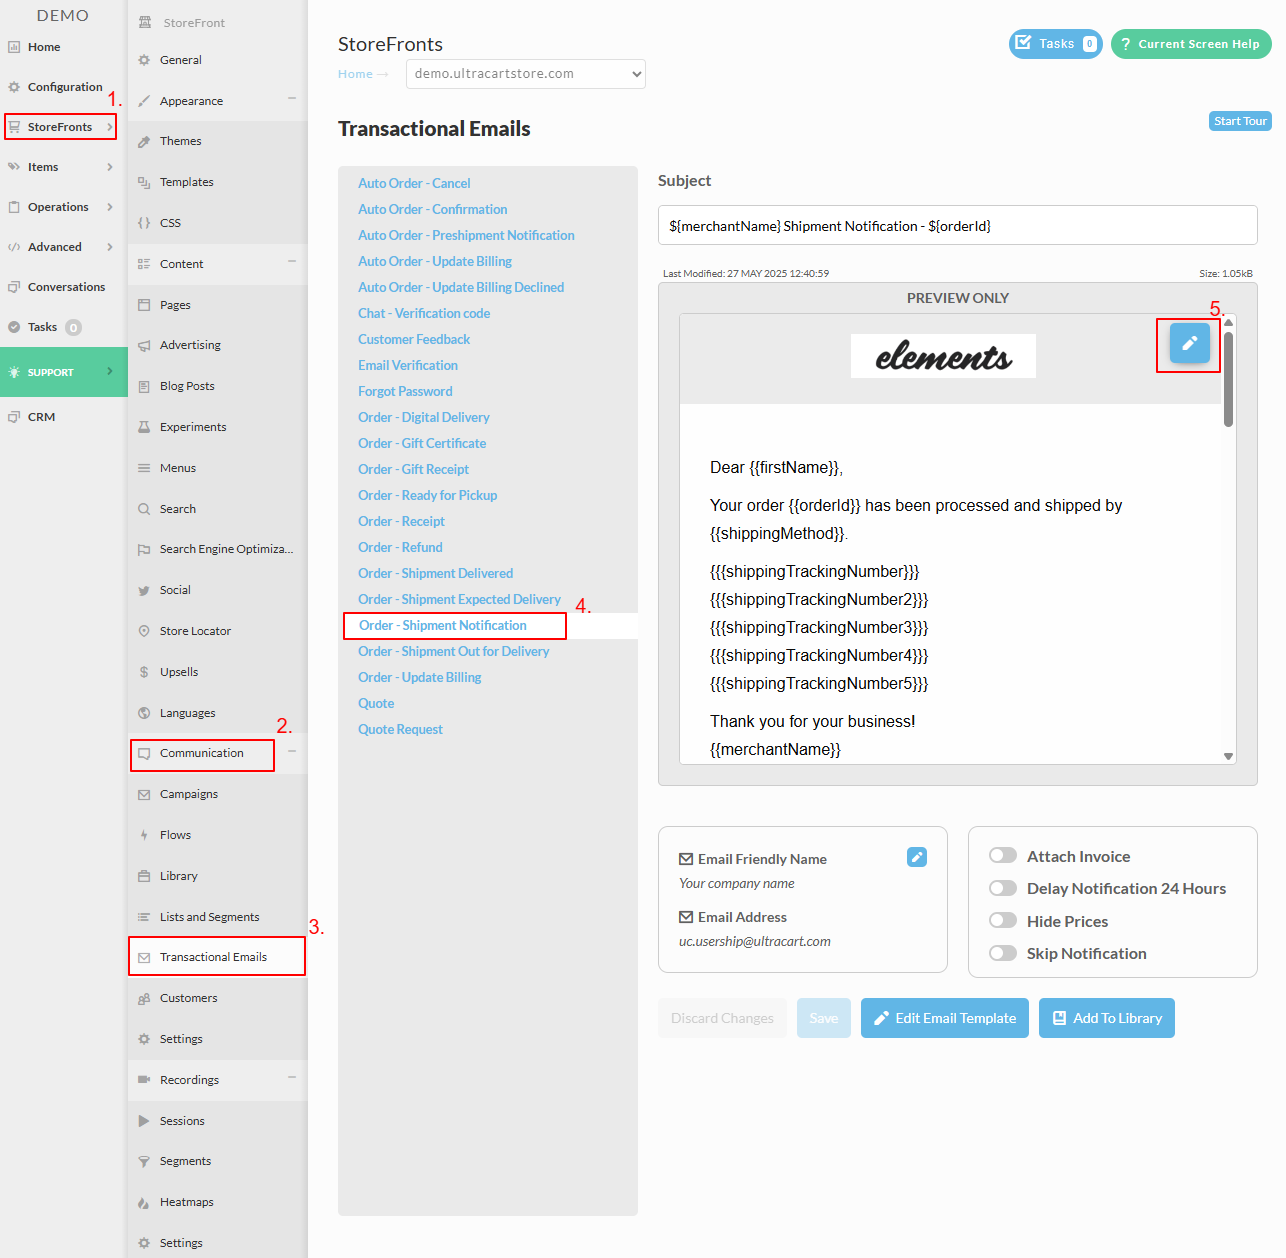
To access the Shipment Notification email template:
-
Navigate to StoreFronts.
-
Select your StoreFront Host.
-
From the StoreFronts menu, scroll to the Communications section.
-
Select Transactional Emails.
-
Choose Order – Shipment Notification.
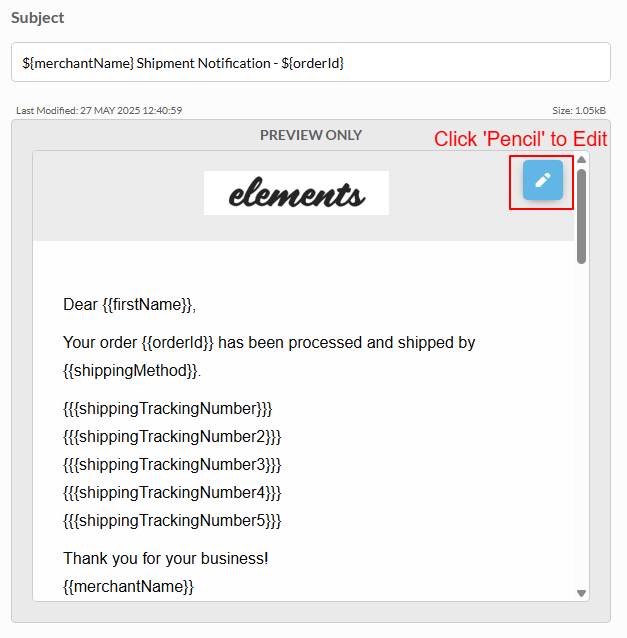
The template preview will display the current version of the email content.
To edit the content:
-
Click the blue Pencil icon located in the upper-right corner of the Preview window.
-
The content editor will open, allowing you to customize the Velocity/HTML content directly.
-
Additional configuration options appear below the preview window.
Configuration Options
The following fields and slider options are available for each transactional email template:
| Setting | Description |
|---|---|
| Friendly Name | Editable name for the outgoing email sender. |
| Email Address | Editable reply-to email address for the outgoing notification. |
| Attach Invoice | Attaches a PDF copy of the invoice to the email. |
| Variable | Description |
|---|---|
| creationDate | Date the order was created. |
| customerServiceEmail | Merchant’s customer service email address. |
| customerServicePhone | Merchant’s customer service phone number. |
| customField1 – customField7 | Custom order fields defined by the merchant. |
| Customer’s email address. | |
| firstItemTitle | Title of the first item on the order. |
| firstName / lastName | Customer’s first and last names. |
| merchantComments | Internal merchant notes for the order. |
| merchantName | The merchant or company name. |
| name | Full customer name. |
| orderId | Order ID number. |
| originalDate | Original order date (for modified or reshipped orders). |
| purchaseOrderNumber | Customer’s purchase order number, if applicable. |
| shipDate | The date the order was shipped. |
| shippingMethod | Shipping method used on the order. |
| shippingTrackingNumber | Primary tracking number (clickable link). |
| shippingTrackingNumber2 – shippingTrackingNumber5 | Additional clickable tracking numbers (for multiple packages). |
| shippingTrackingNumberNoURL – shippingTrackingNumberNoURL5 | Non-clickable tracking numbers (plain text). |
| shipToName | Recipient name for the shipping address. |
Note: Multiple tracking variables are provided to support orders containing several shipments or packages. Include all relevant variables in your template for complete visibility.
Testing the Template
To preview or test-send the Shipment Notification:
-
Create or locate a test order in your StoreFront.
-
Use the Preview function in the Transactional Email editor.
-
Click Email Me to receive a test copy. (Note: Attachments are not included in test sends.)
Tip: When previewing, ensure the order used for testing was placed using the same theme as the email template.
Old UI - Screen Branding Themes
Old UI - Screen Branding Themes
*This is section pertains to a deprecated legacy configuration that does not apply to Storefronts.
Main Menu → Configuration → Email Notifications → Email Templates
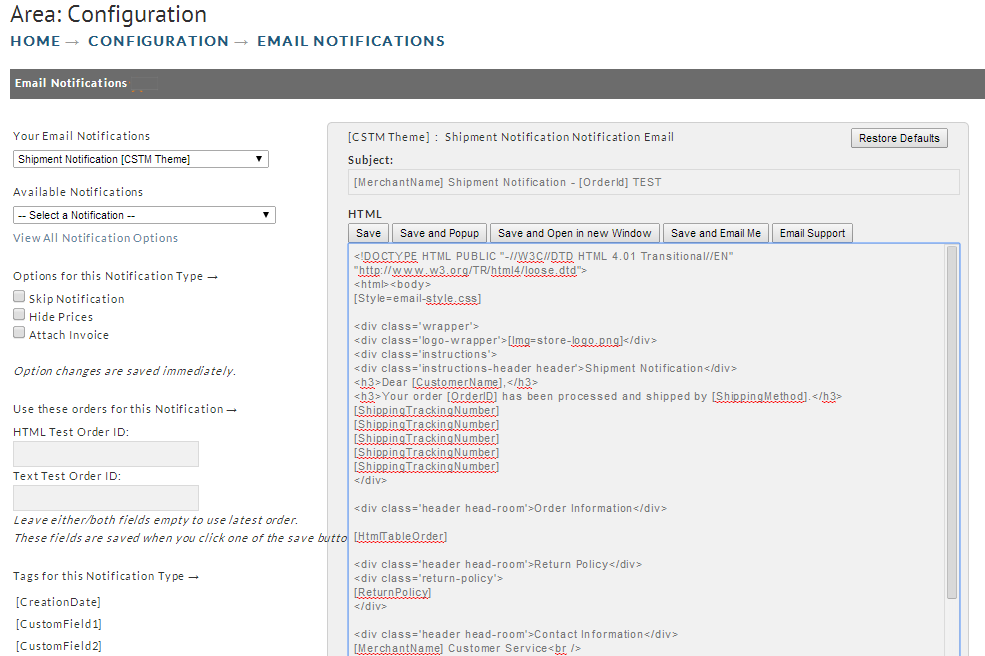
Notification Options
See the options section for specifics about options. Changing an option takes place immediately.
Test Orders
For each email notification (for each screen branding theme too), you may provide an Order ID for previewing the email. This order ID is saved with the configuration for quick retrieval. This can be useful for troubleshooting why a particular email looks strange. If you leave this blank, the last order placed on your system will be used to preview. The order IDs are saved when you click one of the save buttons in the main editing panel.
Subject, HTML, and Text Fields
All fields in this section may contain tags, which are expanded into merchant/order specific information.
Editing an Email
To edit an email, just type into the fields.
Saving Changes
There are four buttons above each text field. All four will save the entire email including subject, html message, text message, and test orders.

They differ in terms of previewing. The buttons above the HTML field will preview the html message. The buttons above the text field will preview the text message.
Previewing
There are three choices when previewing an email.
-
Popup - This will save your edits and display a light box with your email. The light box is deliberately small to mimic the preview panel of many email clients. It's good to keep this size in mind.
-
Open in new Window - This will save your edits and display the email in a new window.
-
Email Me - This will save your edits and save you a copy of the test email
Many email services such a Google will not allow
The "Email Me" feature will send you a copy of the email, but will not send any attachments that may normally accompany the email you're working with. The purpose of the preview features is solely template design and is not meant to be a complete system test. If you wish to see attachments, generate some test orders through your web site.
The Preview feature attempts to simulate real conditions as best possible. So when it renders a preview, it will look at the test order and use any theme associated with that order, regardless of the theme associated with the email template. This could cause strange behavior with the [Style], [FileUrl], and [Img] tags since they rely on the theme to find resources. If you're previewing emails and not seeing content, make sure the order you're previewing is associated with this theme. If you're working with a new theme and don't have any orders for it, place a test order for that theme.
tags
Options for this Notification
Skip Notification You may skip any notification except for digital delivery (think about it...).
Shipment | Hide Prices | Zeroes out prices within the email. |
|---|---|---|
| Attach Invoice | Attaches a PDF invoice to the email |
Email Tags
Shipment Notification |
|
|---|---|
[CreationDate] | Date the order was placed |
[CustomField1] | Custom Field 1 |
[CustomField2] | Custom Field 2 |
[CustomField3] | Custom Field 3 |
[CustomField4] | Custom Field 4 |
[CustomField5] | Custom Field 5 |
[CustomField6] | Custom Field 6 |
[CustomField7] | Custom Field 7 |
[CustomerFirstName] | First name from shipping address |
[CustomerName] | Full name from shipping address |
[CustomerServiceEmail] | Your customer service email |
[CustomerShipToName] | Full name from shipping address |
[FileUrl= | Generate URL of file from graphics library (Note: test order's theme must be the same as email template's theme to preview properly.) |
[HtmlOrderSummary] | A summary of the order formatted with html tables |
[Img= | Generate |
[MerchantName] | Your company name |
[MerchantComments] | Internal merchant notes. Be careful using this. These are your internal merchant notes. |
[OrderID] | Order ID |
[OrderSummary] | A summary of the order |
[Phone] | Your customer service phone number |
[PurchaseOrderNumber] | The customer's purchase order number if specified |
[ReturnPolicy] | Your return policy |
[ShippingMethod] | The shipping method used on the order |
[ShippingTrackingNumberNoURL] | The tracking number (not a clickable link) Configuring tracking numbers for orders with multiple packages You can place multiple "[ShippingTrackingNumber]" or "[ShippingTrackingNumberNoURL]" tags into the email template. So, if you will have orders that will be shipped in multiple packages, adding additional tracking tokens into the template will allow for the message to accommodate the multiple tracking numbers. (See the screenshots listing the tracking number tag multiple times.) |
[ShippingTrackingNumber] | The tracking number in a clickable link form. Configuring tracking numbers for orders with multiple packages You can place multiple "[ShippingTrackingNumber]" or "[ShippingTrackingNumberNoURL]" tags into the email template. So, if you will have orders that will be shipped in multiple packages, adding additional tracking tokens into the template will allow for the message to accommodate the multiple tracking numbers. (See the screenshots listing the tracking number tag multiple times.) |
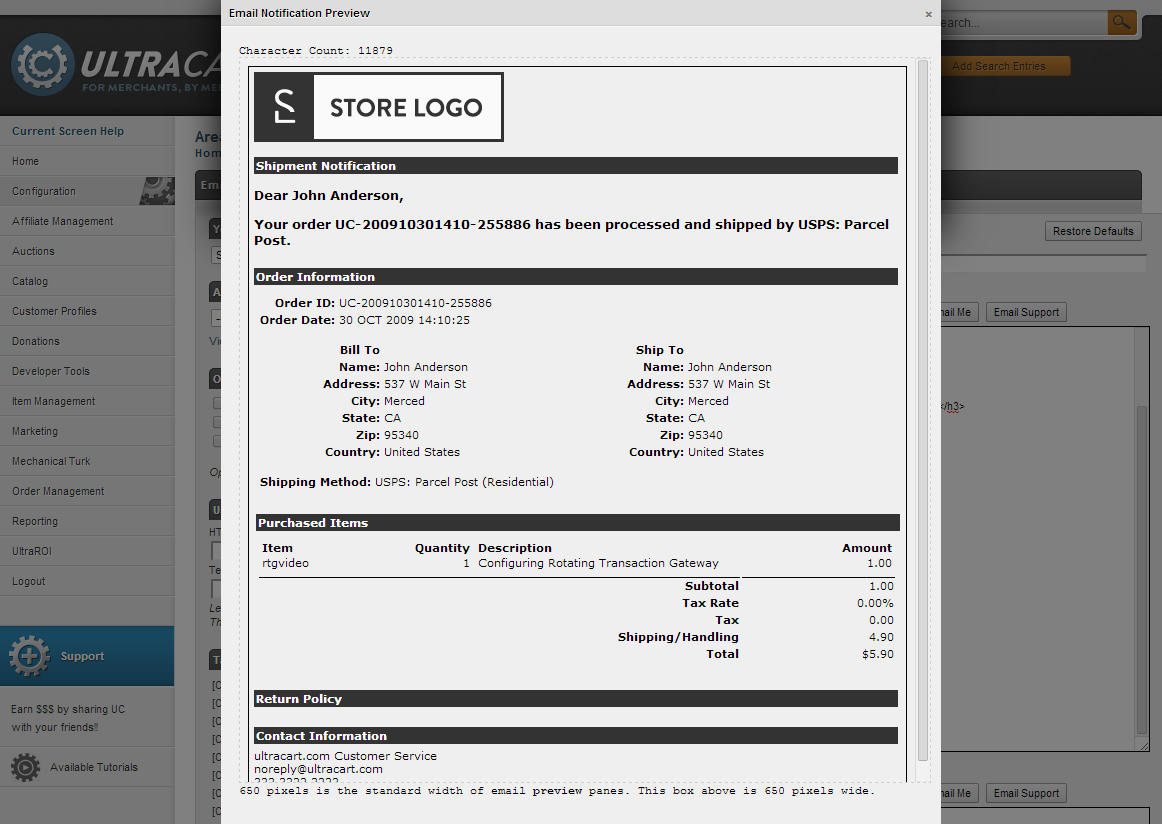
[Style= | Generate inline Sample HTML template code for Shipment Notificationgroovy [Style=email-style.css] [Img=store-logo.png] Shipment Notification Dear [CustomerName],Your order [OrderID] has been processed and shipped by [ShippingMethod].[ShippingTrackingNumber] [ShippingTrackingNumber] [ShippingTrackingNumber] [ShippingTrackingNumber] [ShippingTrackingNumber] Order Information [HtmlTableOrder] Return Policy [ReturnPolicy] Contact Information [MerchantName] Customer Service ]]> Sample HTML Shipment Notification Preview:
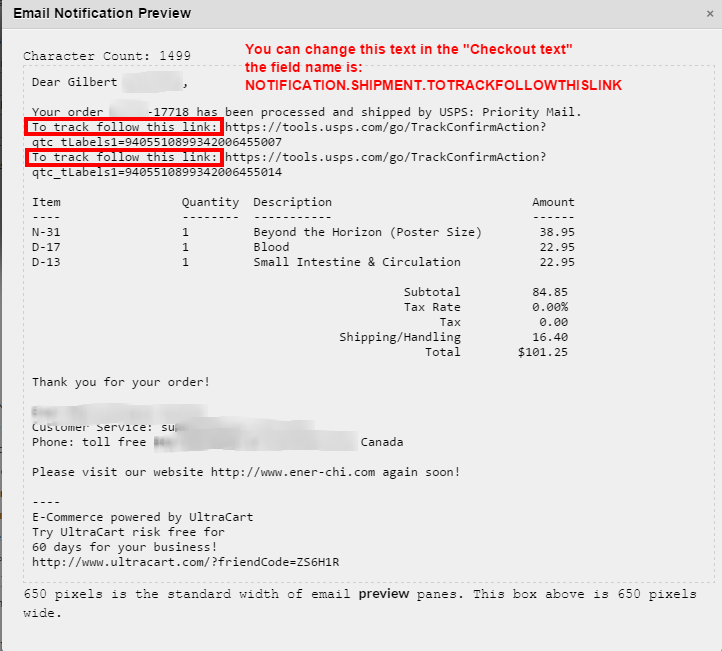
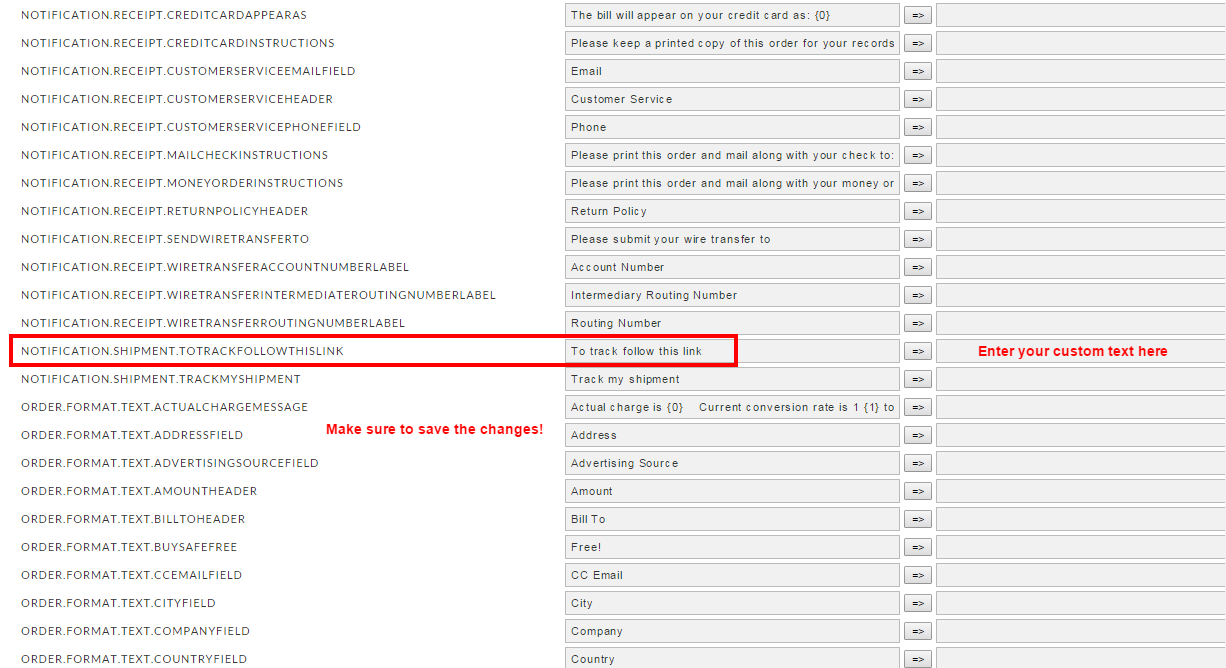
Replace store-logo.png before going live Before taking your store live, please make sure to either remove or replace the sample store-logo.png image with your own store logo! You can either upload your logo as store-logo.png to make the existing templates work without additional editing, or make sure to go back to the templates and update the logo HTML code to reflect the file-name of your own logo image file. Frequently Asked QuestionsQ: When our shipment notification goes out to the customer, the text displayed to the tracking link "To Track Follow This Link" that precedes the tracking link URL in the shipment notification, we would like to edit that text, how do we go about editing it?Answer: You can edit the defaulted text by editing it in the "checkout text" editor. Navigate to: Home → Configuration → Email Notifications (link is in 2nd column, 3-4 sections down) Example Preview of the text as it displays in the Shipment Notification:
To change that text, navigate: Main Menu → Configuration → Checkout → Checkout Text
Remember to click the save button to save the changes! |