Batch Item Import
Batch Item Import creates or updates many items at once from a CSV or Excel file. It is the second half of the usual bulk-edit route: export with Batch Item Export, edit the spreadsheet, then import it here.
Opening the tool
Main Menu → Items → Tools → Batch Item Import
Step 1: File Import

Begin by uploading your data file:
-
Accepted Formats:
.csvor.xls -
Minimum Required Columns:
Item IDandPrice
These two fields are sufficient to create new items or update prices of existing ones.
Advanced Permission
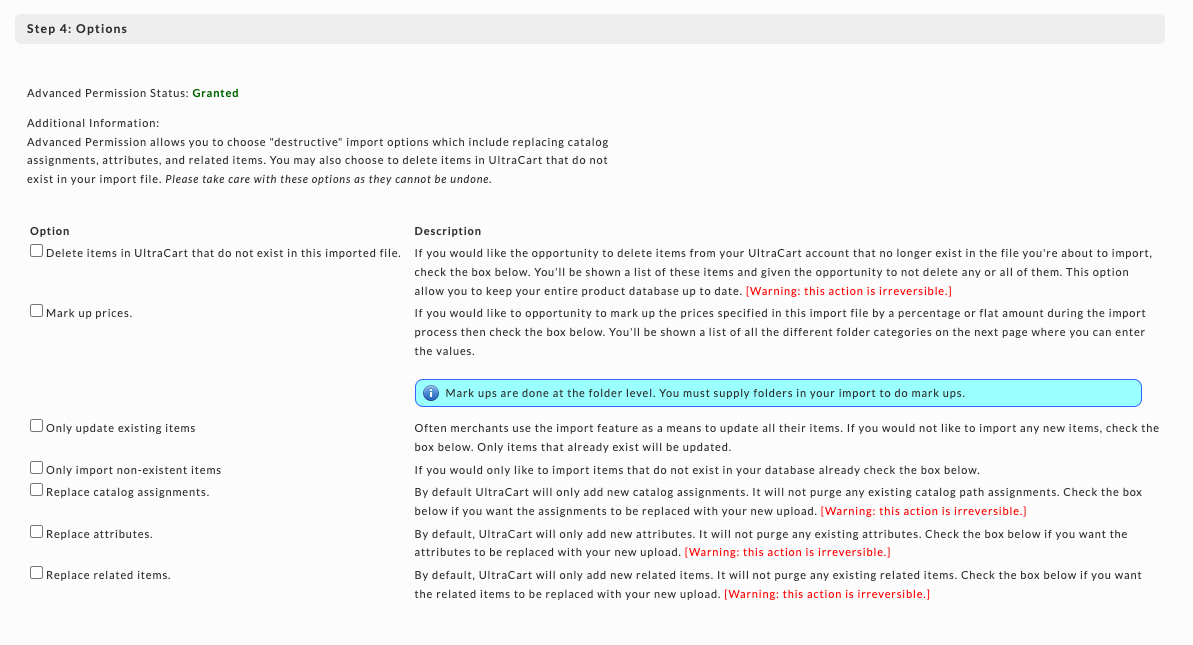
Step 1 shows an Advanced Permission Status of either Granted or not. It controls whether the destructive import options are available to you further along:
- replacing catalog assignments, attributes, and related items rather than adding to them
- deleting items in UltraCart that are absent from your import file
These options cannot be undone. Deleting items missing from the file will remove every item you did not include, so confirm your export covered the whole catalog before choosing it.
If the status is not Granted and you need these options, ask an account administrator to grant the permission.
Sample File Provided:
We've included a sample CSV file to help you get started. This file includes basic headers like Item ID, Description, Price, and Cost.
You can open it in Excel or Google Sheets and modify it to include your own product data.
How to use the sample effectively:
-
Replace the sample rows with your actual item information.
-
Add or remove columns based on which fields you want to import or update.
-
Make sure the
Item IDis included for all rows (required for both creating and updating items). -
Save the file as
.csvor.xlsbefore uploading.
Once your file is ready, click Upload File on the Batch Item Import page to begin the field mapping process.
Note: If you attempt to upload an unsupported file type, you'll receive an error message:
UltraCart cannot understand the file of type [file-type] you transferred. Please contact customer support for assistance.
Step 2: Field Mapping
During this step, you’ll match the columns from your spreadsheet to the corresponding item fields in UltraCart. This ensures that the data is imported into the correct locations within your store’s catalog.
How to Map Fields
-
Upload your CSV or Excel file — The system will display the first row (typically column headers) and a few sample rows of data to help guide your mapping.
-
Use the dropdown menus under “Field Mapping” to assign each column to an UltraCart item field.
- For example, if your first spreadsheet column is “Item ID,” choose
Item IDfrom the dropdown.
- For example, if your first spreadsheet column is “Item ID,” choose
-
Use the blue buttons on the right to speed up the process:
-
Match Row: Attempts to match that row’s column title to the correct UltraCart field. -
Reset Row: Clears the mapping for that row. -
Match All Rows: Automatically attempts to match all columns based on header names. -
Reset All Rows: Clears all field mappings.
-
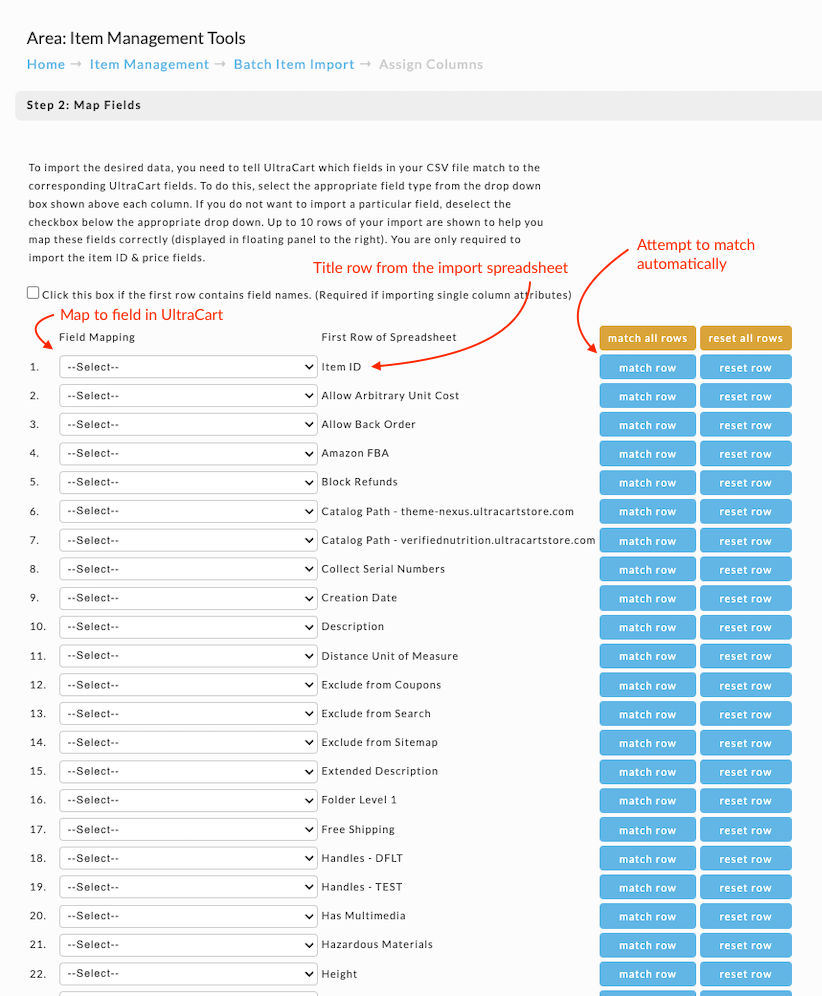
Pro Tip: If your file includes a header row (e.g., “Item ID,” “Price,” etc.), make sure to check the box labeled: “Click this box if the first row contains field names.”
This step is required if you're importing single-column attribute files or want accurate auto-matching.
Note on Updating Existing Items
If you're looking to update existing items, simply include the Item ID column and only the fields you wish to update.
UltraCart will match the Item ID to your existing catalog and modify only the specified fields.
Any fields not included in your file will remain unchanged.
For example:
-
Upload a file with
Item ID,Price, andDescription. -
Map those fields accordingly.
-
Upon import, UltraCart will update only the price and description for each matching item, leaving all other attributes untouched.
Unmatched import fields: If your file includes columns that aren’t used for imports (e.g., system-generated or read-only fields from exports), you can leave them unmapped. Some common fields that are not importable and will appear as unmatched include:
-
Creation Date
-
Has Multimedia
-
Inventory Level (Allocate to Carts)
-
Inventory Level (Allocate to Orders)
-
Inventory Level (Available to Allocate)
-
Item OID
-
Multimedia AI Alt Text 01
-
Multimedia Height 01
-
Multimedia Width 01
-
Skip Shipment Notification
-
Search ("Exclude from Search")
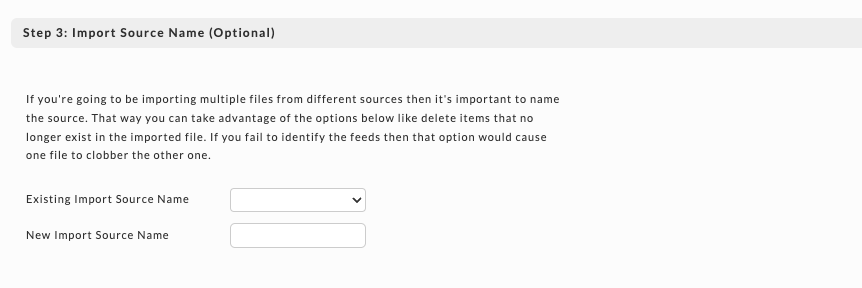
Step 3: Import Source Name (Optional)
If you're importing files from multiple sources, assigning a unique source name to each can help in tracking and managing imports.
Step 4: Options
Configure additional import settings as needed. These options allow for customization of the import behavior to suit your specific requirements.
Step 5: Save Import Mapping (Optional)
To streamline future imports, you can save your current field mapping configuration. This is especially beneficial if you regularly import files with the same structure.

Updating sale pricing in bulk
Batch Item Import can set sale pricing on many items at once. Use it when each item needs a different sale price, since a coupon applies the same discount to everything it covers. The Price Update tool does not include sale cost, so use this method or the Item Editor instead.
Three fields control sale pricing:
| Field | What it sets |
|---|---|
Sale Cost | The price charged while the sale is active |
Sale Start | When the sale price begins |
Sale End | When the sale price ends and the regular cost returns |
To update them:
-
Open Batch Item Export and export the items going on sale. If none of them has a sale price yet, choose All Columns (Including Empty) under Export Contents so the sale columns are included. Populated Columns Only leaves out any column that no exported item uses.
-
In the spreadsheet, keep the
Item IDcolumn and the three sale columns. Delete the other columns so nothing else changes. -
Enter each item's sale cost and its start and end dates. Enter dates as MM/DD/YYYY, the same format the Item Editor uses.
-
Open Batch Item Import, upload the file, check the box for a header row, and click Match All Rows. If a column is left unmatched, pick the field for it from that row's dropdown.
-
In Step 4: Options, check Only update existing items so the import cannot create new items.
Only the fields in the file change; everything else on each item is left alone. Test with two or three items first and check them in the Item Editor before importing the rest.
If the items use variations, include the parent item and every child item. Child items are the ones a customer actually adds to the cart, so the sale price has to be on each one for it to apply. See Item Variations for more on parent and child pricing.
Developers can set the same fields through the item pricing object in the REST API:
sale_cost, sale_start, and sale_end.
Updating image descriptions (alt text) in bulk
Every image on an item has a description, and your StoreFront uses it as the image's alt text: the words a screen reader announces and a search engine reads in place of the picture. When an image has no description, the StoreFront falls back to alt text that UltraCart generates with AI. Batch Item Import lets you review that generated text and write your own descriptions for many images at once.
Three exported columns cover each image. The number on the end (01, 02, and so on) ties
the columns for one image together.
| Export column | Map it to | What it does |
|---|---|---|
Multimedia URL 01 | Multimedia → URL 01 (match existing) | Identifies the image. UltraCart matches the file name at the end of the URL to an image already on the item |
Multimedia Description 01 | Multimedia → Description 01 | The description to save on that image |
Multimedia AI Alt Text 01 | Leave unmapped | The AI generated alt text, exported for reference only |
The import accepts up to 30 images per item, URL 01 through URL 30.
To update descriptions:
-
Open Batch Item Export and export the items. If none of their images has a description yet, choose All Columns (Including Empty) under Export Contents, because Populated Columns Only leaves out the empty description columns.
-
In the spreadsheet, keep the
Item IDcolumn and theMultimedia URLandMultimedia Descriptioncolumns. Leave the URLs exactly as exported. -
Write each description. Where the
Multimedia AI Alt Textcolumn already reads well, copy it into the description so the image keeps that text on purpose. -
Open Batch Item Import, upload the file, and click Match All Rows. Because the file has
Multimedia Descriptioncolumns, eachMultimedia URLcolumn matches to URL (match existing) and each description matches to the Description field with the same number. TheMultimedia AI Alt Textcolumns stay unmatched. -
In Step 4: Options, check Only update existing items.
Check the URL columns before you continue. They must be mapped to URL (match existing), not to Import Multimedia URL or Import Default Multimedia URL. Those two fields download the file again and add it to the item as a new image, and they are what Match All Rows picks for a file that has no description columns.
How the import treats each cell:
- A blank description leaves the image's current description unchanged. To remove a description, use the Item Editor.
- If no image on the item has the file name in the URL, the import lists an error for that item and carries on with the rest of the file.
- A description column mapped without its URL column is ignored, and the import tells you so.
- Images are matched by file name, not by their number. A file exported before you added or removed images still updates the right ones, even though the numbers have shifted.
Developers can read and write the same description through the REST API as
content.multimedia[].description. The generated text is available read-only as
content.multimedia[].ai_alt_text, and both fields appear in the uc_items table of the
BigQuery data warehouse.
Related Documentation
- Batch Item Export - generate the spreadsheet you edit before importing
- Configuring TaxJar - bulk-set item tax codes with the
TaxJar CodeandTaxJar Descriptionfields