Facebook / Meta Integration Guide
Last Updated: August 3, 2026
Overview
This guide explains how to integrate your UltraCart StoreFront with Facebook and Meta services, including Meta Pixel browser tracking, Facebook Analytics and Custom Audiences, product catalog synchronization for Facebook and Instagram Shopping, Facebook Conversions API (CAPI), and Open Graph sharing metadata.
While UltraCart is not a native Meta Commerce Manager partner platform, UltraCart fully supports the core integration points required for modern Facebook and Instagram advertising, conversion tracking, catalog syndication, and retargeting workflows.
This tutorial provides step-by-step instructions for configuring each integration area using current UltraCart administrative interfaces and StoreFront capabilities. The Facebook configuration form now consolidates controls for browser pixels, server-side CAPI tokens, event opt-ins, and standard event selection.
Prerequisites
Before beginning, verify the following requirements.
Facebook / Meta Requirements
You will need:
-
A Meta Business Account
-
A Meta Business Manager account with administrator access
-
A Meta Pixel created in Meta Events Manager
-
A Meta Commerce Manager catalog
-
Your Facebook Pixel ID
-
A Conversions API Access Token (for CAPI configuration)
UltraCart Requirements
You will need:
-
An active UltraCart account
-
At least one configured StoreFront
-
Administrative access to the UltraCart account
-
UltraCart Analytics enabled
-
A populated product catalog with product titles, descriptions, prices, and product images
Warning: Your Conversions API Access Token provides write access to your Meta conversion tracking data. Store it securely and never expose it publicly.
Part 1 — Install the Meta Pixel
The Meta Pixel allows Facebook and Instagram to track storefront activity such as page views, product views, add-to-cart activity, checkout activity, and purchases.
UltraCart includes native Meta Pixel support through the StoreFront Privacy & Tracking settings. The current configuration form also supports multiple pixel IDs, server-side event delivery via CAPI, and granular control over standard events.
Step 1 — Locate Your Facebook Pixel ID
-
Log in to Meta Business Manager.
-
Navigate to Events Manager.
-
Select your Pixel under Data Sources.
-
Copy the numeric Pixel ID shown at the top of the page.
Example: 1234567890123456
Step 2 — Open Privacy & Tracking Settings in UltraCart
Navigate to:
Main Menu → StoreFronts → [StoreFront] → Privacy & Tracking → Other (Tab)
The Facebook configuration form and Facebook Analytics & Custom Audiences section may appear on this page or under Conversion and Tracking settings depending on your UltraCart version.
Step 3 — Configure Facebook Pixel and Event Settings
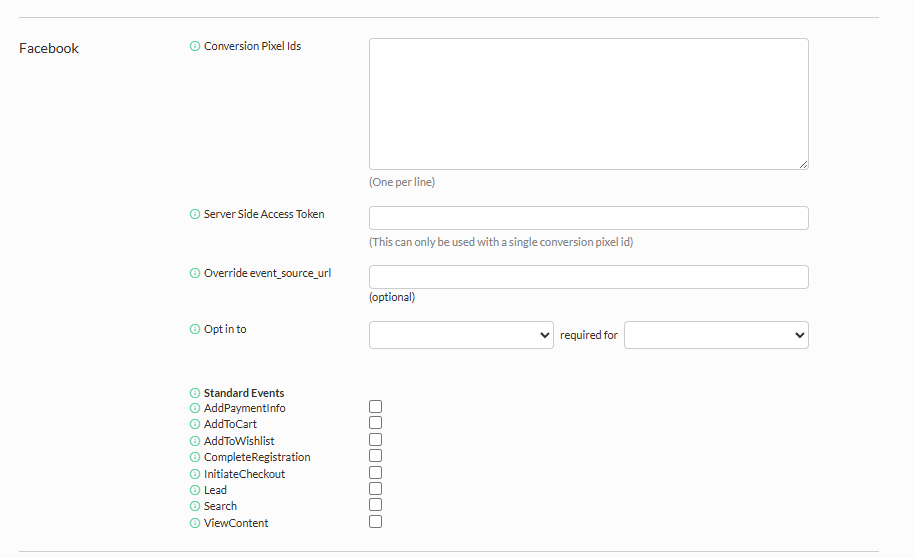
The Facebook section provides the following fields. Complete each relevant field and click Save.
Conversion Pixel Ids (textarea, one per line)
Enter one or more Meta Pixel IDs. Place a single ID on each line. This field supports sending events to multiple pixels when required.
Server Side Access Token (input)
Paste the Conversions API Access Token generated in Meta Events Manager. This enables server-side event delivery.
Important: This token can only be used with a single conversion pixel ID.
Override event_source_url (input, optional)
Enter a custom event source URL when your implementation requires overriding the default source URL sent with events.
Opt in to (dropdown, required for dependent field)
Select the desired opt-in option. This setting is required for the associated secondary dropdown. The exact behavior depends on the selected value and controls additional tracking or matching features.
Standard Events (checkboxes)
Select which standard Meta events UltraCart should automatically track and forward. Available events:
-
AddPaymentInfo
-
AddToCart
-
AddToWishlist
-
CompleteRegistration
-
InitiateCheckout
-
Lead
-
Search
-
ViewContent
PageView events typically fire on all page loads regardless of checkbox selection. The remaining events fire only when their corresponding checkbox is enabled and the triggering storefront action occurs.
Step 4 — Verify Pixel Tracking
-
Open your storefront in a browser.
-
Open Meta Events Manager in another tab.
-
Navigate to Events Manager → Test Events.
-
Browse your storefront.
-
Verify that events begin appearing.
Test the following actions:
-
View a product
-
Add an item to cart
-
Begin checkout
-
Complete a test purchase
Tip: Install the Meta Pixel Helper Chrome extension to verify Pixel activity directly in your browser.
Automatically Tracked Events
| Event | Description |
|---|---|
| PageView | Fires on all storefront page loads |
| ViewContent | Fires on product detail pages |
| AddToCart | Fires when a product is added to cart |
| InitiateCheckout | Fires when checkout begins |
| AddPaymentInfo | Fires when payment information is entered |
| AddToWishlist | Fires when a product is added to a wishlist |
| CompleteRegistration | Fires on completion of registration or signup |
| Lead | Fires on lead form submissions |
| Search | Fires on internal site search actions |
| Purchase | Fires on the receipt page after checkout |
Part 2 — Connect Facebook Analytics & Custom Audiences
UltraCart Analytics can connect directly to Facebook using the Graph API to import advertising spend data, sync customer lists into Facebook Custom Audiences, and support Lookalike Audience generation.
Step 1 — Find Your Facebook Account ID
-
Log in to Facebook Business Manager.
-
Navigate to Business Settings → Business Info.
-
Locate your numeric Business Account ID.
Example: 987654321098765
Step 2 — Open Facebook Analytics Settings in UltraCart
Navigate to:
Main Menu → StoreFronts → [StoreFront] → Conversion and Tracking → Other

Scroll to the Facebook Analytics & Custom Audiences section. This section may also appear directly below the Facebook fields on the Privacy & Tracking page in current UI versions.
Step 3 — Connect Your Facebook Account
-
Enter the Facebook Account ID in the Account ID field.
-
Click Connect.
-
Authorize UltraCart within Facebook.
After authorization:
-
UltraCart downloads Facebook advertising spend data hourly.
-
UltraCart uploads customer audiences for retargeting.
Step 4 — Verify Audience Syncing
After 24–48 hours:
-
Open Meta Ads Manager.
-
Navigate to Audiences.
-
Confirm that the UltraCart audience appears.
Tip: Use your synced customer audience to generate Lookalike Audiences for prospecting campaigns.
Part 3 — Sync Your Product Catalog with Facebook
UltraCart can automatically generate a Facebook-compatible product feed through the Google Product Search integration. This feed can then be connected directly to Meta Commerce Manager for Facebook Shop, Instagram Shopping, Dynamic Product Ads, and Catalog Ads.
Unlike a completely manual export workflow, UltraCart automatically generates and maintains the Facebook feed file once the Google Product Search integration is enabled.
Note: The generated Facebook feed file is named
facebook.xmland is automatically placed in the StoreFront File Manager under theFeedsfolder.
How the Facebook Feed Generation Works
UltraCart uses the Google Product Search feed configuration as the source for both Google Product feeds and Facebook / Meta product feeds. The product-level feed configuration performed within the item editor also controls which products appear in the generated Facebook feed.
The generated Facebook feed file is facebook.xml. The file is automatically generated and updated by UltraCart after the feed integration is enabled.
Step 1 — Enable the Google Product Search Feed
Navigate to:
Main Menu → StoreFronts → [StoreFront] → Google Product Search
This configuration area controls feed generation, feed activation, manual feed updates, and global feed settings.
After configuring the feed settings:
-
Click Save.
-
Click the Update Now button.
The Update Now button immediately regenerates the product feed files, including Google feed files and facebook.xml.
Tip: The Update Now button is located next to the Save button on the Google Product Search configuration page.
Step 2 — Configure Product Feed Settings Within Each Item
Each product included in the Facebook feed should be reviewed within the item editor.
Navigate to:
Main Menu → Items → Item Editor → Google Product Search
The Google Product Search section of the item editor controls important feed data including product titles, descriptions, product categories, brand information, availability, GTIN / UPC values, MPN values, product condition, apparel attributes, and feed inclusion settings.
This information is used when generating both the Google and Facebook product feeds.
Excluding Products from the Feed
Products that should not appear in Facebook or Google Shopping feeds can be excluded individually.
Within the item editor's Google Product Search section:
-
Locate the Omit from feed checkbox.
-
Enable the checkbox.
-
Save the item.
Excluded products will not appear in generated feed files, including facebook.xml.
Common reasons to exclude products include restricted items, internal-only products, incomplete product data, products without valid images, non-shippable products, and products not intended for advertising.
Important: Products omitted from the feed will not be available for Facebook Shop, Instagram Shopping, or Dynamic Product Ads.
Step 3 — Locate the Generated Facebook Feed File
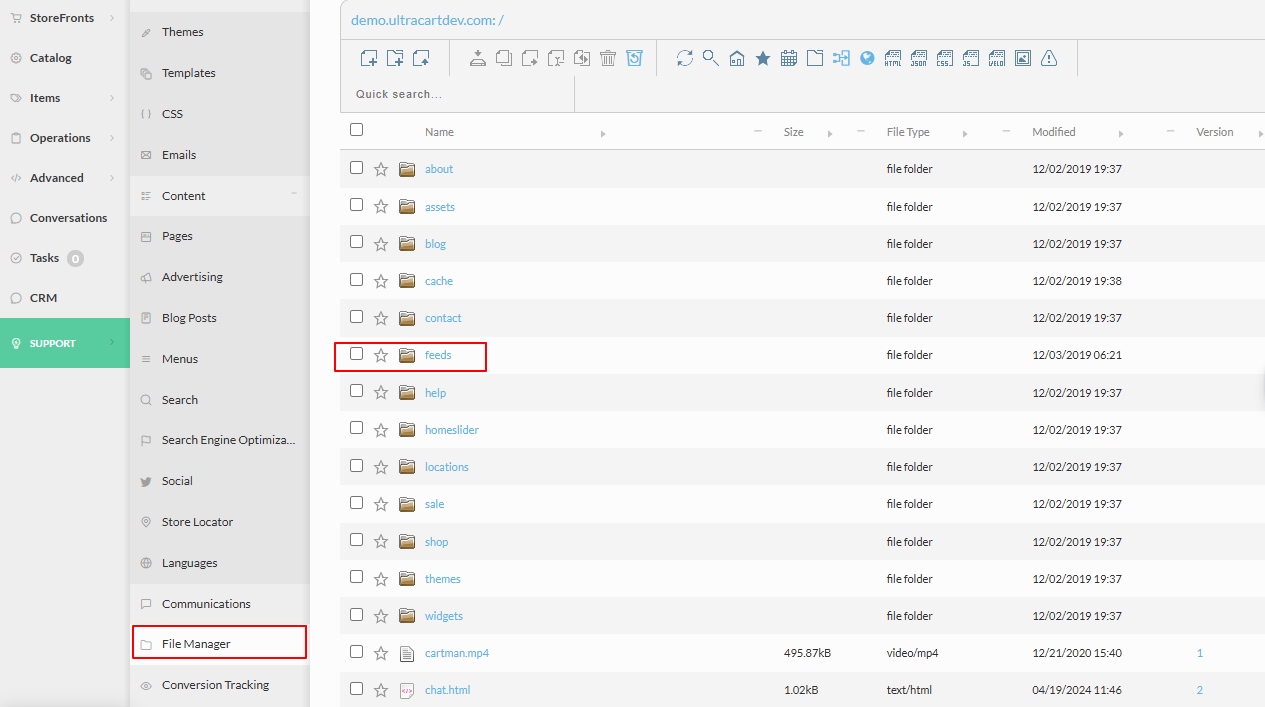
After the feed has been generated, the Facebook feed file is available within the StoreFront File Manager.
Navigate to:
Main Menu → StoreFronts → File Manager → Feeds
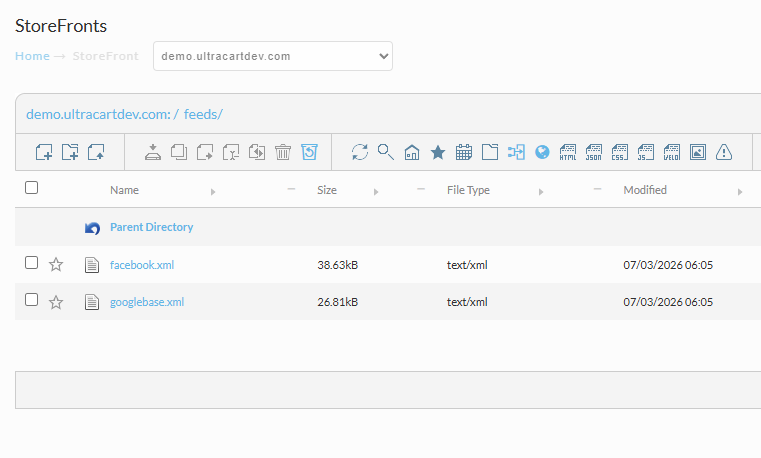
The generated file will be facebook.xml.
This XML feed file is the file you will provide to Meta Commerce Manager.
Step 4 — Connect the Feed to Meta Commerce Manager
-
Open Meta Commerce Manager.
-
Create or select a catalog.
-
Navigate to Data Sources → Add Items.
-
Select Data Feed.
-
Choose Use a URL.
-
Enter the public URL to your
facebook.xmlfeed. -
Configure the refresh schedule.
-
Complete the import.
Tip: Daily feed refreshes are recommended for most stores. High-volume stores may prefer more frequent refresh schedules.
Step 5 — Review Feed Diagnostics
After importing the feed into Meta Commerce Manager:
-
Review the Diagnostics section.
-
Resolve any feed warnings or errors.
-
Confirm products are approved.
Common issues include missing images, invalid pricing formats, missing brand data, invalid availability values, and missing GTIN or MPN values.
Important: Product image URLs must be publicly accessible. If Meta cannot access the image directly, the product may be rejected from the catalog feed.
Part 4 — Configure Facebook Conversions API (CAPI)
The Conversions API supplements browser Pixel tracking with server-side event delivery.
Benefits include improved conversion attribution, reduced tracking loss from ad blockers, better iOS tracking reliability, and higher Event Match Quality scores.
Note: UltraCart automatically handles event deduplication between browser and server-side tracking.
Step 1 — Generate a CAPI Access Token
-
Open Meta Events Manager.
-
Select your Pixel.
-
Navigate to Settings → Conversions API.
-
Click Generate Access Token.
-
Copy and securely store the token.
Step 2 — Configure CAPI in UltraCart
The Server Side Access Token is entered in the Facebook configuration form described in Part 1, Step 3.
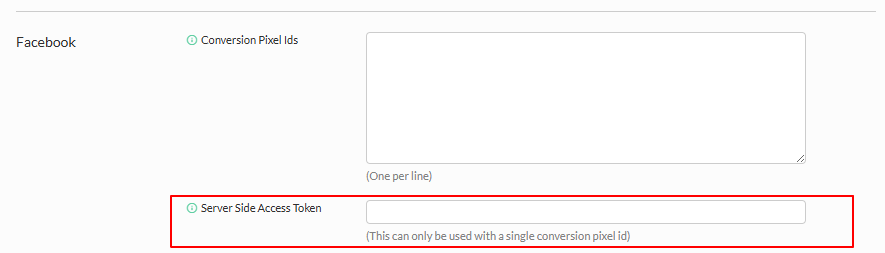
Use the Server Side Access Token field (supports a single pixel ID only). The primary Pixel ID is supplied via the Conversion Pixel Ids field on the same form.
Save the configuration after entering the token.
Step 3 — Verify CAPI Delivery
-
Open Meta Events Manager.
-
Navigate to Test Events.
-
Place a test order.
-
Confirm that events display both browser source and server source.
Tip: Aim for an Event Match Quality score of 8.0 or higher.
Understanding Event Match Quality Scores
In Meta Events Manager, every standard event displays an Event Match Quality (EMQ) score from 0 to 10. A low score — especially on an early-funnel event such as PageView — is one of the most common reasons merchants contact support believing their Pixel is broken. In almost every case, nothing is wrong.
Event Match Quality does not measure whether your Pixel fired, and it does not measure how many events you sent. It measures how well Meta can match a given event back to a specific person using the customer information attached to that event. You simply know far less about a shopper who is browsing anonymously than about one who has just completed checkout, so early events naturally match less reliably and score lower. As a shopper moves toward purchase and shares more information, the events fired for that shopper carry more identifying data and score higher.
This pattern is visible in a typical Events Manager dashboard, where the score climbs as the event moves down the funnel:
| Event | Funnel stage | Customer data typically available | Relative score |
|---|---|---|---|
| PageView | Anonymous browsing | IP address, user agent, browser ID (fbp), click ID (fbc) | Lowest |
| ViewContent | Product interest | Same as above, occasionally an email if the shopper is logged in | Low |
| Search | Product interest | Same as PageView | Low–moderate |
| AddToCart | Intent | Sometimes email or phone if already captured | Moderate |
| InitiateCheckout | Checkout | Email, phone, and name once entered on the checkout | Higher |
| Purchase | Conversion | Full billing and shipping details — email, phone, name, address | Highest |
So a dashboard showing PageView at 5.3/10 and Add to cart at 7.1/10 is behaving exactly as expected. The gap reflects how much the shopper had shared at each stage, not a configuration error.
How the Score Is Calculated
Meta derives the score from the quantity and quality of customer information parameters sent with each event. These parameters include email, phone number, first and last name, city, state, ZIP, country, date of birth, external ID, the browser ID (fbp) and click ID (fbc) cookies, IP address, and user agent. The personally identifiable values are hashed before they leave UltraCart, so raw customer data is never sent in plain text. The more high-value parameters an event carries — and the more of them Meta can match to a real account — the higher the score.
Meta groups scores into approximate bands. Exact thresholds are not published and can shift, but the ranges are roughly:
| Approximate score | Meta rating | Interpretation |
|---|---|---|
| 8.0 – 10.0 | Great | Strong matching; little to gain |
| 6.0 – 7.9 | Good | Solid; minor gains possible |
| 4.0 – 5.9 | Ok | Acceptable for early-funnel events; room to improve |
| 0 – 3.9 | Poor | Few matched parameters; review your setup |
Note: A
PoororOkrating on PageView or ViewContent is normal, because those events fire before the shopper identifies themselves. Focus your attention on the mid- and lower-funnel events — AddToCart, InitiateCheckout, and Purchase — where a low score is more likely to indicate missing customer data.
Why Scores Rise Through the Funnel
Event Match Quality is best understood as a reflection of the sales funnel itself:
-
Top of funnel (PageView, ViewContent, Search). The shopper is anonymous. UltraCart sends everything it can — cookies, IP, and user agent — but there is no email or phone to match, so scores sit in the lower ranges.
-
Middle of funnel (AddToCart, InitiateCheckout). As the shopper enters checkout, UltraCart captures email, phone, and name and attaches them to subsequent events, lifting the score.
-
Bottom of funnel (Purchase). The completed order provides full billing and shipping details, producing the highest-quality match.
Because the early events fire far more often than purchases (note the large PageView volume relative to Purchase), your top-of-funnel scores will always be the lowest numbers on the dashboard — and that is normal.
How UltraCart Maximizes Your Scores
UltraCart is built to send Meta the richest possible signal for every event. When you have both a Conversion Pixel Id and a Server Side Access Token (Conversions API) configured on the Facebook form (see Part 4), UltraCart delivers every event through both the browser Meta Pixel (client-side) and the Conversions API (server-side).
Either side can originate an event, and UltraCart relays it to the other so both always fire:
-
When an event originates server-side, UltraCart relays it to the browser and fires the Meta Pixel.
-
When an event originates client-side in the browser, UltraCart relays it to the server and fires it through the Conversions API.
Both copies carry the same synced event ID, so Meta deduplicates them into a single event rather than counting it twice. This dual delivery raises Event Match Quality for two reasons:
-
Coverage. Server-side events are not blocked by ad blockers, browser tracking prevention (such as Safari ITP), or dropped network requests, so events that the browser Pixel alone would lose still reach Meta.
-
Parity of customer data. Whenever UltraCart holds customer information for a shopper (email, phone, name, address), it hashes that data and attaches it to both the browser Pixel event and the Conversions API event. The goal is full parity between the two copies — the same hashed parameters on each — so whichever copy Meta relies on, it has the strongest possible signal to match against. The synced event ID then lets Meta deduplicate the pair into a single, well-matched event.
Important: The dual-fire, deduplicated behavior only takes effect once both the Pixel ID and the Conversions API token are configured. With the Pixel ID alone, events are delivered client-side only and cannot benefit from the additional server-side parameters. See Part 4 — Configure Facebook Conversions API (CAPI) to enable it.
Improving Scores Over Time
Event Match Quality is an aggregate, trailing measure — it reflects the events collected over a recent window and updates gradually as more events accumulate and as you add customer data. Expect scores to climb steadily after a change rather than jump immediately. To raise them:
-
Configure the Conversions API. Add the Server Side Access Token so every event fires both client-side and server-side with a synced event ID (Part 4).
-
Collect customer information at checkout. Ensure email, phone, first name, and last name are gathered during checkout so mid- and lower-funnel events carry more matchable parameters.
-
Enable all relevant standard events. Turn on the standard-event checkboxes in the Facebook form (Part 1, Step 3) so Meta receives the full funnel rather than a partial one.
-
Let data accumulate. Give Meta 24–72 hours (and enough event volume) after any change before re-checking the scores.
Note: An
Update recommendedflag next to an event's score is Meta suggesting that sending additional customer-information parameters would improve matching for that event. It is guidance for improvement, not an error — work through the steps above and the recommendation typically clears as your scores rise.
Reading the Events Manager Dashboard
When reviewing your scores in Events Manager → Data Sources → your Pixel, interpret the columns as follows:
| Column | What it tells you |
|---|---|
| Event | The standard event (PageView, ViewContent, AddToCart, and so on) |
| Status | Whether the event is currently active and receiving data |
| Event match quality | The 0–10 matching score for that event |
| Total events | How many of that event Meta received in the reporting window |
| Update recommended | Meta's hint that more customer parameters would improve the match |
Read the dashboard down the funnel, not across a single threshold: compare each event against what a shopper realistically shares at that stage, and prioritize improvements where a lower-funnel event scores below its potential.
Why Facebook Reports More Conversions Than UltraCart
A frequent support question sounds like this: "Facebook says it drove 120 purchases from this campaign, but when I look at my UltraCart orders I only see 45. Which number is wrong?"
Neither number is wrong. They count different things. UltraCart records the orders it actually processed and attributes them to the traffic source it can directly observe. Facebook (Meta) reports the conversions it credits to your ads under its own attribution model — and that model deliberately counts conversions your UltraCart order data never will. The single largest contributor to the gap is view-through attribution.
Click-through vs. view-through attribution
Meta credits a conversion to an ad in two ways:
-
Click-through. The shopper clicked your ad and later purchased. This is the intuitive case, and it lines up closely with what UltraCart records, because the click carries a Facebook click ID (
fbc) that ties the order back to the ad. -
View-through. The shopper was shown your ad, did not click it, and later arrived and purchased through some other path — a bookmark, a search, typing in your URL. Meta still takes credit because it served the impression and recognizes the same person at checkout.
UltraCart's own reporting is built around measurable, click-based attribution. It has no way to know that Facebook displayed an ad impression elsewhere on the internet days earlier, so every view-through conversion Facebook reports is one your UltraCart order data will not show. That difference alone accounts for most of the gap.
How Meta recognizes a view-through conversion
For a view-through conversion to be credited, Meta has to connect two events it observed separately: the ad impression it served, and the purchase that happened later on your storefront. It makes that connection by matching the hashed customer-information parameters on your Purchase event — email, phone, name, address, the fbp and fbc cookies — against the person it showed the ad to. This is the same matching that drives Event Match Quality: the stronger the identifiers on the event, the more confidently Meta can recognize the shopper across sessions and attribute a view-through conversion it would otherwise never see in your order data.
This is why the two systems can never fully agree. UltraCart is measuring orders it processed; Meta is recognizing shoppers it advertised to and stitching those impressions to purchases after the fact. Those are different questions, so they produce different totals.
Attribution windows shift the counts further
Meta reports a conversion against the day the ad was clicked or seen, not the day the order was placed, and it does so for any purchase that falls inside the ad set's attribution window — by default 7 days after a click and 1 day after a view. An order placed on Friday can therefore appear in Facebook's numbers against the previous Monday's ad spend. When you line up a Facebook date range against the same range of UltraCart orders, this shift alone produces differences in both directions.
What to expect
| Dimension | UltraCart order data | Facebook Ads Manager |
|---|---|---|
| Counts | Orders actually placed and processed | Conversions Meta credits to your ads |
| Attribution | Directly observed, click-based | Click-through and view-through |
| Dated by | Order date | Ad click / impression date, within the attribution window |
| Includes | Real, de-duplicated orders | Cross-device and statistically modeled conversions |
Expect these two numbers to disagree — often substantially — and treat that as normal rather than a defect. Use UltraCart order data as your source of truth for revenue actually earned, and Facebook's numbers as Meta's estimate of the advertising influence behind it.
Tip: For the most complete server-side attribution, configure the Conversions API — see Part 4 — Configure Facebook Conversions API (CAPI).
Part 5 — Open Graph Tags for Facebook Sharing
Open Graph (OG) tags control how product pages appear when shared on Facebook or Instagram.
UltraCart automatically outputs Open Graph metadata for supported pages. No configuration or opt-in is required.
Automatically Generated Open Graph Tags
| Tag | Description |
|---|---|
| og:title | Product or article title |
| og:description | Product description |
| og:image | Main product image |
| og:url | Canonical page URL |
| og:type | product or article |
Step 1 — Verify Open Graph Output
-
Open a product page.
-
View the page source.
-
Search for
<meta property="og:title">.
Alternatively, use Facebook's Sharing Debugger at <https://developers.facebook.com/tools/debug/.>
Step 2 — Refresh Facebook Cache
If Facebook displays outdated previews:
-
Open the Sharing Debugger.
-
Paste the product URL.
-
Click Scrape Again.
Tip: Use high-quality images at least 1200 × 630 pixels for best share preview quality.
Troubleshooting
Pixel Issues
Pixel Not Firing
-
Verify the Pixel ID(s) entered in Conversion Pixel Ids are correct.
-
Remove any duplicate manual Pixel scripts from themes or content.
-
Confirm Privacy & Tracking settings were saved.
-
Verify at least one standard event checkbox is enabled for the expected action.
Purchase Events Missing
Ensure the storefront uses the UltraCart-hosted receipt page.
Product Feed Issues
Products Rejected
Common causes:
-
Missing brand field
-
Incorrect price formatting
-
Invalid image URLs
-
Missing GTIN or MPN values
Feed Not Updating
Verify:
-
The feed URL is public
-
The file updates correctly after clicking Update Now
-
Meta can access the file
CAPI Issues
Invalid Access Token
Generate a new token in Meta Events Manager and update the Server Side Access Token field.
Low Match Quality
Ensure customer information is collected during checkout, including email, phone, first name, and last name.
Open Graph Issues
Incorrect Share Image
Use the Facebook Sharing Debugger and click Scrape Again.
OG Tags Missing
Open Graph tags are emitted automatically on supported StoreFront pages. Confirm the page you are testing is a supported page type, and that the item has a title, description, and main image.
Quick Reference
| Integration | Purpose | Configuration Location |
|---|---|---|
| Meta Pixel | Browser-based tracking | StoreFront → Privacy & Tracking (Facebook section) |
| Facebook Analytics | Ad spend import and audience syncing | Conversion and Tracking → Other (or combined Facebook form) |
| Product Feed | Shopping ads and catalogs | Google Product Search feed + Commerce Manager |
| Conversions API | Server-side conversion tracking | Facebook form → Server Side Access Token |
| Open Graph Tags | Social sharing previews | Automatic — no configuration required |
Conclusion
UltraCart provides all major Facebook and Meta integration capabilities required for advertising attribution, catalog advertising, dynamic product ads, retargeting, server-side conversion tracking, and social sharing optimization.
Although setup involves several independent components, each integration can be configured directly through UltraCart administrative tools and Meta Business Manager.
Next Steps
After completing this setup, consider reviewing:
-
Facebook Dynamic Product Ads
-
Instagram Shopping setup
-
UltraCart Analytics reporting
-
StoreFront Visual Builder customization
-
Email and SMS retargeting flows
For additional assistance, contact UltraCart Support.