Overview
How to configure an item as a pre-order item within the item editor.
Navigation
Items → Item Management → Add/Edit item → Shipping (Tab) → "General Preferences" section > Pre-order (checkbox field)
Configuring item as a Pre-Order item
You'll navigate to the Shipping tab of the item editor:
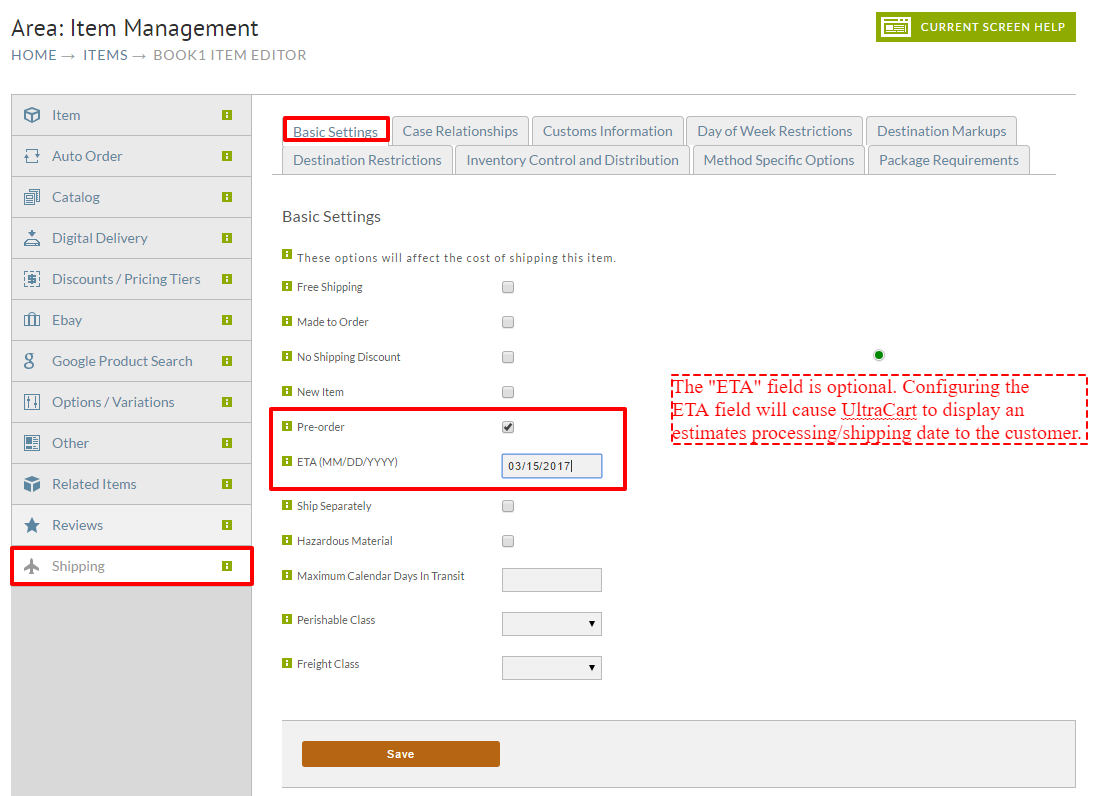
The shipping tab of the item editor will have a section titled "Basic Settings" and there will be two Pre-Order related fields:
- Pre-order (REQUIRED FIELD)
- ETA (MM/DD/YYYY (OPTIONAL FIELD)
Message Displayed to the Customer in their Shopping Cart
Here's how the message will display to the custoemr when they place a preorder item into their shopping cart:
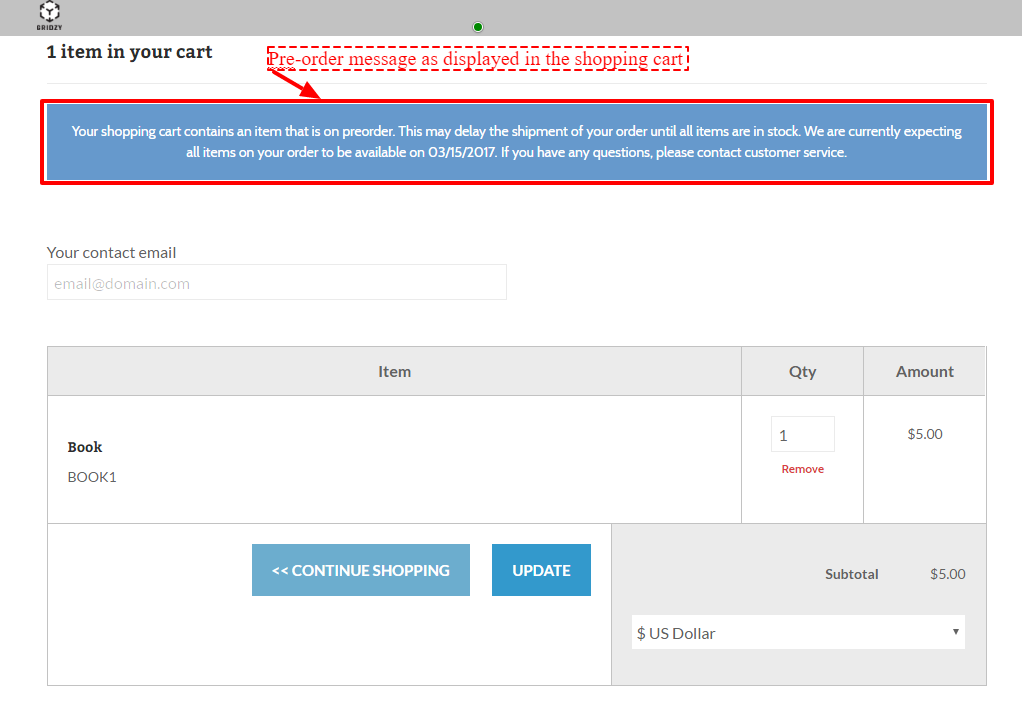
Modifying of the default "Pre-Order" messages displayed to the customer
You can modify the default message displayed to the customer when an item designated as a pre-order item is placed into the shopping cart by navigating to the "Languages" tab in the storefronts menu, and there searching for "Pre-order".
Navigation
Home → Storefronts (Choose host) → Languages → (Edit Language)
Search the languages page for: Your shopping cart contains an item that is on preorder
There will be multiple matches as the fields a both the single page and multi-page checkouts. So make sure that you aare updating the appropriate ones for your account configuration.

To edit the defaulted text, after identifying the field(s), to modify the defaulted text scroll to the right of the field name until you get to the text editing field. There modify the text.
Once you have modified the text a save button will appear at the bottom left side of the page. Make sure to save your changes!
The CheckoutPreorderWarning Element
The cart and checkout notice ("Your shopping cart contains an item that is on preorder...") is rendered by a specific storefront element named CheckoutPreorderWarning, not by an automatic system message. Like any other theme element, you can add, remove, or reposition it independently of the item's pre-order settings, using the Theme Editor in the visual builder.
UltraCart's own reference storefronts typically include this element by default on the classic shopping cart page. On a custom-built theme, or on Single Page Checkout, the element can be missing entirely. When it's missing, the item-level pre-order validation (the popup warning a customer that their order contains a pre-order item) still fires normally, so the missing notice can look like a wording problem rather than a missing element.
Adding the Element to a Theme
-
Open the Theme Editor: Home → Configuration → Screen Branding Themes → [theme] → Theme Editor. You can also reach the same editor from a live storefront or checkout page by clicking Edit in the top toolbar while logged in as the merchant.
-
In the Hierarchy panel, select the container where the notice should appear. For Single Page Checkout, select the header of the Order Summary panel so the notice sits directly below it and above the item list.
-
Use that element's Add (+) action to open the element picker, search for "preorder", and select CHECKOUT PRE-ORDER WARNING (listed under the CHECKOUT category).
-
Save. The element renders immediately once a pre-order item with an ETA is in the cart, using the live ETA date from the item's Shipping tab. No per-order or per-page configuration is needed beyond that.
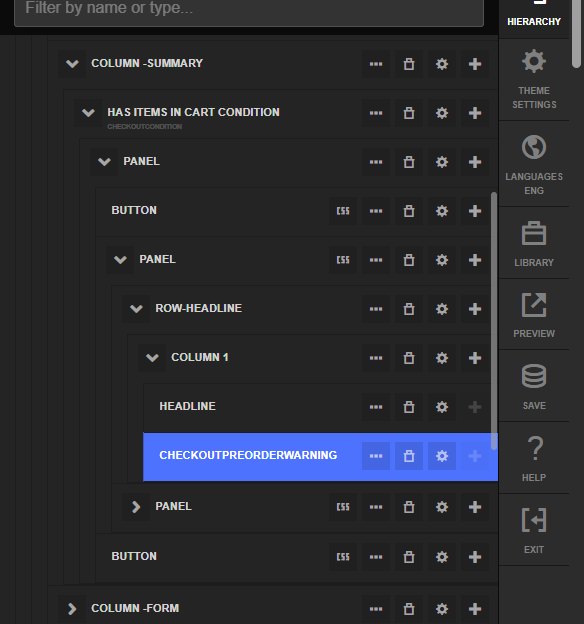
Single Page Checkout themes commonly render two separate Order Summary regions: a persistent desktop panel and a separate mobile-only collapsible accordion. Add the element to each region separately. Adding it to only one leaves the notice missing at the other breakpoint.
The element's settings include the same Warning (with ETA) and Warning (no ETA) text fields you edit from the Languages tab, described above, along with Element Title, Element ID, visibility toggles per device, alignment, colors, and margin.
Wrapping the Element in a Checkout Condition
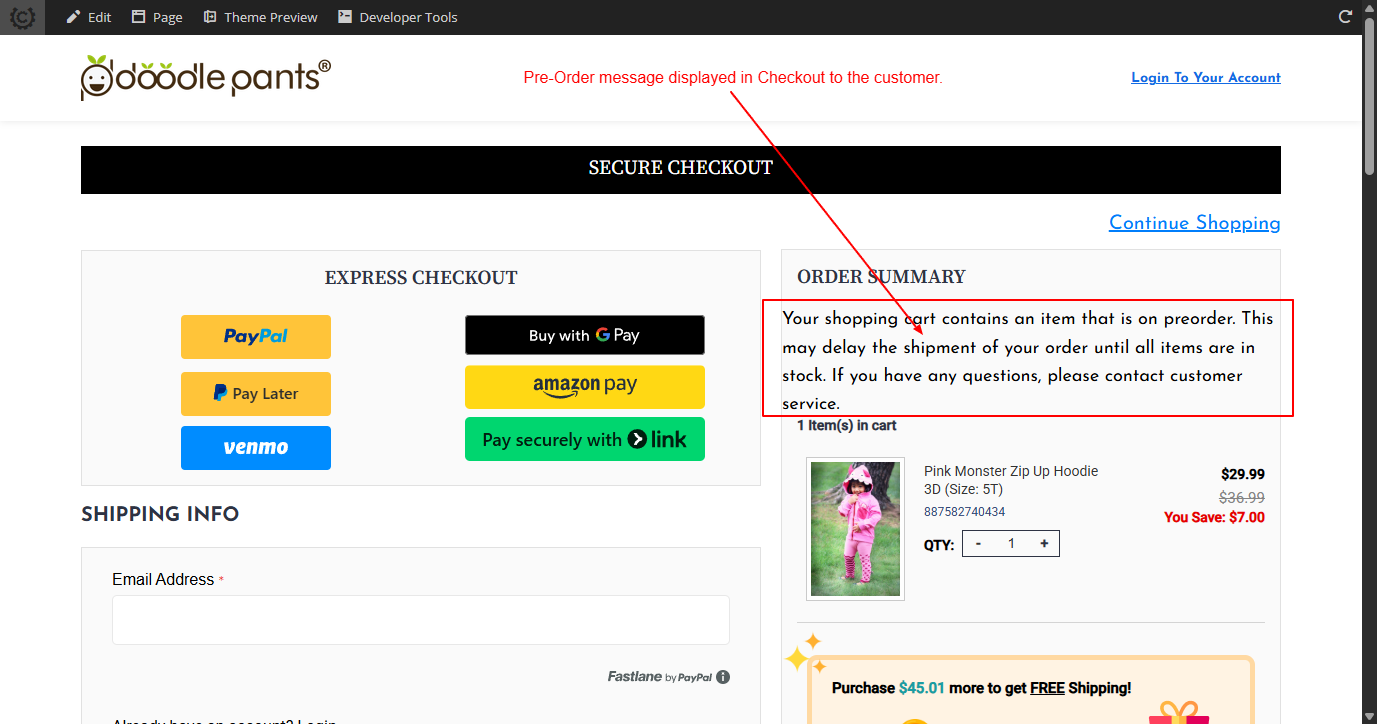
CheckoutPreorderWarning doesn't check the cart's contents on its own. It renders wherever it's placed in the theme, whether or not a pre-order item is actually in the cart. To limit the notice to carts that contain one, wrap the element in a Checkout Condition element, the same conditional-visibility mechanism used elsewhere in the Visual Builder (see Allowing Customers to Drop Ship for another example of a Checkout Condition gating an element).
Every default Storefront Theme available from Home → Configuration → Screen Branding Themes → Theme Gallery ships with CheckoutPreorderWarning already wrapped in a Checkout Condition set to the correct condition. An unmodified default theme needs no action here. The wrapper can go missing when you customize a theme or build or edit checkout pages by hand, since it's easy to move or recreate CheckoutPreorderWarning without carrying the condition around it.
To add or restore the wrapper:
-
In the Theme Editor's Hierarchy panel, add a Checkout Condition element as the parent of CheckoutPreorderWarning. If CheckoutPreorderWarning already exists unwrapped, move it inside the new Checkout Condition's row and column structure.
-
Configure the Checkout Condition's settings:
- Matches: Yes
- Condition 1: pre-order item in cart
- Condition 2: leave blank
-
Save.
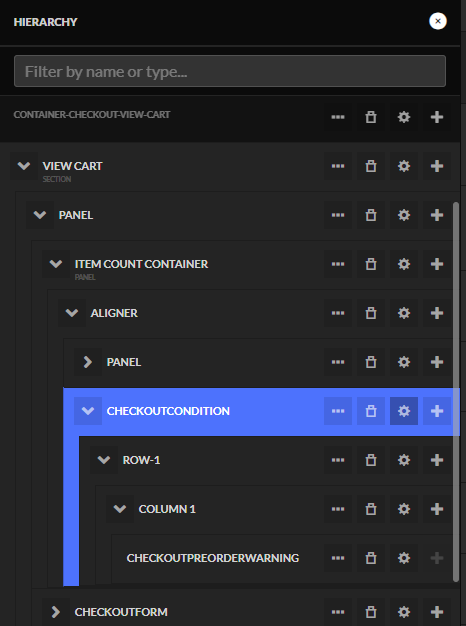
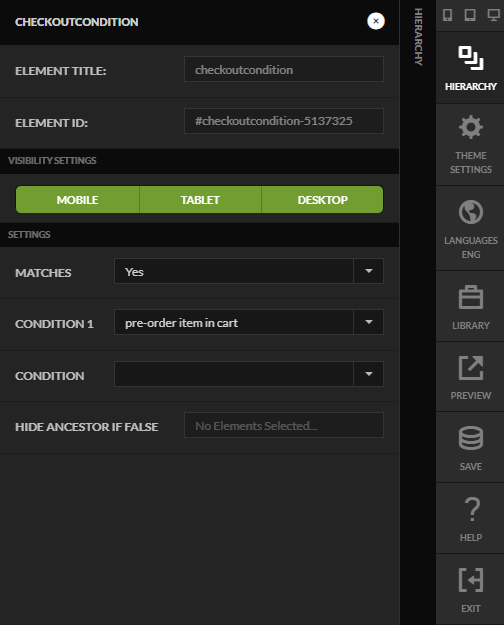
After saving, the Hierarchy panel should show CheckoutPreorderWarning nested inside the Checkout Condition element. Confirm the fix by adding an item that isn't configured as a pre-order to a test cart; the notice should no longer appear.
Troubleshooting: Notice Missing at Checkout
If the pre-order popup still appears at checkout but the written cart notice doesn't, the CheckoutPreorderWarning element is likely missing from your theme rather than a text or Language customization issue. This is common on custom-built or heavily modified themes. Add the element by following the steps above.
Troubleshooting: Notice Displays on Every Cart
If the pre-order notice displays even when no pre-order item is in the cart, check whether CheckoutPreorderWarning is wrapped in a Checkout Condition element matching "pre-order item in cart." This is most common after theme customization or manual page edits. Default Storefront Themes ship with this configured correctly.