Shipping Department Tool Bar
Overview
The Shipping Department Tool Bar provides options for the layout of the shipping department.
Shipping Department View
In the new Shipping department user interface provides two buttons that you can click to access the configuration settings for the Shipping department when the corresponding shipping distribution center has the transmission mechanism set to "none".
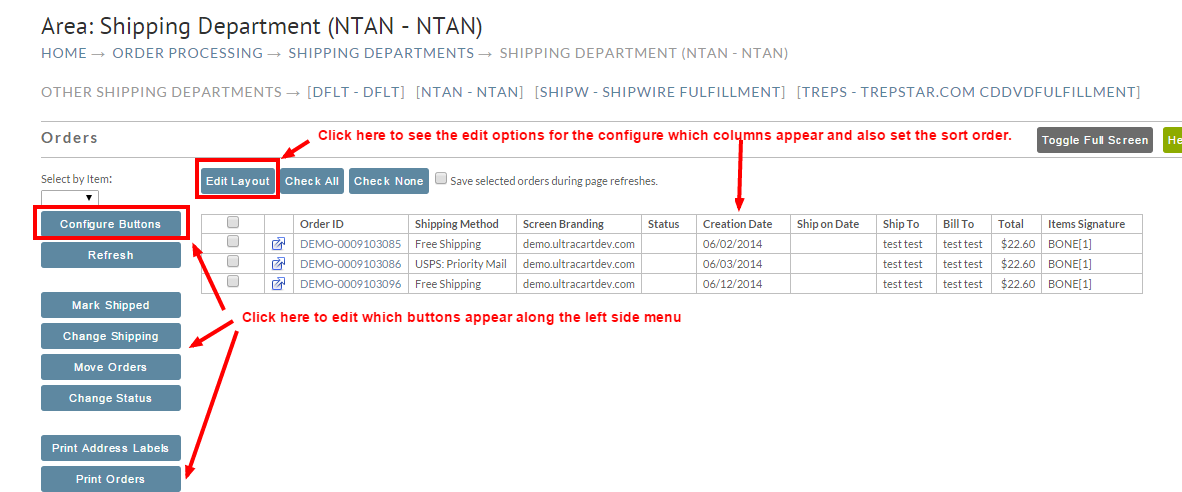
The two configuration buttons are "Configure Buttons" and "Edit Layout"
"Configure Buttons" Button
When you click the "Configure buttons" button, a pop up window will appear:
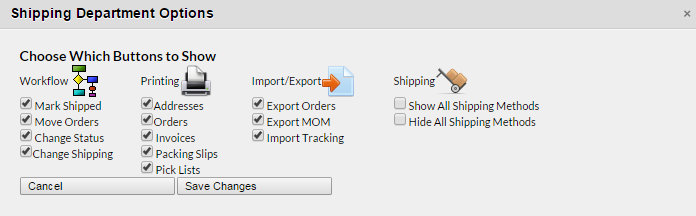
You can select and unselect the checkboxes to assign which buttons you want to appear in the shipping department page.
Edit Layout
Overview
Clicking the "Edit Layout" button will open a popup window that provides options for configuring which columns appear in the shipping department table
as well as configure the sort order.
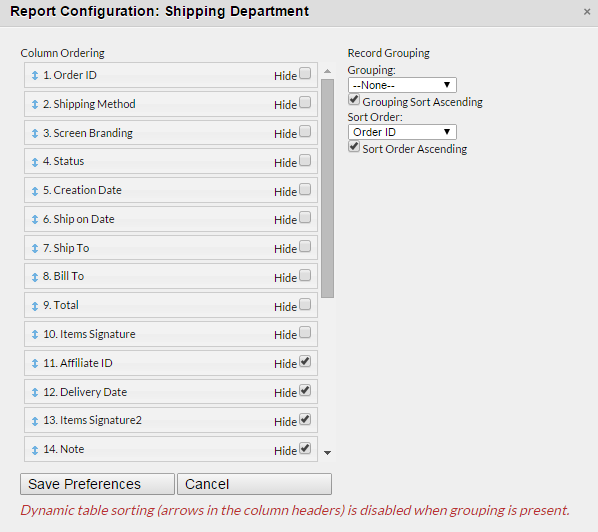
Settings that appear in this popup window include:
Column Ordering
The "Column Ordering" section allows you to choose to drag and drop the columns into the order you wish them to appear in the shipping department table. Click and then drag the field to the spot in the list where you want it to appear (top spot is the first column on the left and the bottom column will be on the far right).
Here are the configuration columns:
- Order ID
- Shipping Method
- Screen Branding
- Status
- Creation Date
- Delivery Date
- Ship on Date
- Ship To
- Bill To
- Ship To State
- Ship To Country
- Total
- Items
- Affiliate ID
- Signature
- Signature2
- Note
- Custom Field 1
- Custom Field 2
- Custom Field 3
- Custom Field 4
- Custom Field 5
- Custom Field 6
- Custom Field 7
In addition to the ordering, you also have a "hide" checkbox that , if checked, will hide the column from appearing in the table.
Record Grouping
The Record Grouping lets you choose which columns is the primary column the records will "group" together. For example you could group orders by "Ship to Country", so that yo can see the orders shipping grouped together based upon the ship to country. You can toggle between ascending and descending sort on the grouping column.
Sort Order
The Sort Order lets you choose which columns is the sort column and also lets you define the sort order as either "Ascending" (checkbox field is checked) or "Decending" (checkbox field is not checked)
Transcluded from Mark Shipped.
Change Shipping
The 'Change Shipping' button allows you to change the shipping method on selected orders.
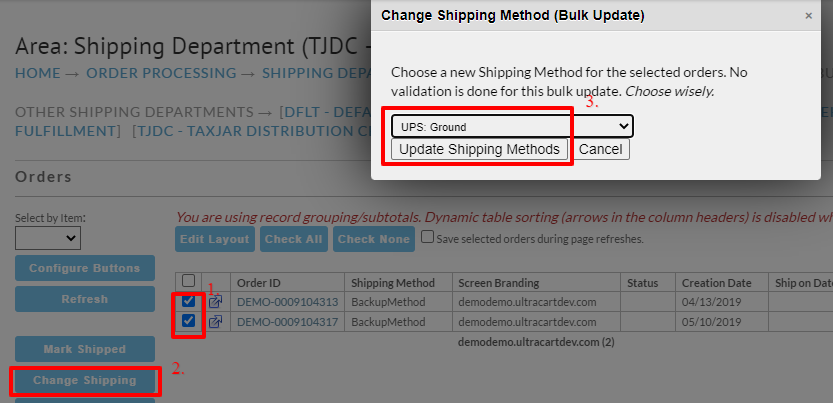
After selecting the orders you wish to change the shipping method for, you'll be prompted with a pop-up menu to select the new shipping method, then you'll click the "Update Shipping Methods" button to complete the shipping method change.
Move Orders
The 'Move order' button will move the selected orders to the selected new shipping department location.
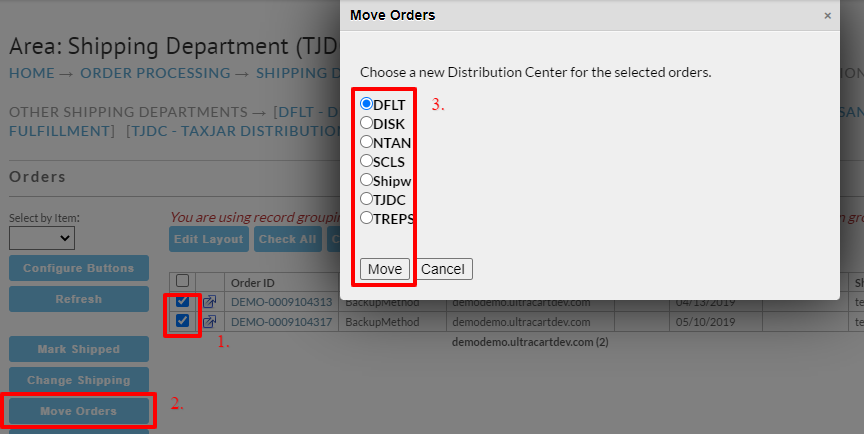
You'll be prompted with a radio button list of the available shipping departments. Select the new shipping department then click the 'Move' button to complete the move.
Change Status
Overview
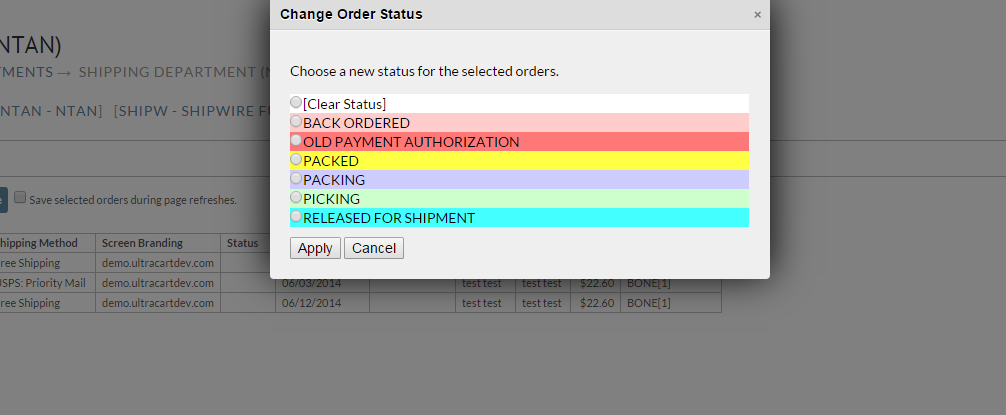
UltraCart allows you to mark each order with its own status in the shipping department. When you change the status of an order its background color will change. Status colors are shown as te background color of the status that is being selected from the window. Your choices for shipping status are; Back ordered, Picking, Packing, Packed, Released for shipment and Old payment authorization.
To change a status First click in the check box to left of the orders that you want to change the status of, and then click the "Change Status" button.
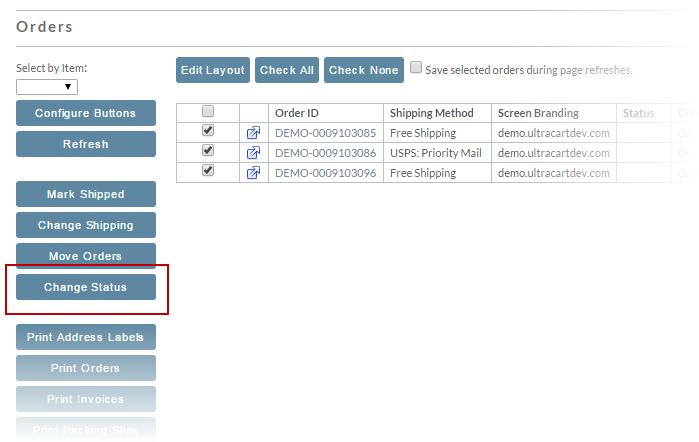
You will then be presented with change order status window which will allow you to select the status you would like to set for the order or orders. Once you have selected a status simply click the "Apply" button to set this change.
Print Address Labels
Overview
UltraCart allows you to print address labels for multiple orders onto a sheet of labels. The size and layout of the label sheets is configured in the Printable Documents settings section of the UltraCart configuration. If there is a partial sheet of labels, set the starting position to the first available label on the sheet. Labels are printed left to right and then top to bottom.
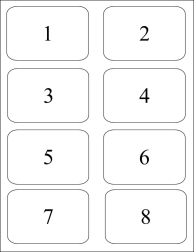
UltraCart will create a PDF file which will be viewed in your browser.
Print Orders
Overview
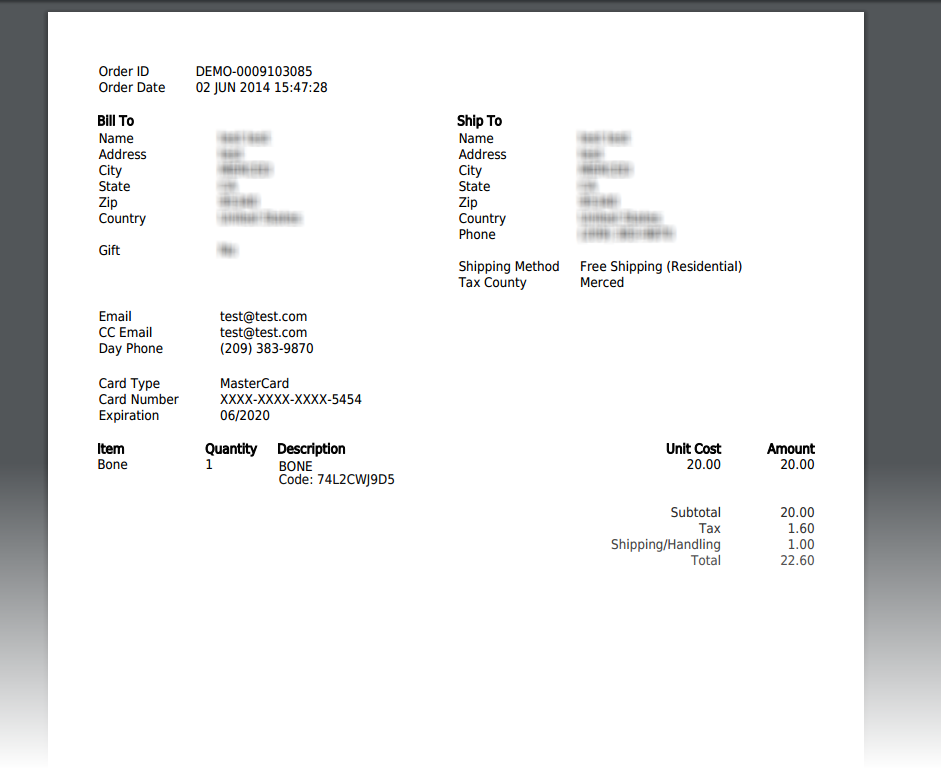
Allows you to print a copy of the order details including the customer address information, payment type, and item details.
Select orders for printing by placing a check in the box to the left of the item ID. Then click on the "Print Orders" button.
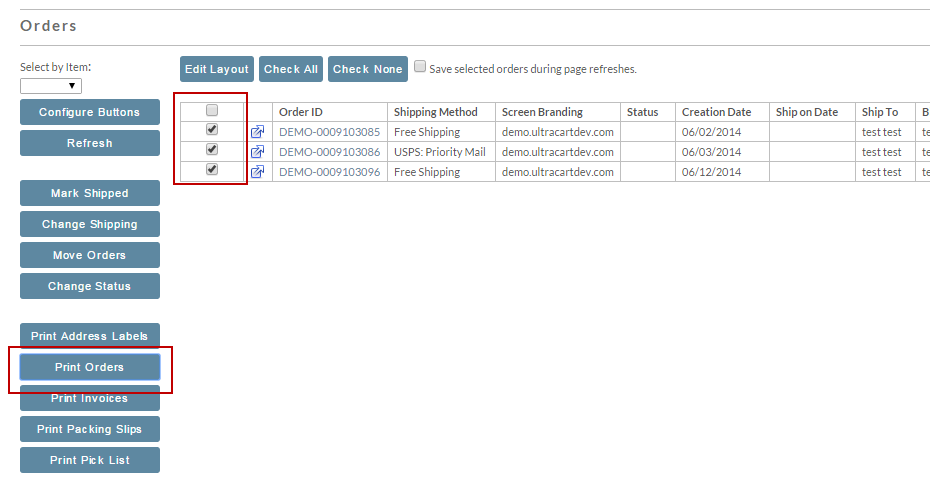
The order will be sent to a PDF file which you can view from your browser and then print.
Add print invoices
Print Packing Slip
Overview
UltraCart allows you to print packing slips to enable streamlined packing operations. To print packing slips, simply check the desired orders, and click on the "Print Packing Slips" button. UltraCart will then create a PDF file containing one packing slip per page. This file will usually appear in your browser window from which you can print your packing slips.
Print Pick List
Overview
This routine will print a list of any orders you have selected with a check mark. It will list the Item ID, Quantity and Description. Place a check mark on the orders desired and click on the "Print Pick List" button. UltraCart will create a PDF file which will be viewed in your browser.
Import Tracking
Overview
The shipping department has a generic import option for importing tracking numbers from a CSV file to populate into the existing orders in the shipping department.
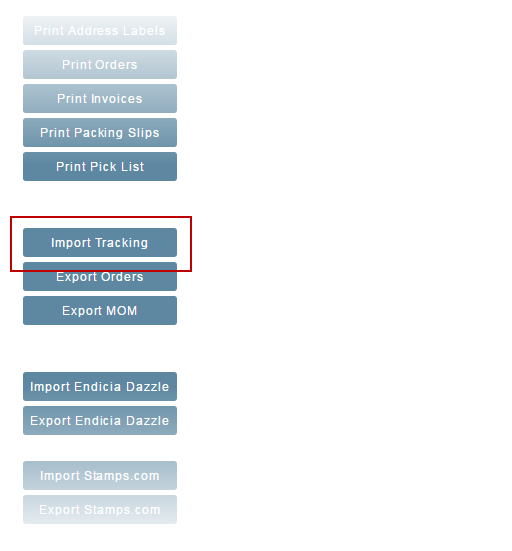
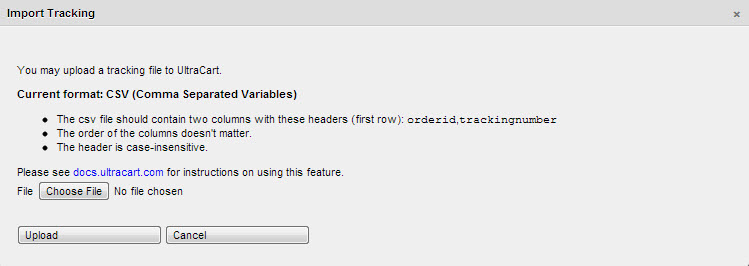
Clicking on the Import Tracking button will display the import tracking dialog window:
Export Tracking
Overview
The CSV file has the following specifications:
- CSV (Comma Separated Variables) format (exampe: trackingnumbers.csv)
- The csv file should contain two columns with these headers (first row):
orderid,trackingnumber - The order of the columns doesn't matter.
- The header is case-insensitive.
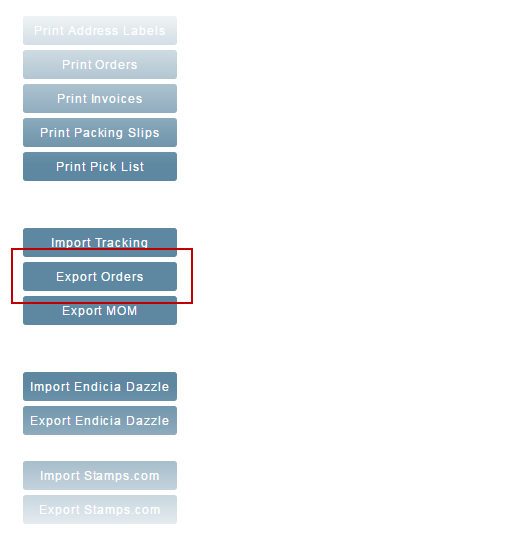
The export orders button in the Shipping Department allows you to export the selected orders in either CSV or XML format for processing in other applications. Click in the check box to left of the orders that you want to export. Then click on the "Export Orders" button. The export file will appear in a browser window. From there you can "save" the file to your system (drive). Read the following for important information about exporting Auto Orders.
Auto Order Export
The Exporting of Auto Orders, due to the PCI requirement related to the handling of the sensitive billing information, require that the data be exported using PGP encryption.
In order to export the auto order data:
- The Owner user of the UltraCart account (*only the Owner user*) must submit to UltraCart a PGP Public Key.
- Then an UltraCart Support representative will place the key on file for the account.
- Once the key is on file, the owner user (*only the Owner user*) will be able to perform the auto order export.
These steps are required in order to ensure that this sensitive data is properly entrusted only to a person on the account that should have access to this data.
Export MOM
Overview
UltraCart provides support for Dydacomp's Mail Order Management (MOM) software by generating (exporting) the required import file. For further details about MOM see http://www.dydacomp.com/mom/index.asp.
Importing / Exporting Endicia Dazzle
Transcluded from Export Endicia Dazzle.
Importing / Exporting UPS WorldShip
Importing WorldShip
UltraCart allows you to import the UPS WorldShip result file to automatically enter tracking numbers into the corresponding order. You do not need to select any orders to use this button. Importing UPS WorldShip is also covered in Chapter 8 under "Importing a UPS WorldShip Export File".
Exporting WorldShip
The export UPS WorldShip button allows you to export the selected orders in a format suitable for import into UPS WorldShip. For more information regarding UPS WorldShip integration, please see UPS WorldShip in Chapter 8.
Importing / Exporting Fedex ShipManager
Importing Fedex
Exporting Fedex