Upsells
An upsell offers a customer something extra around the moment they buy. UltraCart builds these visually, so you design the offer pages with the same drag-and-drop editor you use for the rest of your site, with no HTML, CSS, or JavaScript.
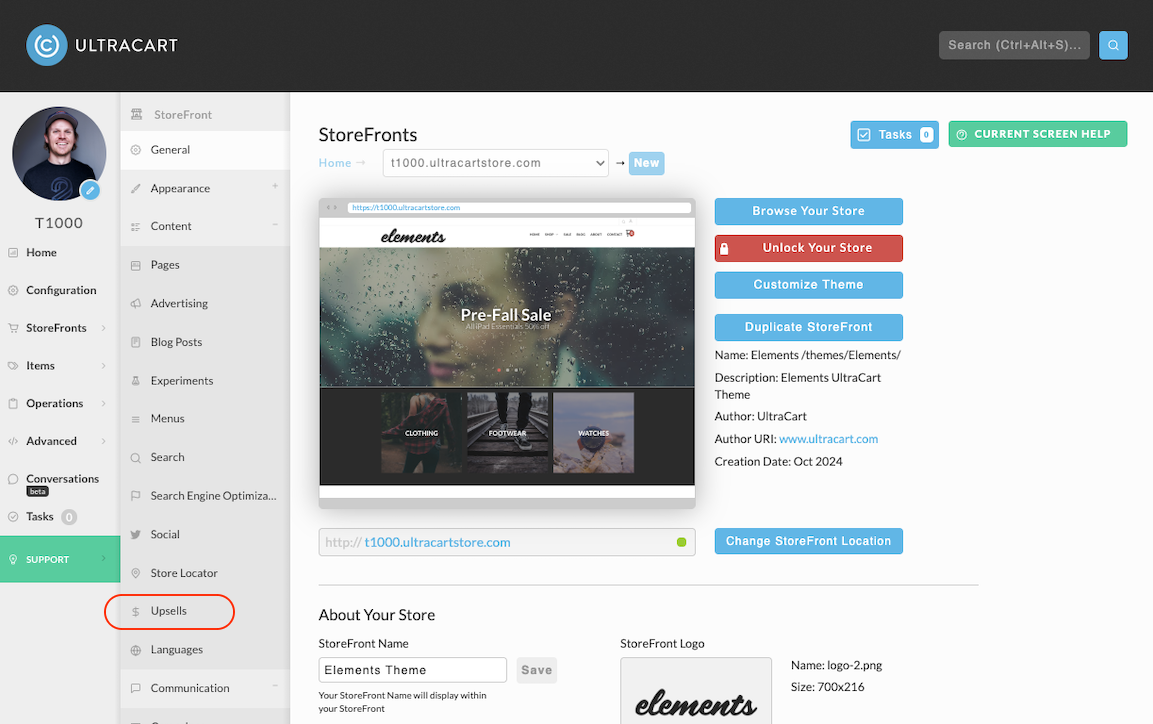
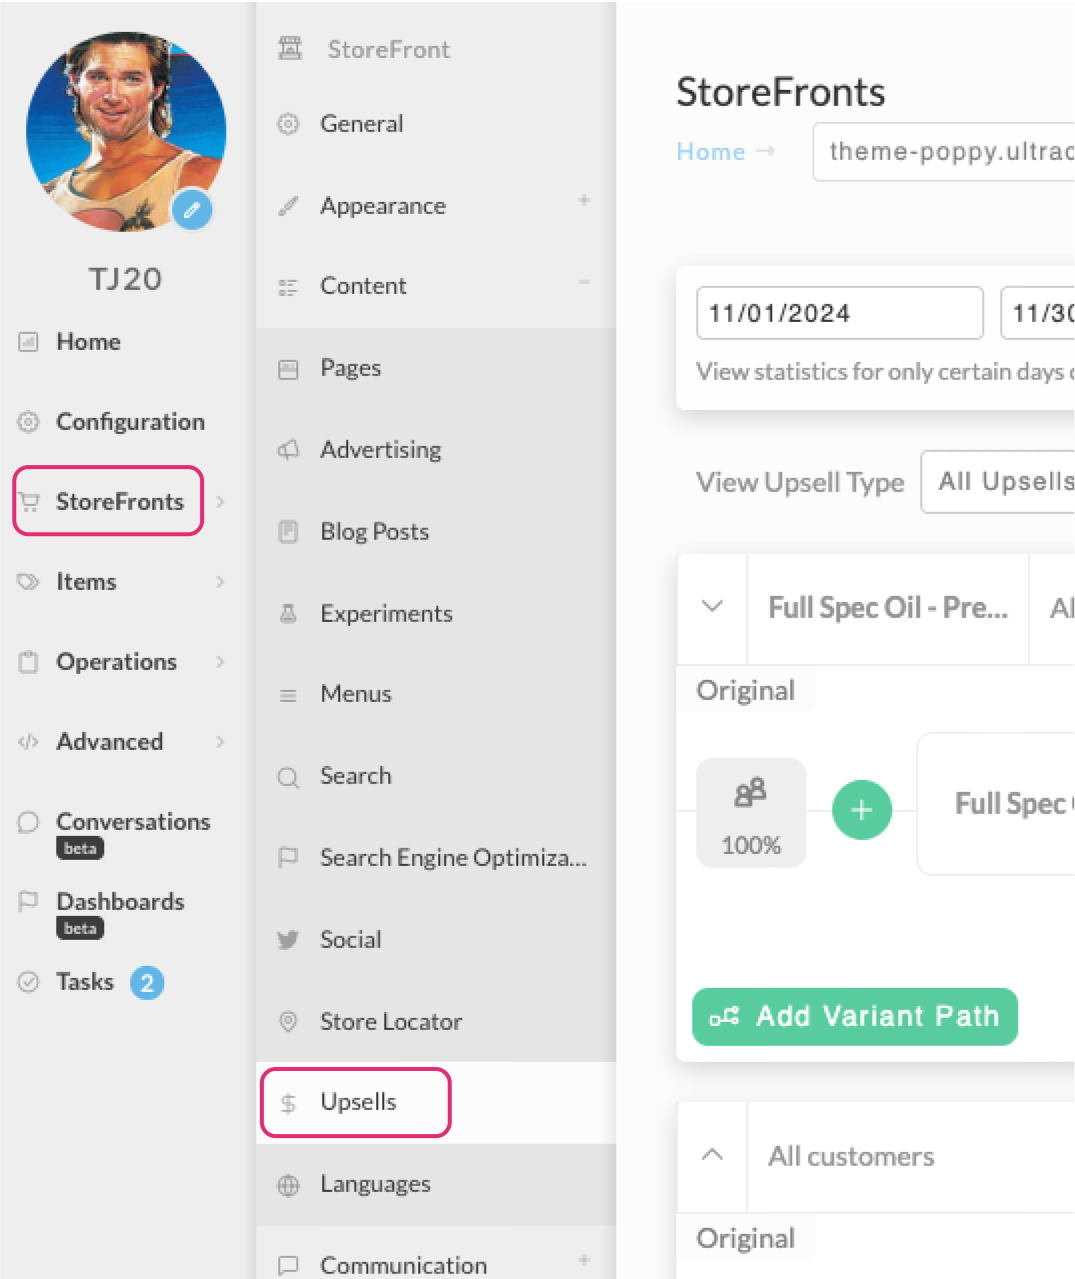
Find them under StoreFronts → [select your storefront] → Content → Upsells. If Upsells is not there, your theme does not support them.
Before you build
Two decisions shape everything else.
Where the offer appears. Post-checkout offers come after the customer has submitted their payment details. UltraCart guarantees the order from that point, so the offer cannot cost you the sale. The card is charged once the customer finishes the path; see When are Credit Cards Charged. Pre-checkout offers appear before checkout, as a modal, while purchase intent is highest but the order is not yet committed. You set this per path, and the same tools build both.
What triggers it. An offer can fire for specific item IDs, for a product tag across many items, for everyone, or on customer attributes. Tags are usually easier to maintain than lists of item IDs, because adding a tag to a new product enrolls it automatically.
Then decide what you are actually offering, at what price, and confirm you have the stock to fulfill it. An upsell for something out of stock costs you goodwill.
How paths and offers fit together
A path is a sequence of offers a customer moves through when their cart triggers it. A customer goes through every path they qualify for, starting at the top of the list.
An offer is a single yes-or-no proposition inside a path.
Create a path
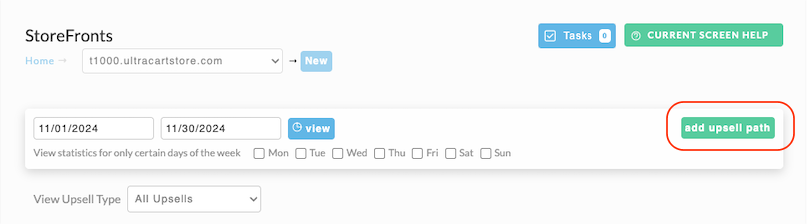
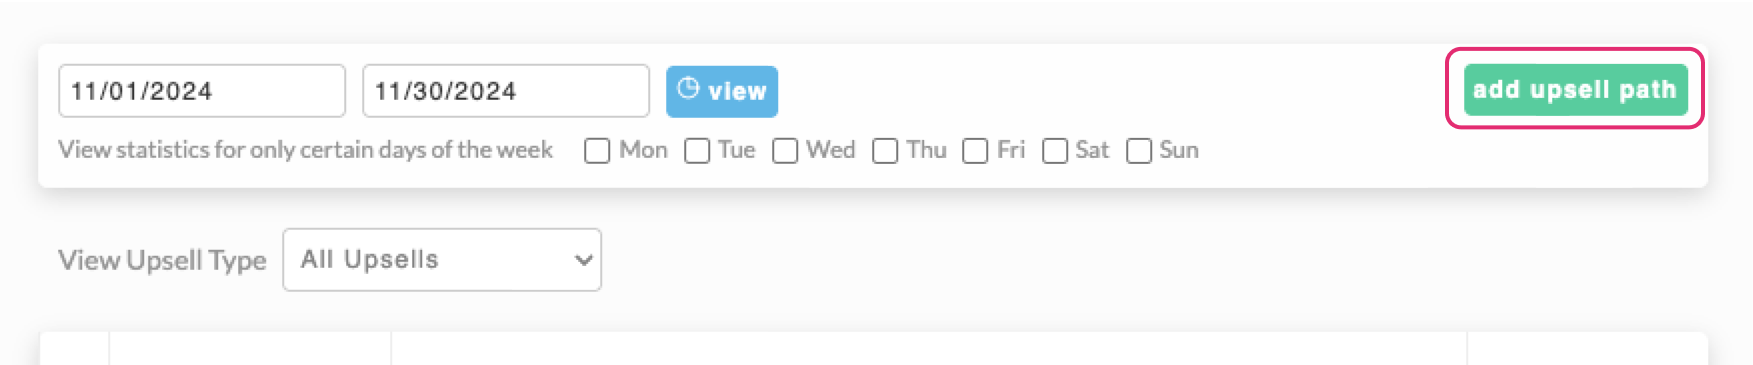
Select Add Upsell Path.
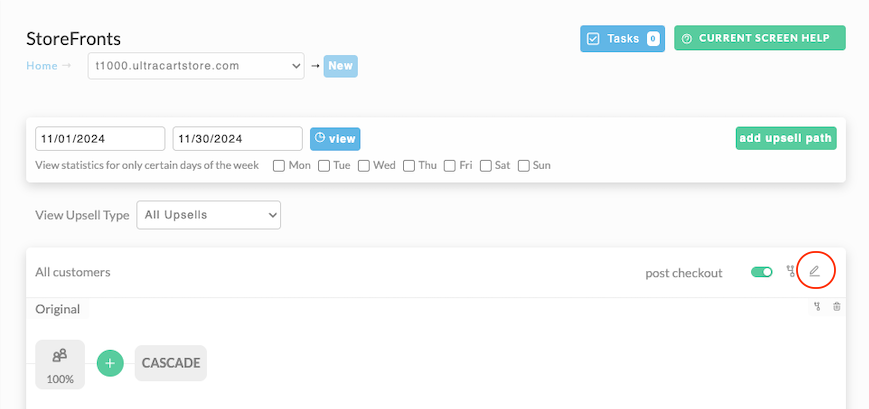
Select the pencil icon on the right of the path row to open the Upsell Path Editor.
Path settings
The path editor controls when a path activates, when it is skipped, where it appears, and how many offers a customer may see.
| Field | Options | What it does |
|---|---|---|
| Name | Text | Internal name, never shown to customers. |
| Customer Type | All (default), New, Existing | Limits the path by whether the email address has ordered before. |
| Trigger Tags | Text | Fires the path when a cart item carries any of these product tags. |
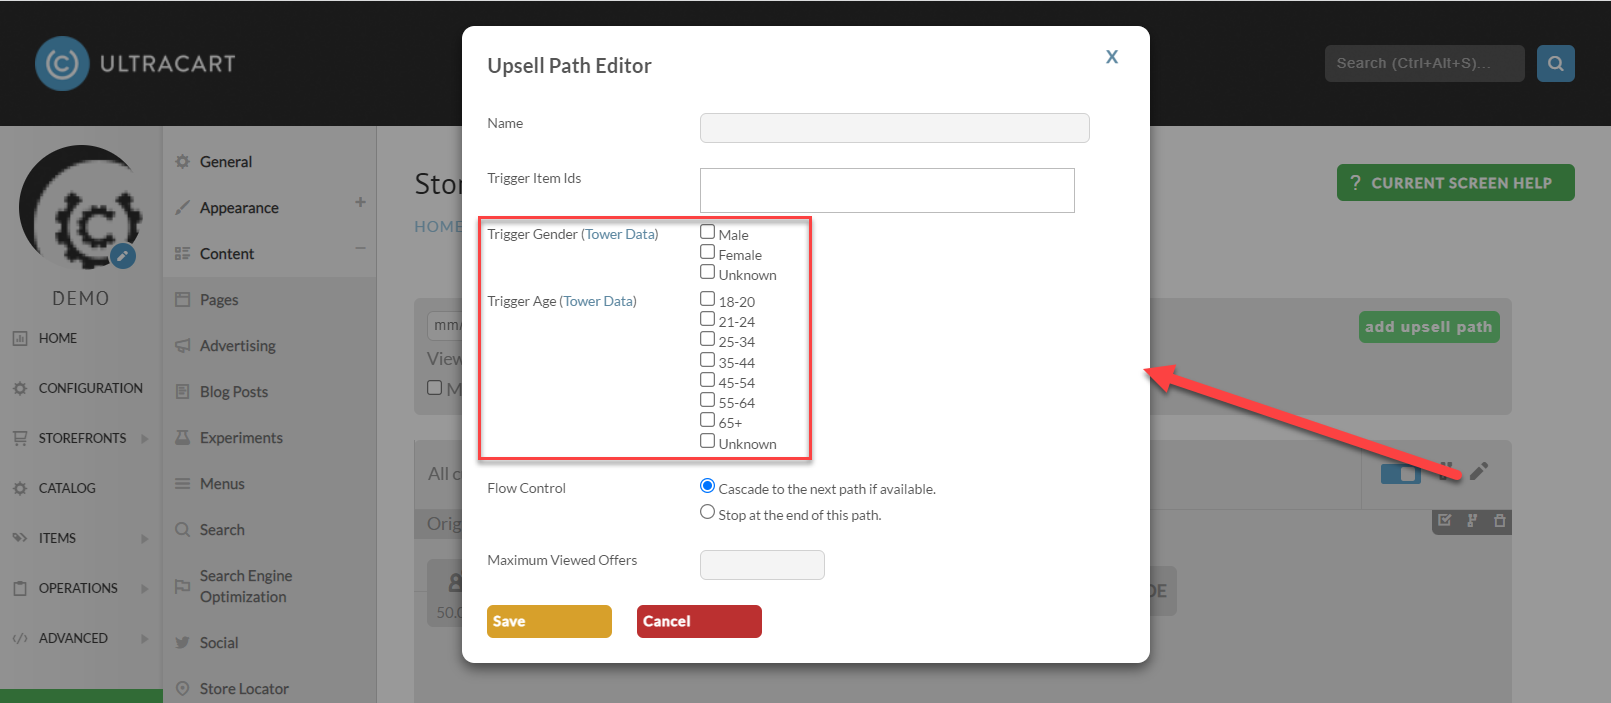
| Trigger Gender | Checkboxes | Fires for matching gender values. Requires AtData. |
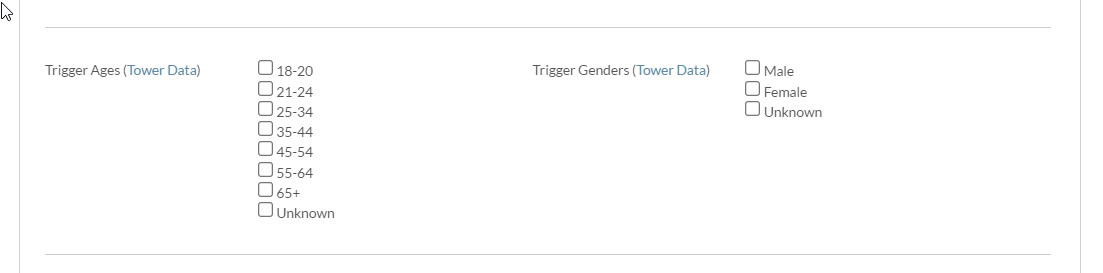
| Trigger Age | Checkboxes | Fires for matching age bands: 18-20, 21-24, 25-34, 35-44, 45-54, 55-64, 65+, Unknown. Requires AtData. |
| Trigger Item(s) Logic | Dropdown | How the Trigger Items list is evaluated against the cart. |
| Trigger Items | Item ID list | Item IDs evaluated by the logic above. |
| Suppression Item(s) Logic | Dropdown | How the Suppression Items list is evaluated. A cart that satisfies it skips the path. |
| Suppression Items | Item ID list | Item IDs evaluated by the suppression logic. |
| Flow Control | Cascade to the next path (default), Stop at the end of this path | Whether the customer continues to the next qualifying path. |
| Flow Location | Post Checkout (default), Pre Checkout (Upsell Modal) | Where the offers appear. Externally hosted offers work only in Post Checkout (see Offsite content). |
| Maximum Viewed Offers | Number | Optional cap on offers shown inside this path. |
An item with Exclude from search enabled cannot be used as a trigger item or a suppression item.
Trigger and suppression logic share the same options:
Quantity-based
- ALL items must meet their quantity (AND)
- ANY item meets its quantity (OR)
- Total quantity across all items
Presence-based (legacy)
- Cart contains ANY of these items
- Cart contains ALL of these items
Create an offer
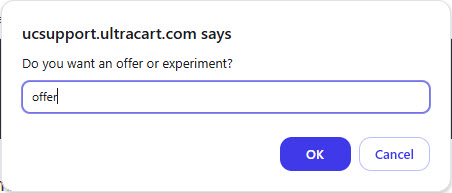
Select the plus button inside the path, leave the prompt on Offer, and select OK.
Five things are required:
- A meaningful name, not shown to the customer.
- Set the offer active when you are ready.
- The item or items being upsold.
- A layout. Select a predefined layout, then select the offer preview to open the visual
editor and adjust the content. The first two predefined layouts ship with
lorem ipsumplaceholder text, so replace it. - Save.
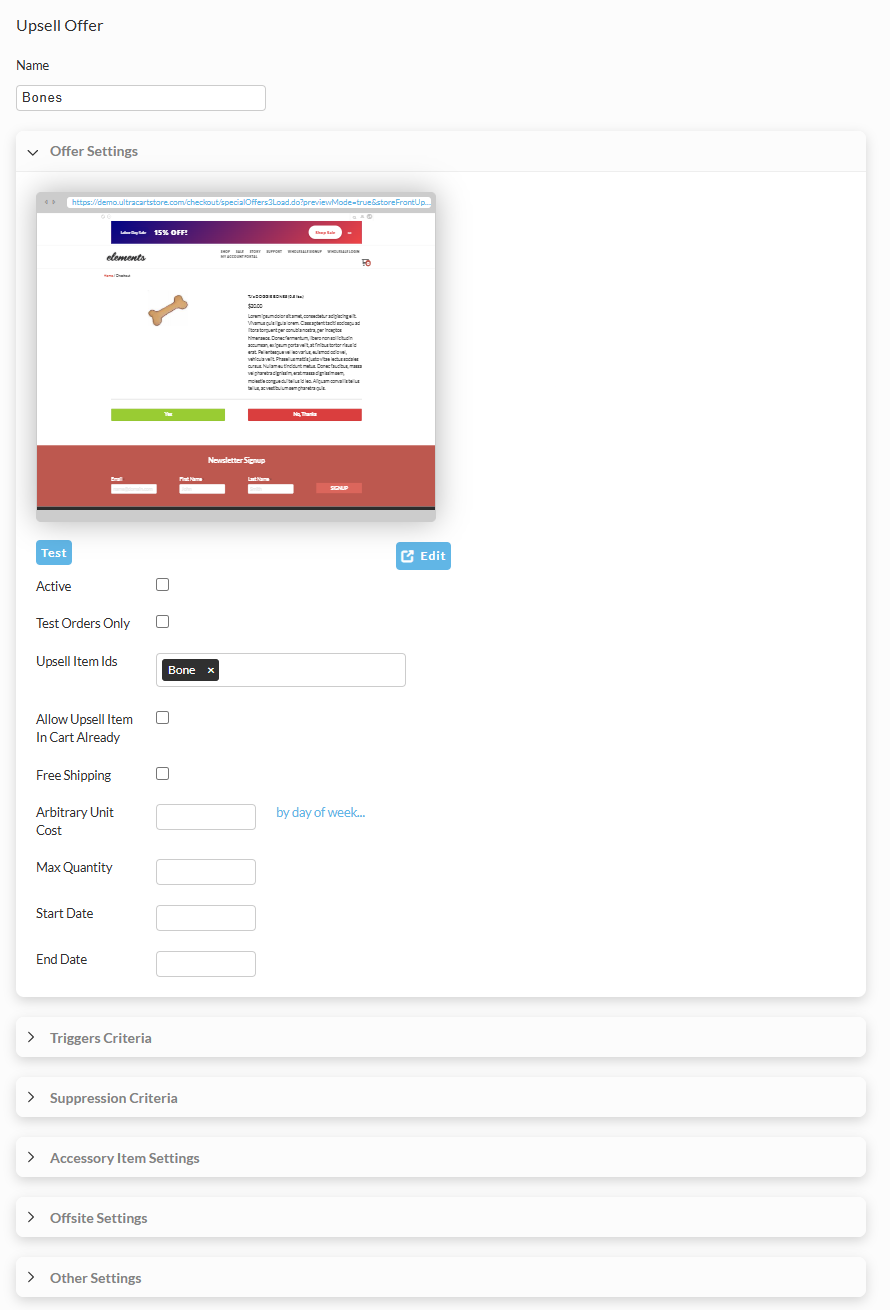
| Field | What it does |
|---|---|
| Active | Whether the offer is live. |
| Test Orders Only | The offer appears only when the test credit card is used. |
| Upsell Item Id's | The items added to the order if the customer accepts. |
| Allow Upsell Item In Cart Already | Use when the upsell item may already be in the cart before the offer displays. |
| Free Shipping | Ships the upsell item free even if the item normally charges shipping. |
| Arbitrary Unit Cost | A lower unit price for this offer. The optional By Day of Week setting allows a different price per day. |
| Max Quantity | Caps the quantity of the upsell item. |
| Start Date | When the offer begins, useful for seasonal promotions. |
| End Date | When the offer ends. |
Keep offers simple. A single item ID gives the customer a clear yes or no; multiple items work only if the layout supports it or you customize the layout yourself.
Trigger criteria on an offer
Triggers work at two levels: on the path, affecting every offer in it, and on an individual offer, under Advanced Settings.
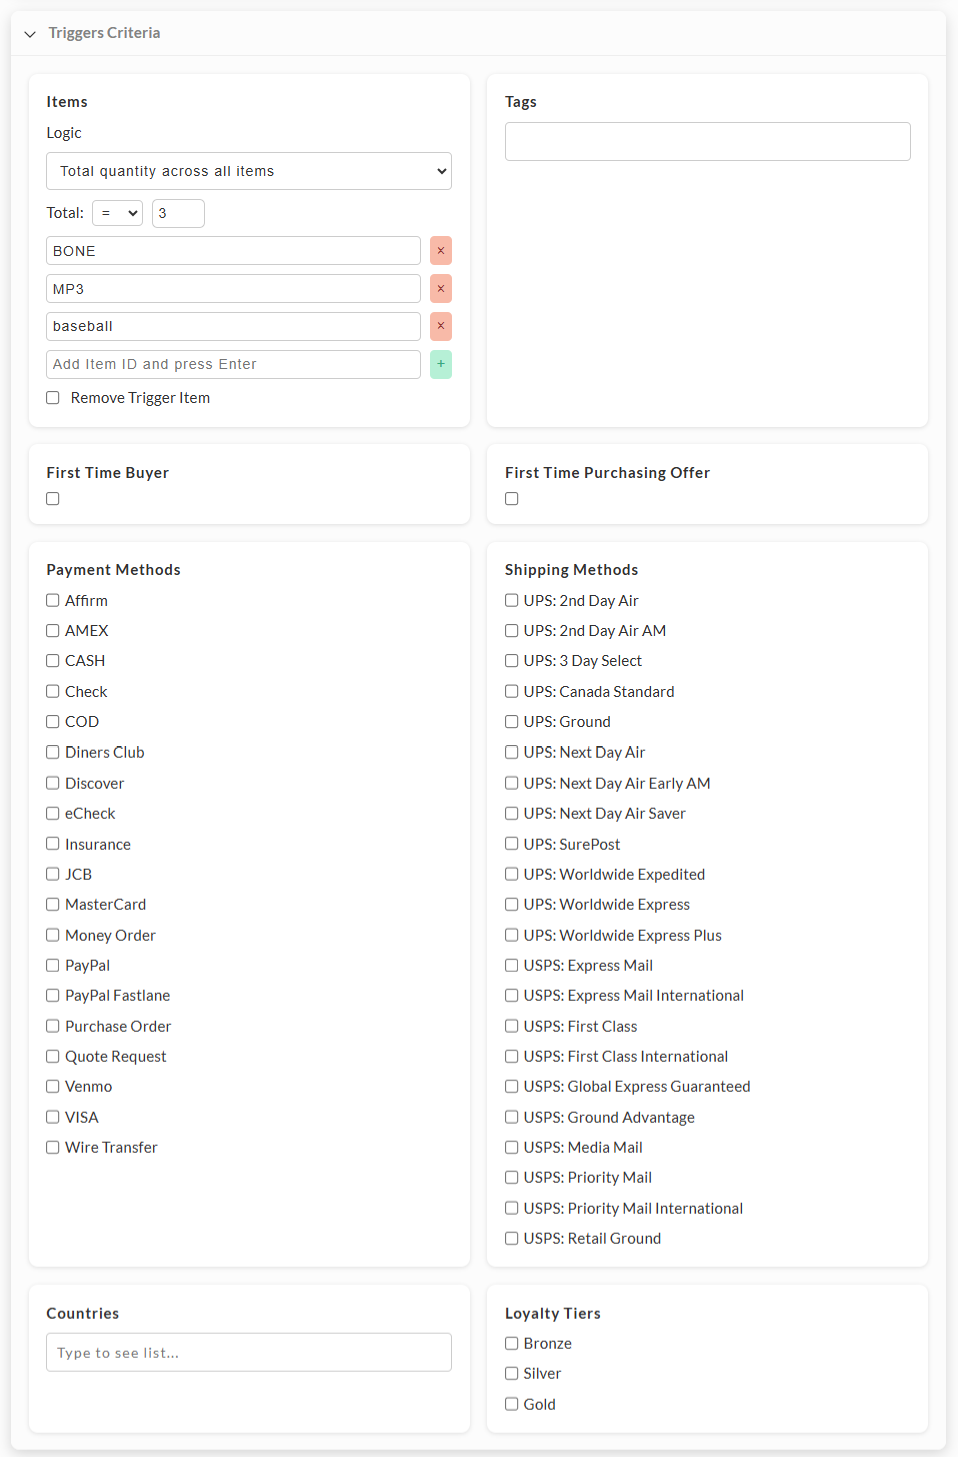
| Field | What it does |
|---|---|
| Items (Logic) | How the item list is evaluated, for example "Total quantity across all items". |
| Total | The quantity condition, for example = 3. |
| Item IDs | The item IDs participating in the trigger. |
| Remove Trigger Item | Removes the original trigger item from the cart when the customer accepts the upsell. Use it when the upsell replaces the trigger item rather than adding to it. Leave it unchecked to combine both. |
| Tags | Order or customer tags to trigger on. |
| First Time Buyer | Restricts the trigger to first-time buyers. |
| First Time Purchasing Offer | Restricts the trigger to a buyer using a first-time purchase offer. |
| Payment Methods | Restricts the trigger by payment method, such as VISA, PayPal, eCheck, Affirm, or Venmo. |
| Shipping Methods | Restricts the trigger by shipping method, such as UPS Ground or USPS Priority Mail. |
| Countries | Restricts the trigger by country. |
| Loyalty Tiers | Restricts the trigger by loyalty tier, such as Bronze, Silver, or Gold. |
Suppression criteria on an offer
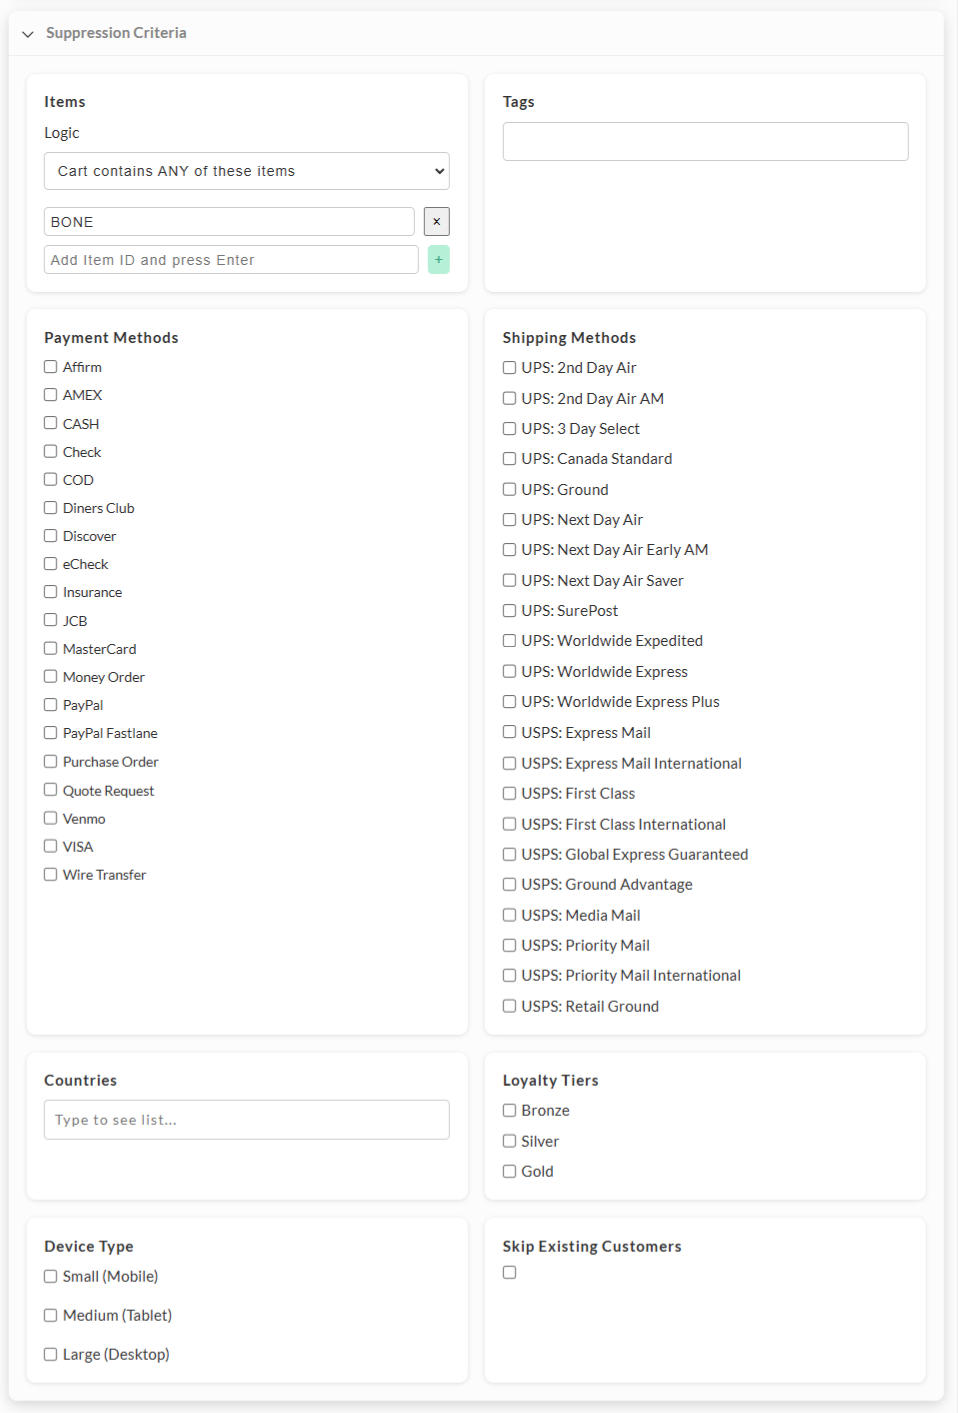
| Field | What it does |
|---|---|
| Items (Logic) | The rule for cart items, for example "Cart contains ANY of these items". |
| Items (Item ID) | The item IDs in the suppression list. |
| Tags | Tags that suppress the offer. |
| Payment Methods | Payment methods that suppress the offer. |
| Shipping Methods | Shipping methods that suppress the offer. |
| Countries | Countries that suppress the offer. |
Accessory item IDs are configured on the same panel:
| Field | What it does |
|---|---|
| Accessory Item Ids, Add | Accessory item IDs to add. |
| Accessory Item Ids, Remove | Accessory item IDs to remove. |
| Migrate Accessory Item Ids, From | The original accessory item ID to migrate from. |
| Migrate Accessory Item Ids, To | The new accessory item ID to migrate to. |
Other offer settings
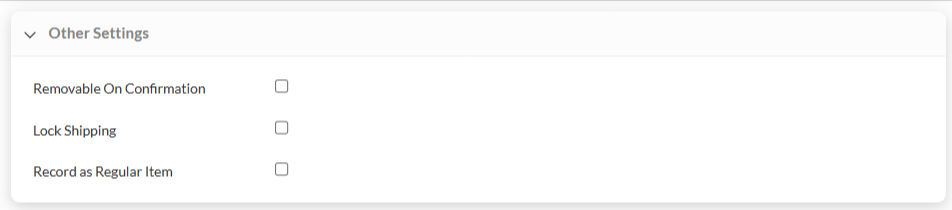
| Field | What it does |
|---|---|
| Removable On Confirmation | Allows the item to be removed at confirmation. |
| Lock Shipping | Prevents the shipping method from being changed. |
| Record as Regular Item | Records the item as a standard item rather than an upsell. |
Upgrade replacement: swapping an item rather than adding one
A common pattern is offering a premium version that replaces what the customer already bought, rather than adding to it. Remove Trigger Item is what makes this work.
Set up the offer with the standard product as the trigger item and the premium product as the upsell item, then enable Remove Trigger Item. The flow becomes:
- The customer buys
ITEM-A. - The offer for
ITEM-Bdisplays. - The customer accepts.
- UltraCart removes
ITEM-Afrom the order. - UltraCart adds
ITEM-B.
This suits product upgrades, premium versions, subscription tier upgrades, warranty and service upgrades, and bundle upgrades.
Make the upgrade explicit in the offer copy. A customer who thinks they are adding a second item and finds they have swapped the first will contact support, so say plainly what is being replaced and what the price difference is.
If the upsell adds the item instead of replacing it, check that Remove Trigger Item is enabled on the offer and that the trigger item matches what is actually in the cart.
Pre-checkout upsells
A pre-checkout upsell appears as a modal before the customer reaches checkout. Building one takes the same path and offer work as above, plus one change on the path and some setup on the StoreFront itself.
Configure the path
-
Go to Content → Upsells and select Add Upsell Path.
-
Select Edit on the new path. New paths default to post-checkout, so set Flow Location to Pre-Checkout (Upsell Modal) and save.
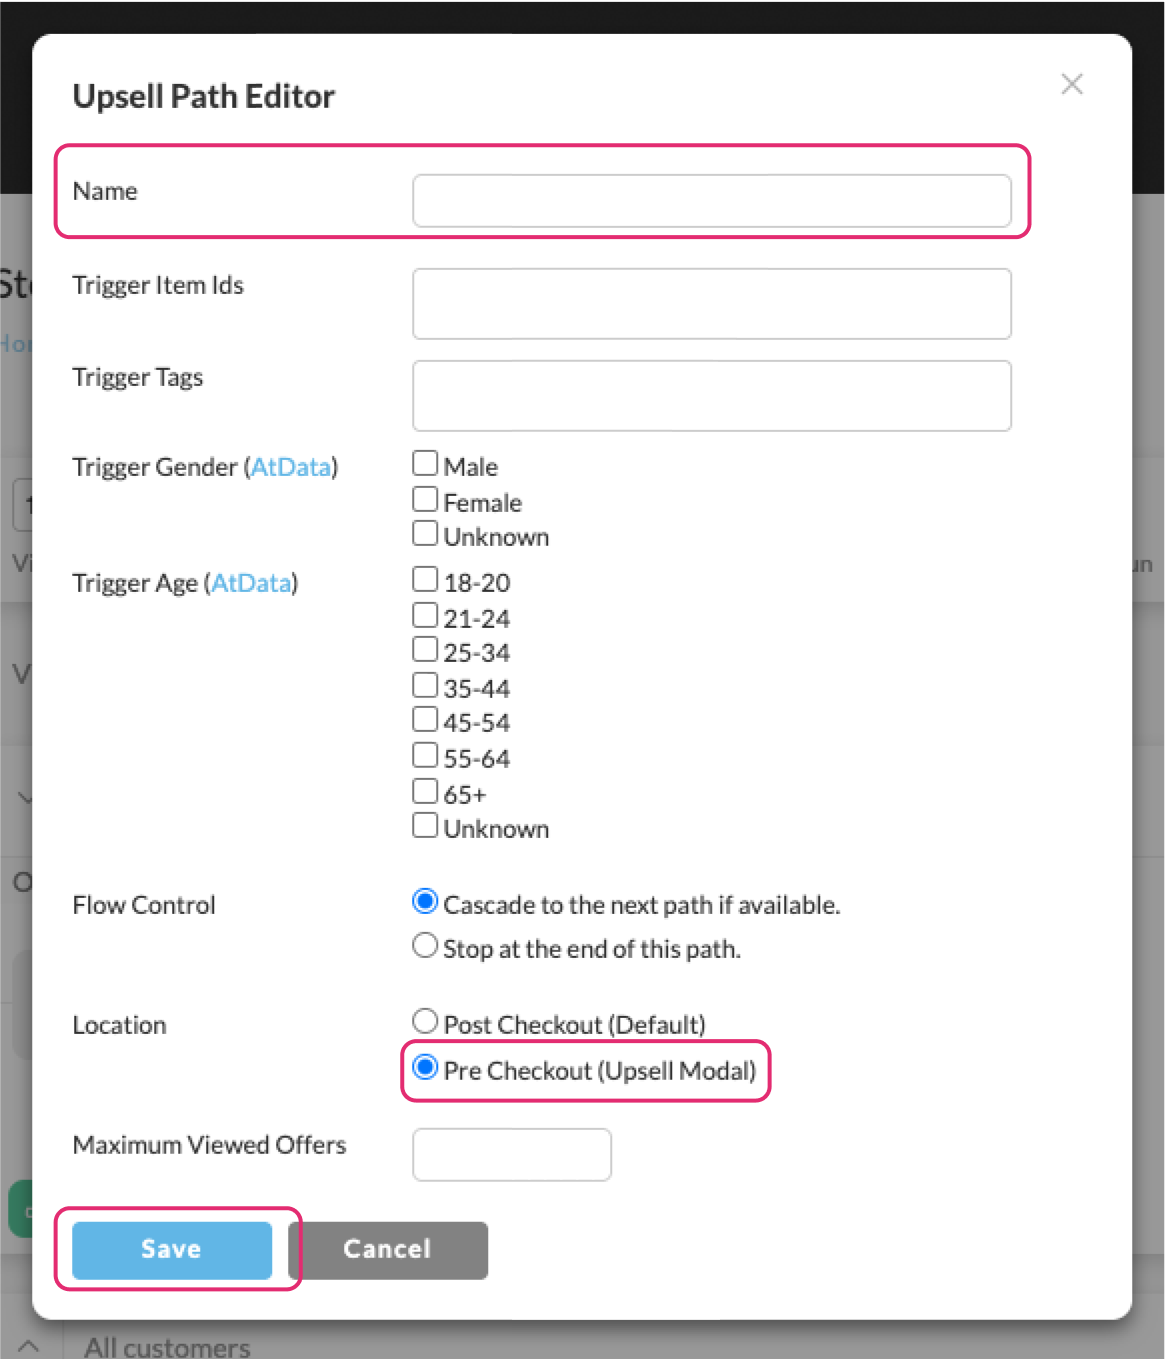
Give the path a clear name. It is the name you pick from later in the StoreFront editor.
Add the offer
Select the plus icon inside the path, leave the prompt on Offer, and select OK.
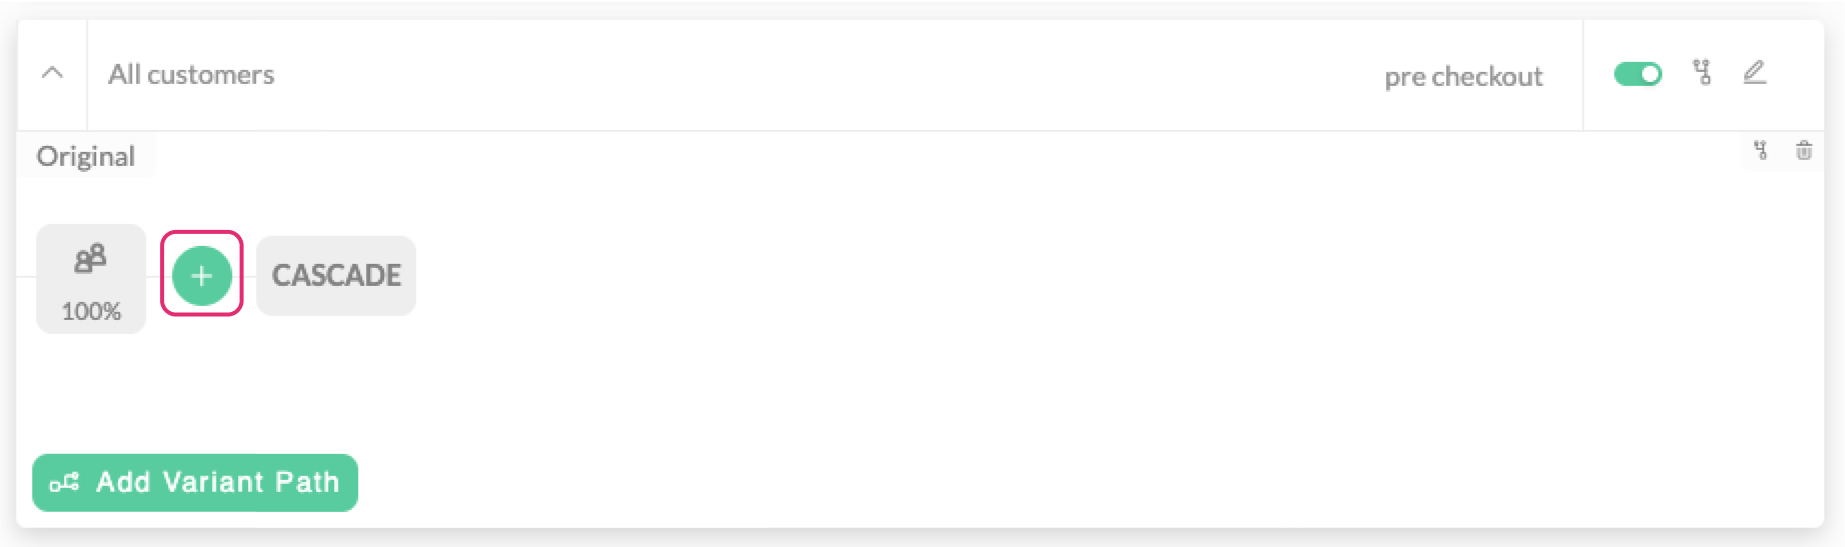
Name the offer, add the item IDs that get added when the customer accepts, and choose a layout. A default layout that shows the item, its options and variations, and accept and decline buttons is a good starting point.
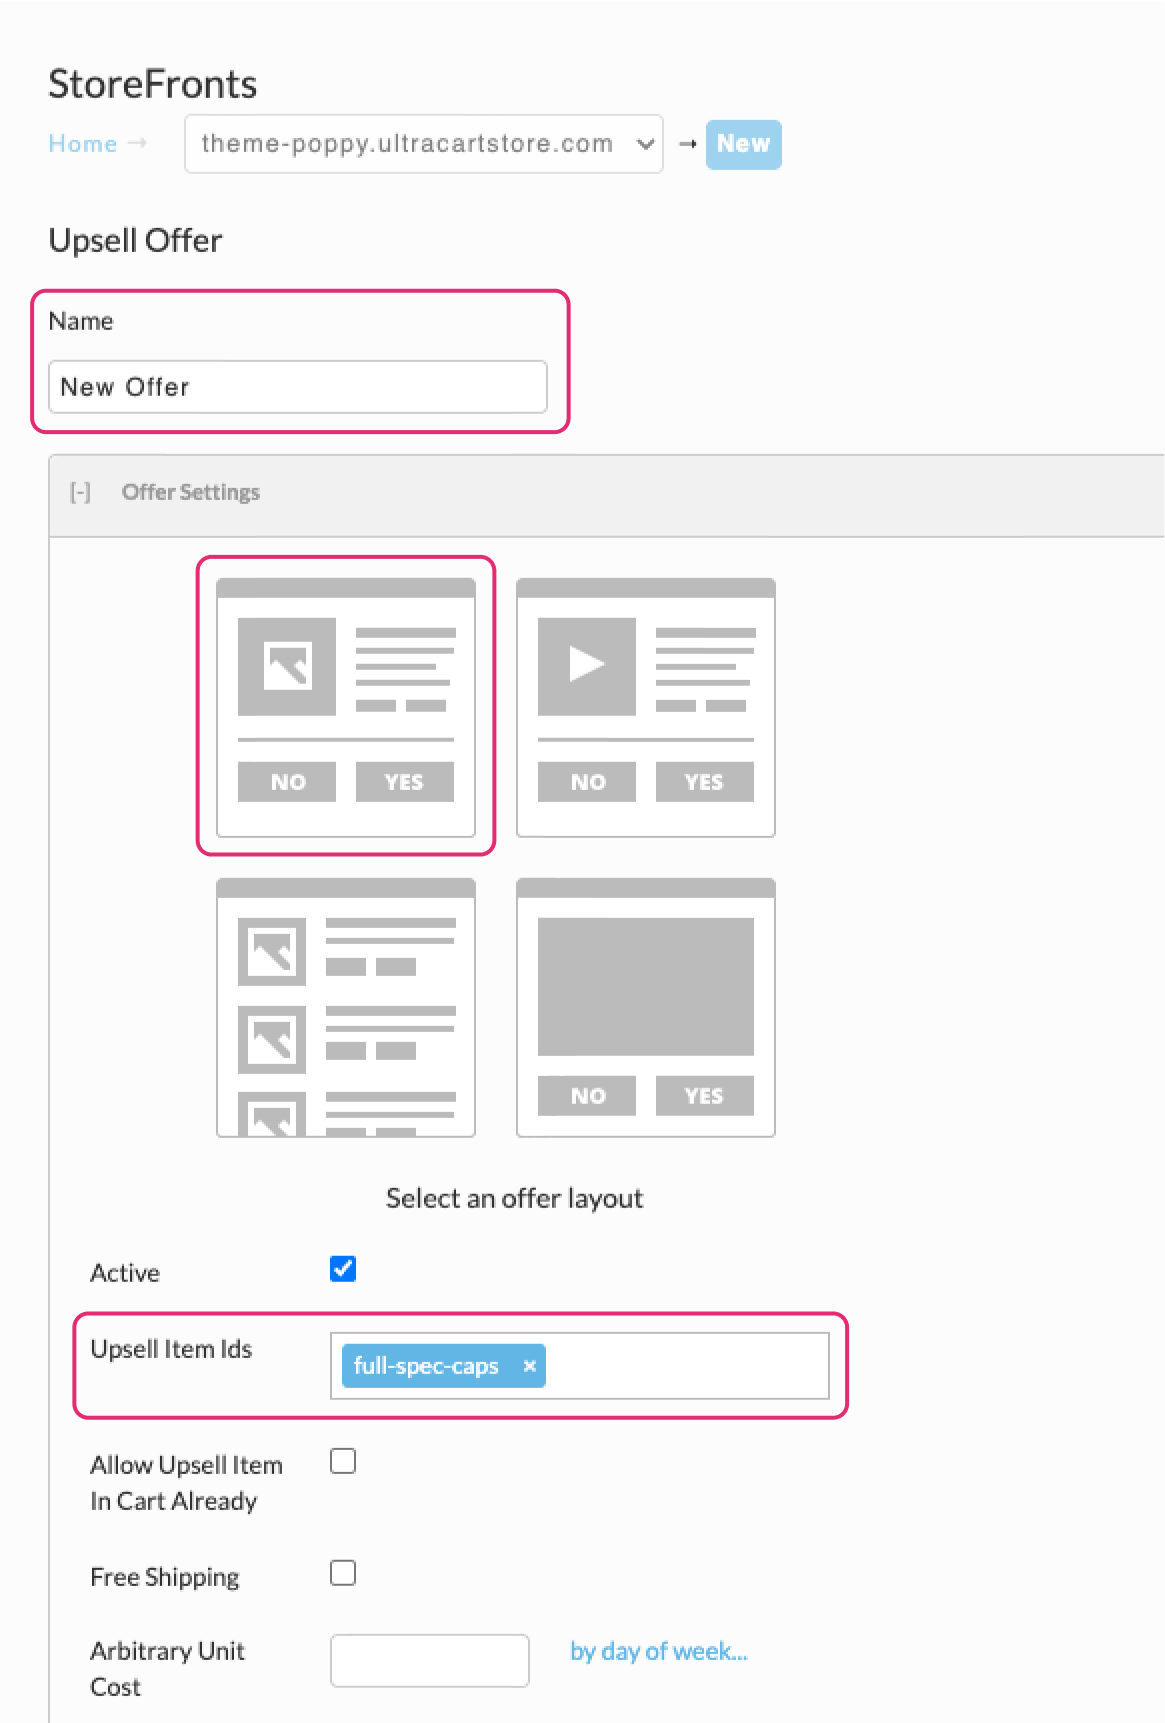
Set triggers under Advanced Settings on the offer.
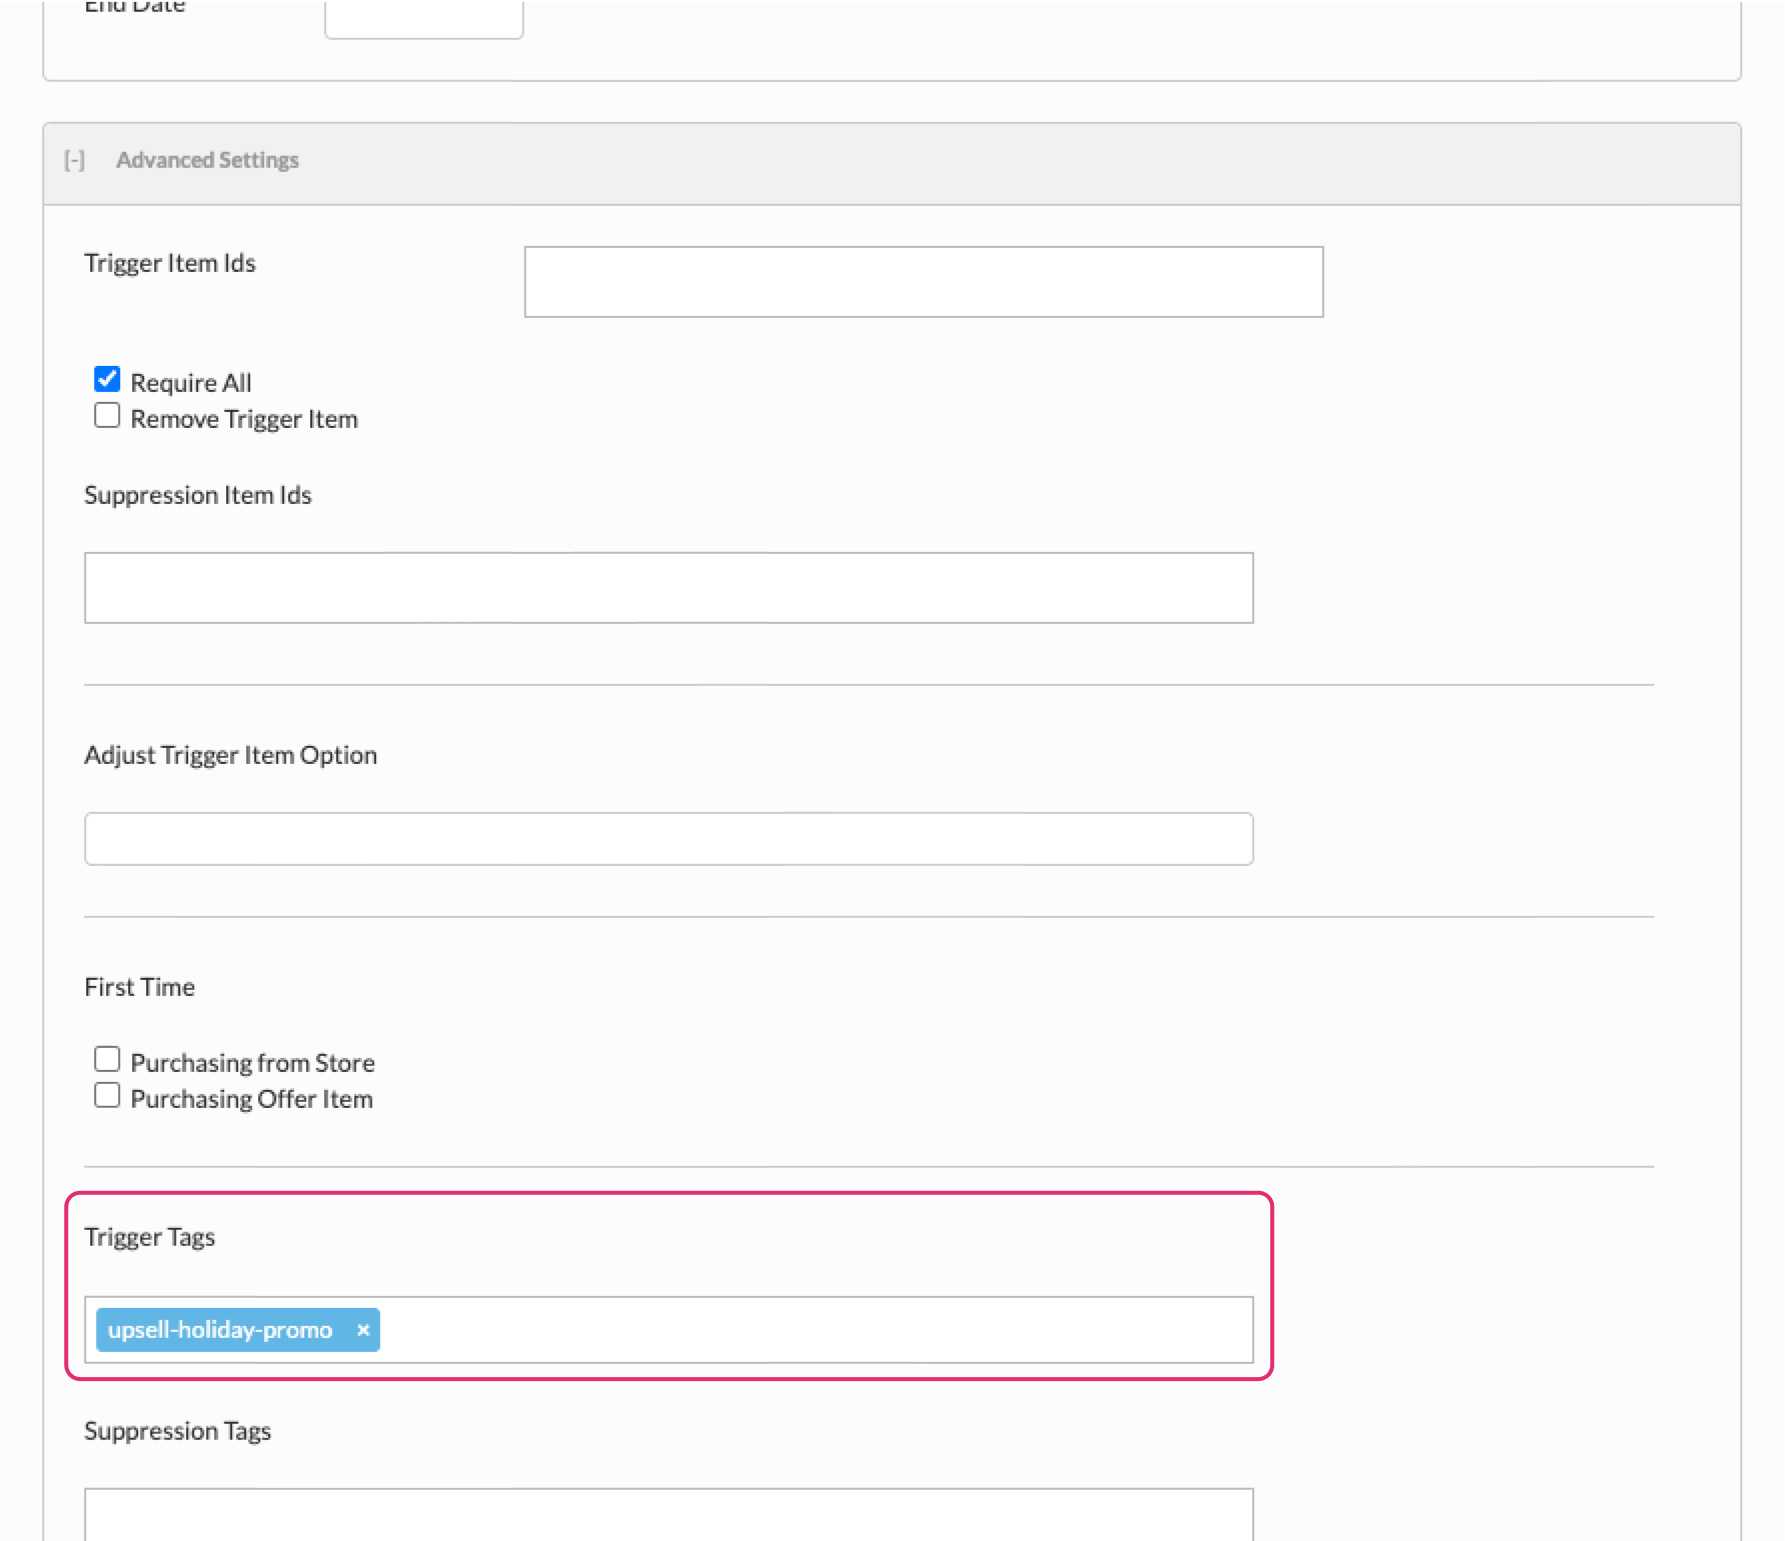
Tags have to exist on your items before you can reference them in the upsell editor. Adding the
tag upsell-holiday-promo to several items makes all of them trigger the offer.
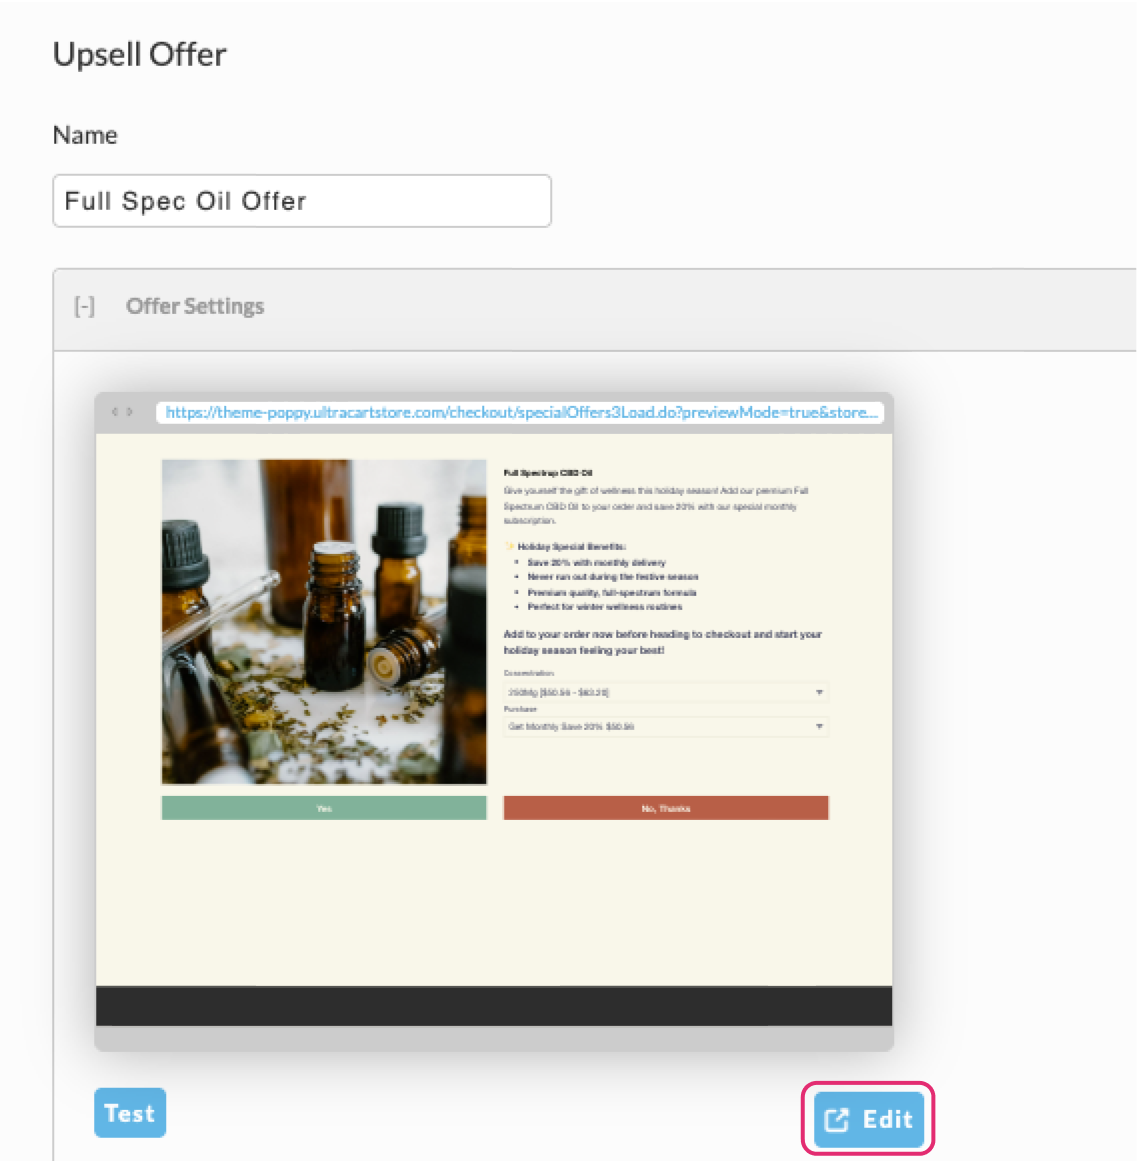
Format the offer content in the Visual Builder from inside the upsell editor, not from the StoreFront editor. Arrange the components so a shopper can pick variations and accept or decline.
Set up the StoreFront
This assumes a typical setup where Add to Cart submits an item form that shows the cart. To show the modal instead, adjust the item form.
-
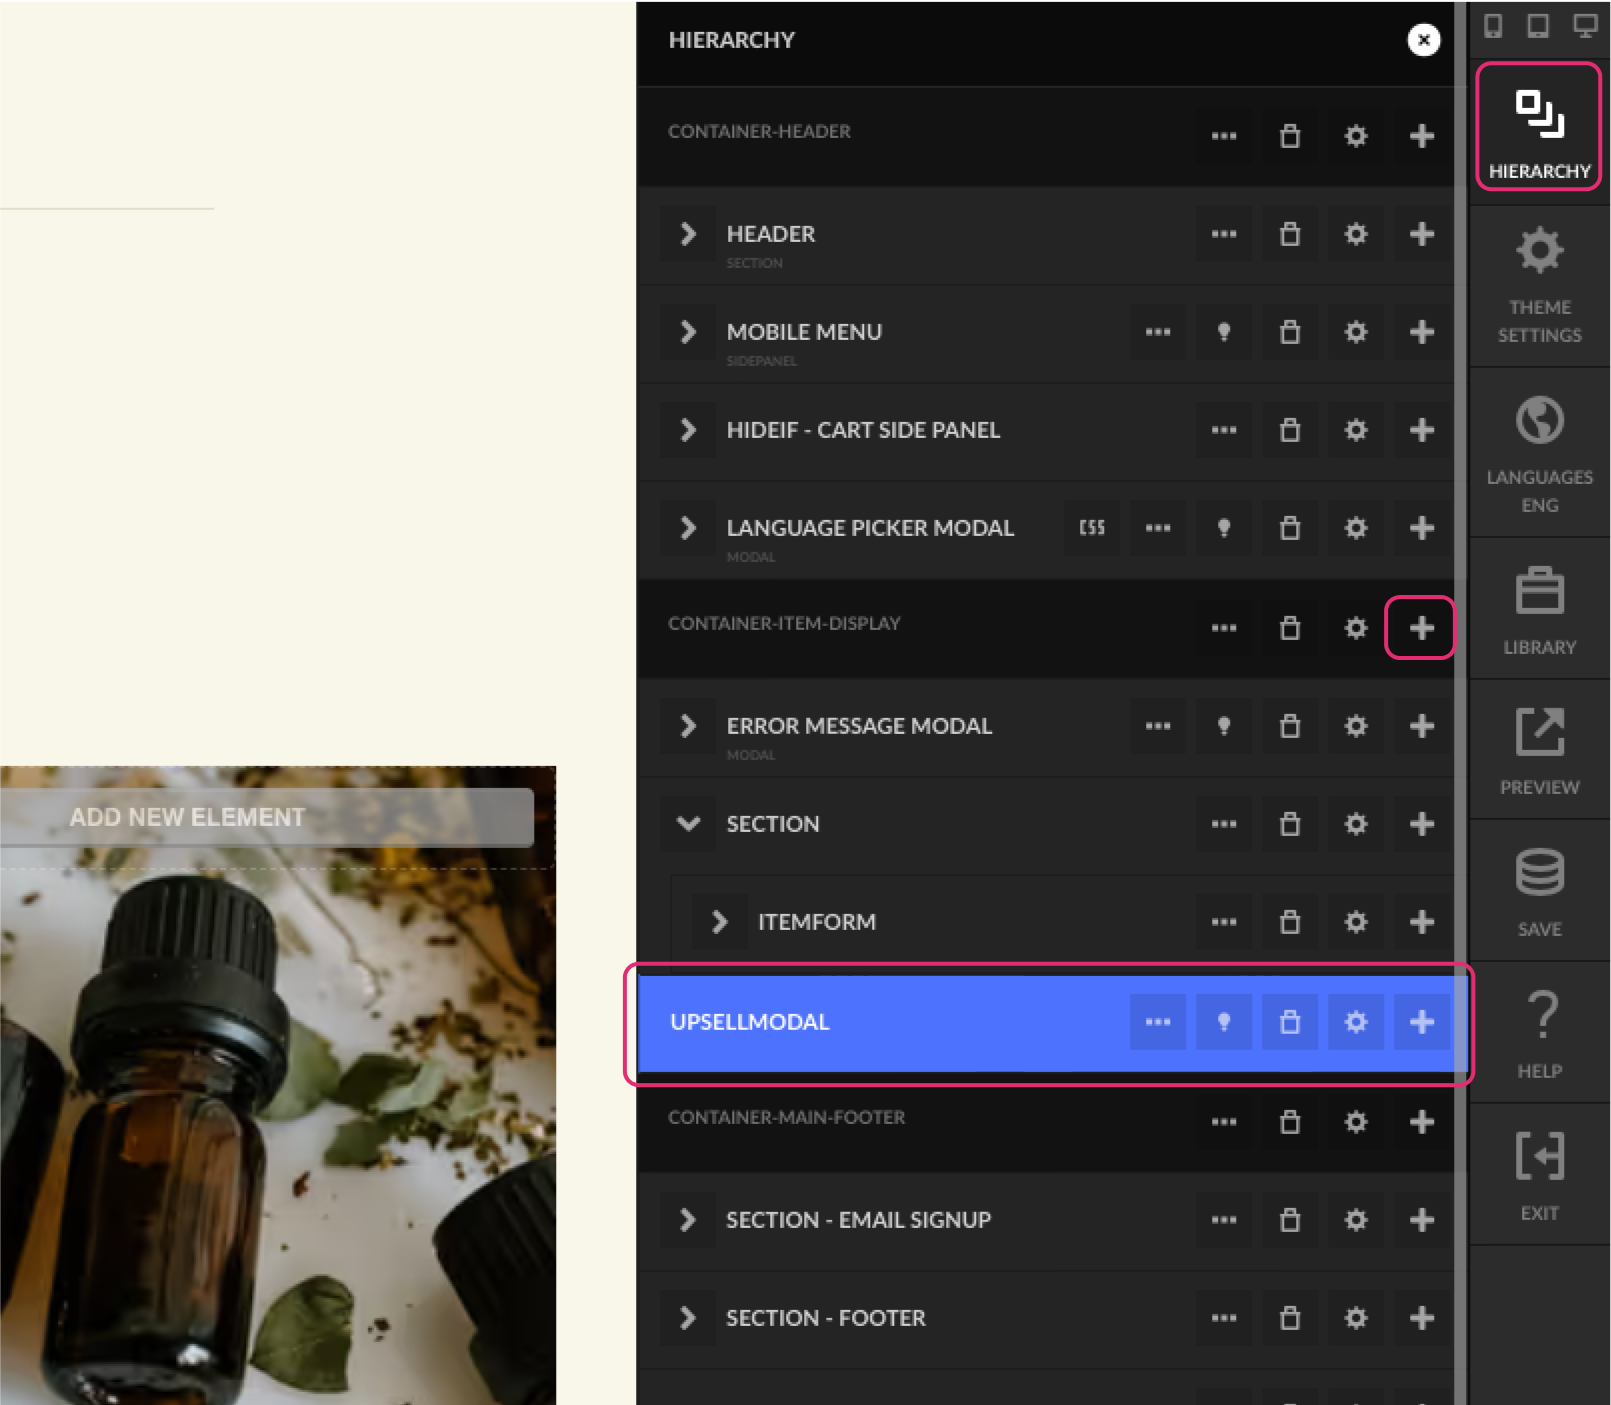
Add the Upsell Modal component in the hierarchy view. The Item Display Container is a reasonable place for it.
-
Configure the component:
Setting Value Specific Path The upsell path you named earlier Once Per Visitfor one session, orPage Loadfor every page loadAfter Upsell Complete Action Checkout Trigger None 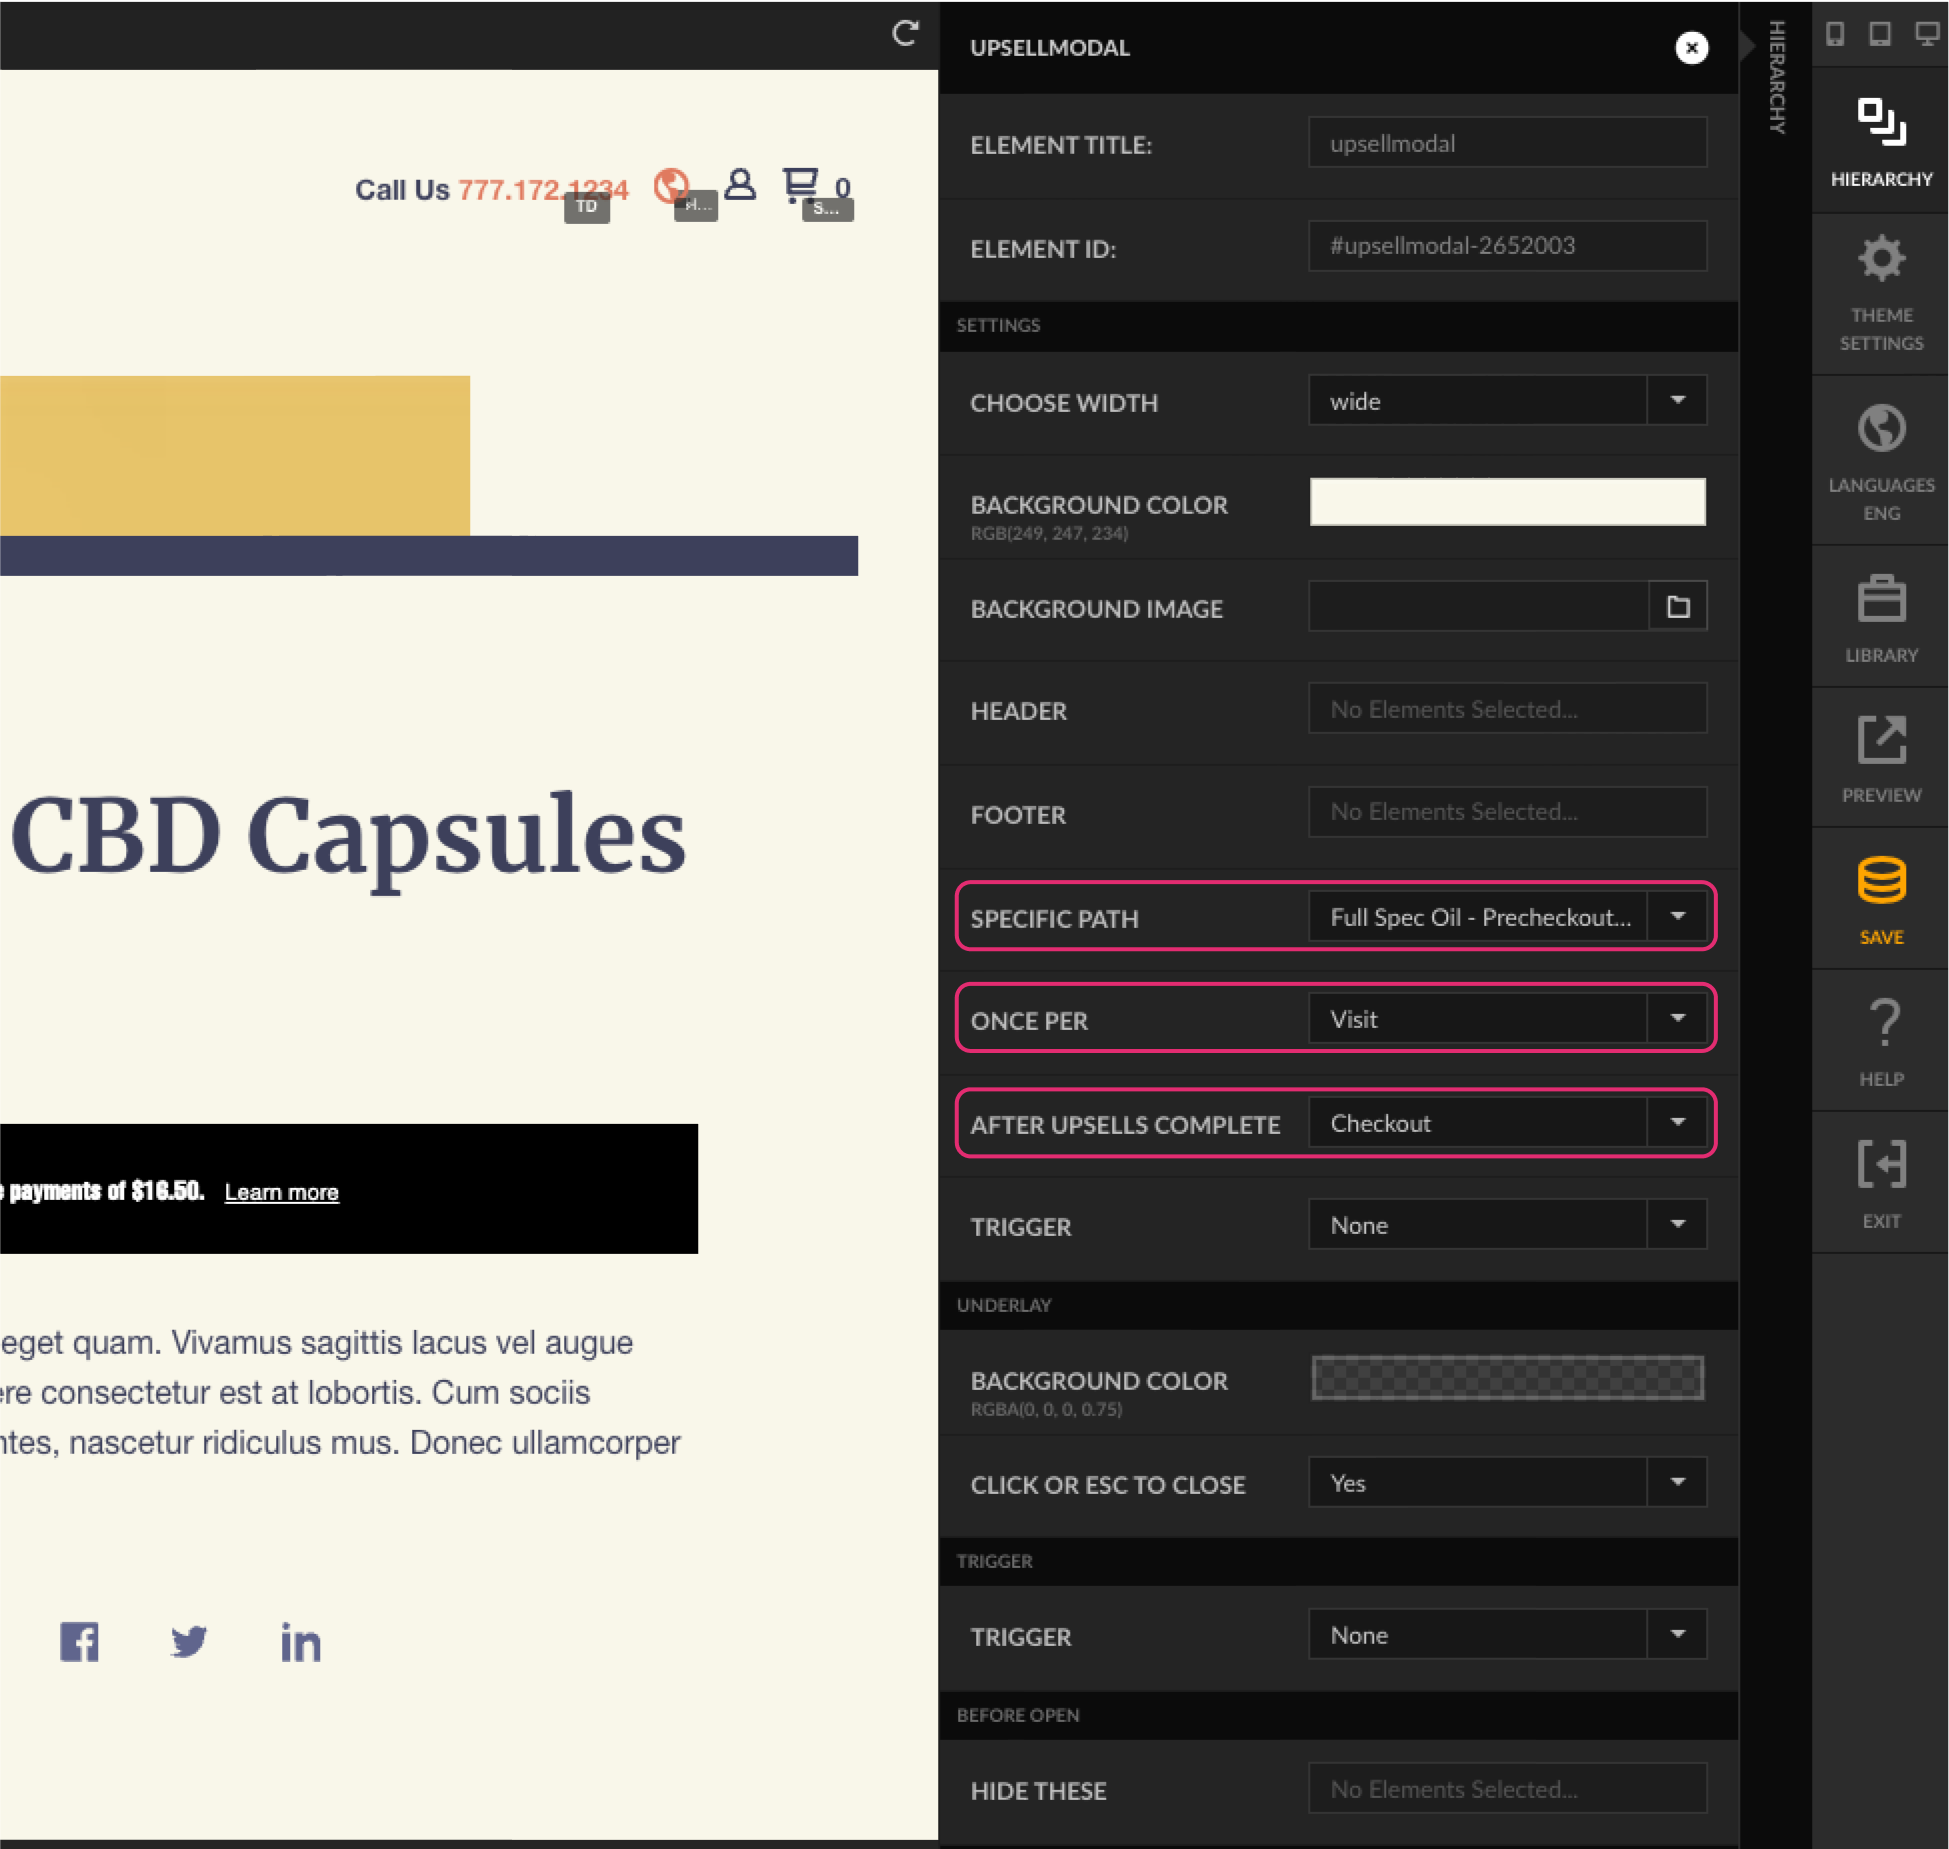
-
Set the Add to Cart button's Action to Submit Form Action.
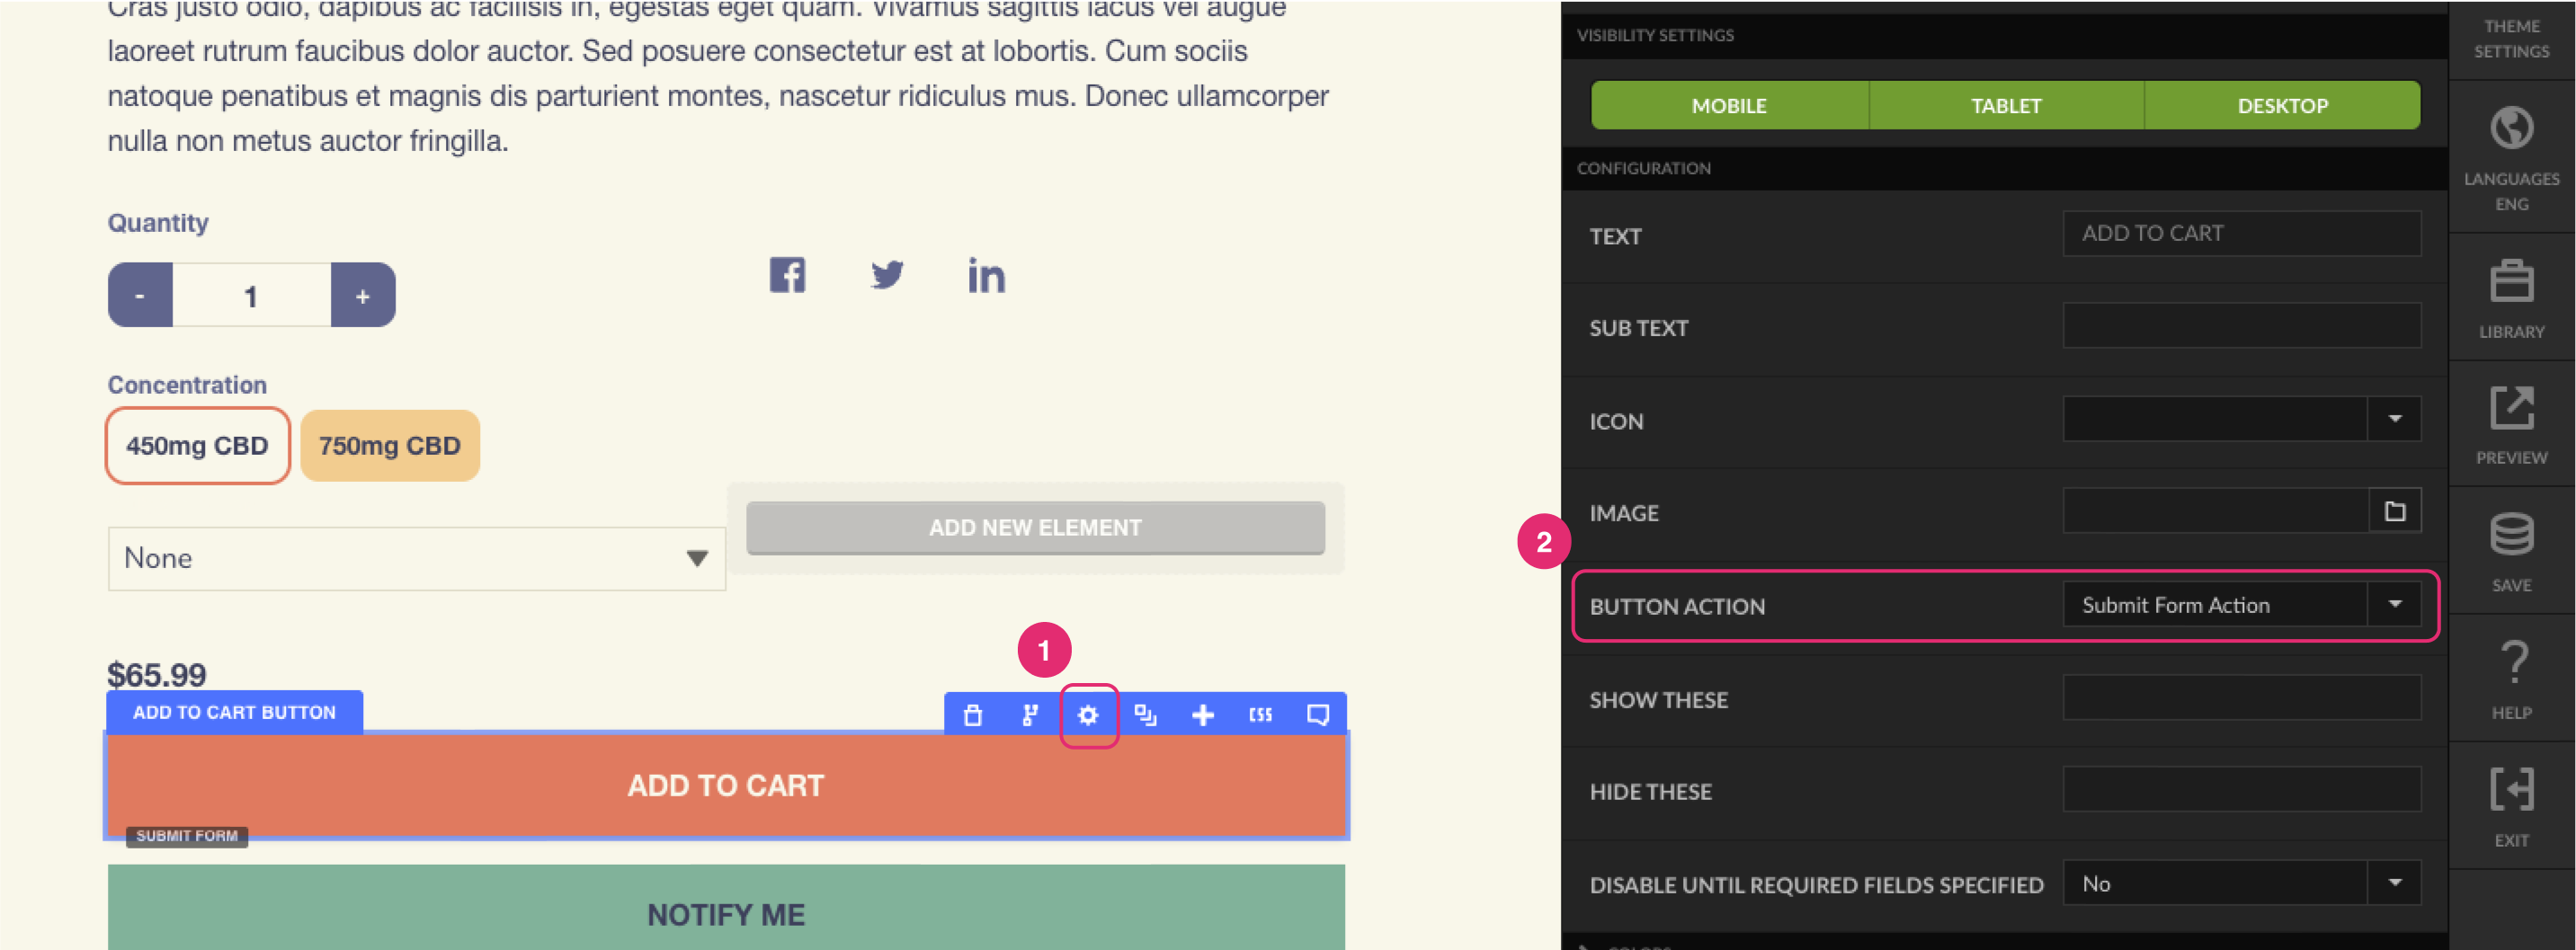
-
On the item form, set After Submission Action to Show/Hide Action, and under Show These, select the upsell modal component you created.
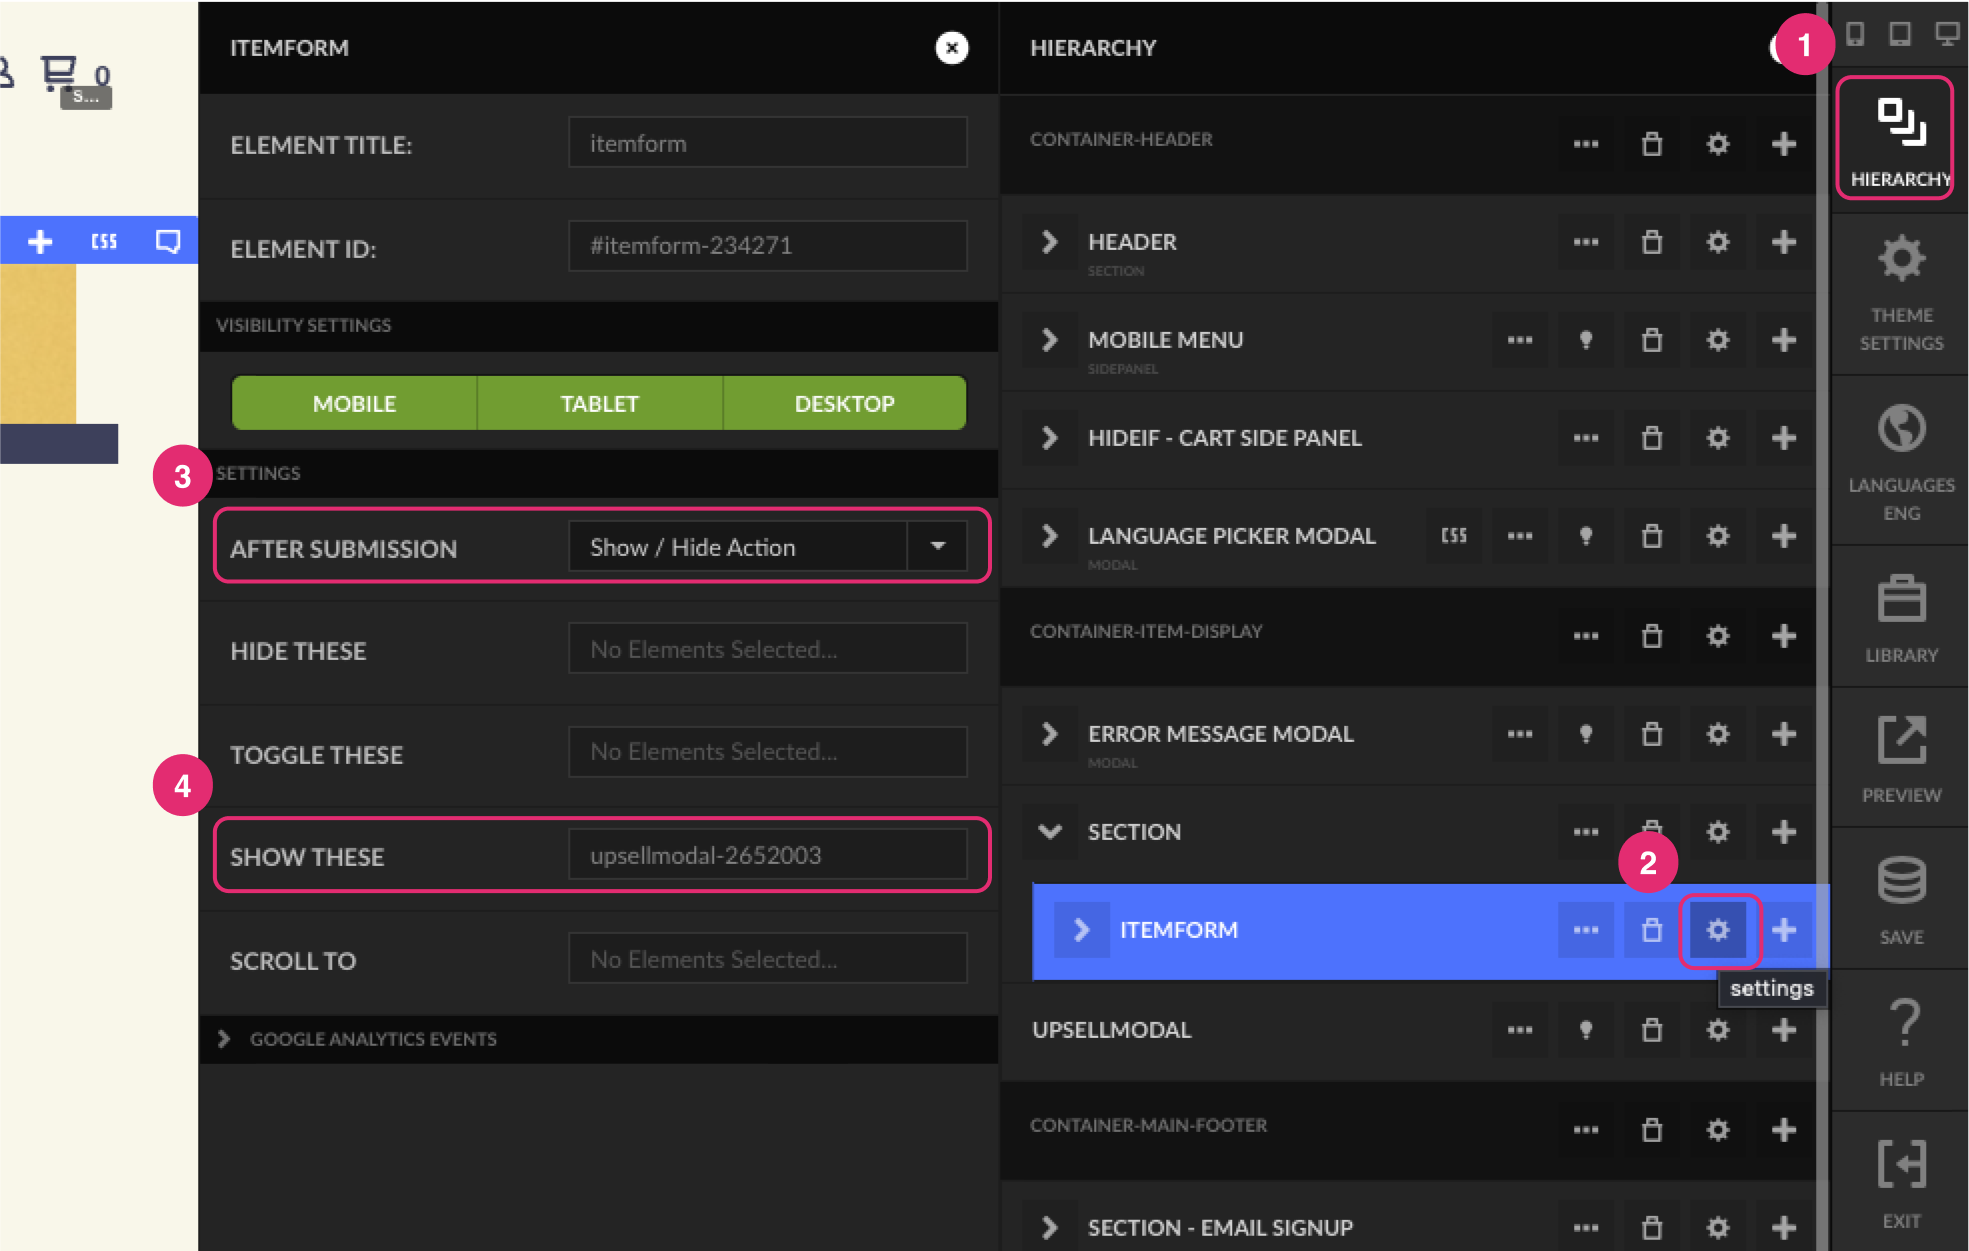
Now selecting Add to Cart shows the modal when the trigger conditions match. Accepting adds the upsell item and continues to checkout; declining goes straight to checkout unchanged.
When the path or offer targets specific item IDs or tags, the modal only appears if a qualifying item is in the cart. Otherwise Add to Cart behaves normally. That also means you need a qualifying item in the cart to preview it.
Working with paths and offers
Hovering over an offer shows a toolbar, a DOWNSELL option, and a toggle that switches the offer active (blue) or inactive (grey).
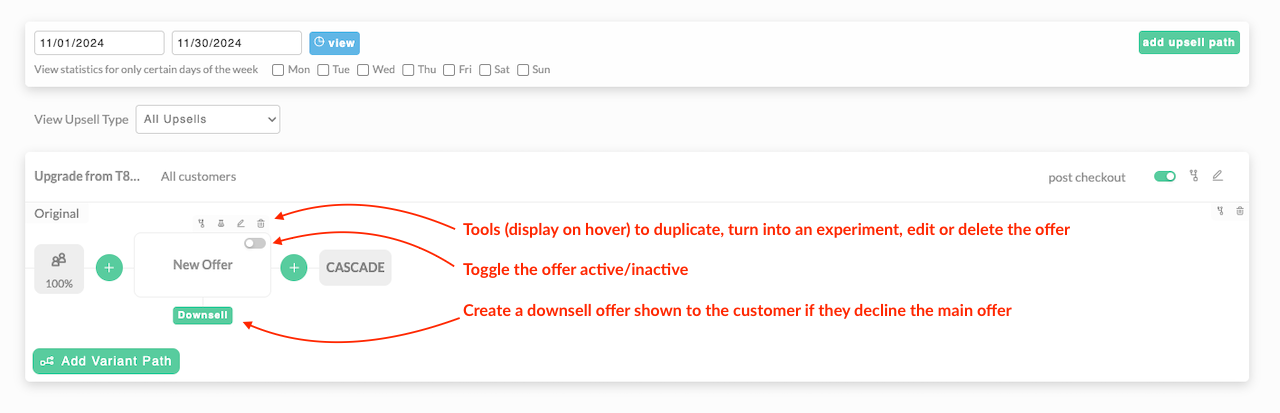
Filter by type to see all upsells, only post-checkout, or only pre-checkout.

Filter by status with the Upsell Status dropdown.

- Active shows everything not archived. This includes inactive offers, as long as they have not been archived.
- All shows archived and unarchived alike.
- Archived shows only archived paths and offers.
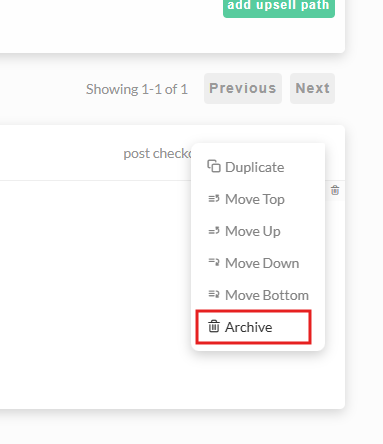
Archive a path from the three-dot menu at its right, to hide it without deleting it.
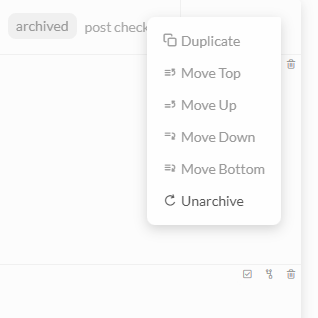
Archived paths show an Archived status and reappear when you switch the filter to All or Archived. Unarchive from the same menu.
Pagination kicks in at 50 offers per page.

Drag and drop moves offers and experiments within a path, between paths, and into or out of an experiment.
Testing offers and paths
Upsells have their own experiment system, separate from StoreFront experiments.
Offer experiments
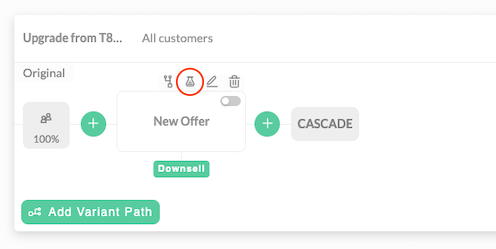
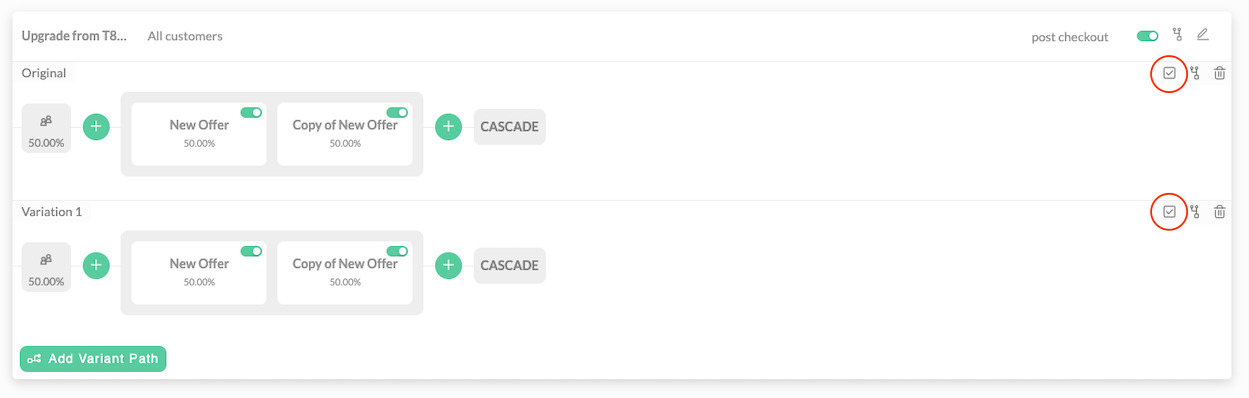
Hover an offer and select the experiment icon.
With the offer inside an experiment, hover it and use the duplicate tool to add a second.
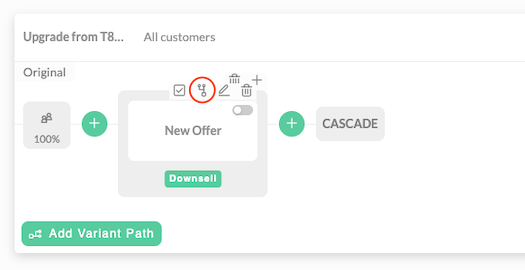
Traffic splits evenly and the split is fixed: two offers get 50 percent each, three get 33.3 percent each, and so on.
A border around an offer means an experiment is initialized. Hovering the bordered area shows a delete icon and a plus to add another offer. Hovering an offer inside the experiment gives four options: promote, duplicate, edit, and delete.
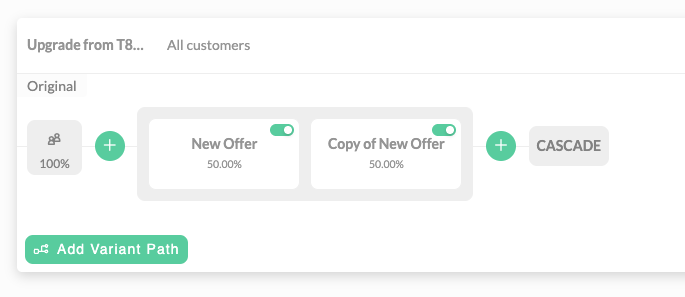
When you have a winner, hover it and select the promotion tool. Only the winning offer remains.
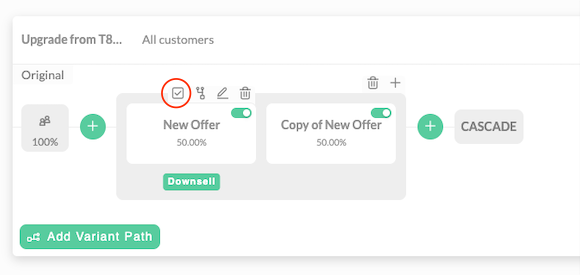
How long should an offer experiment run? Aim for at least one to two weeks, reach 95 to 99 percent statistical significance, and ideally cover one to two business cycles so seasonality and weekly patterns do not distort the result.
Path experiments
You can also test whole paths against each other, which tests sequences and combinations of offers rather than a single offer. Select Add Variant Path, or duplicate an existing path.
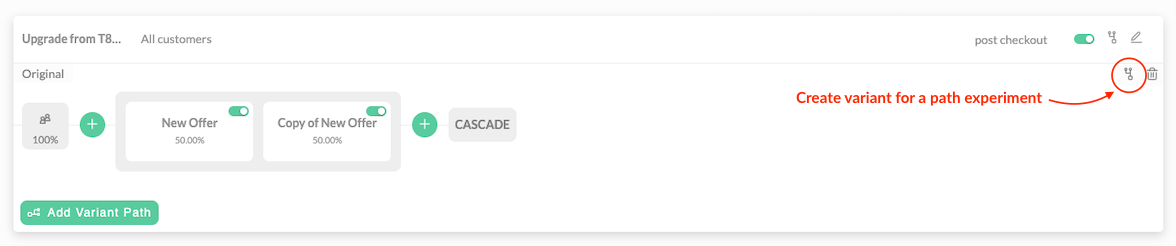
Traffic splits across the variant paths.
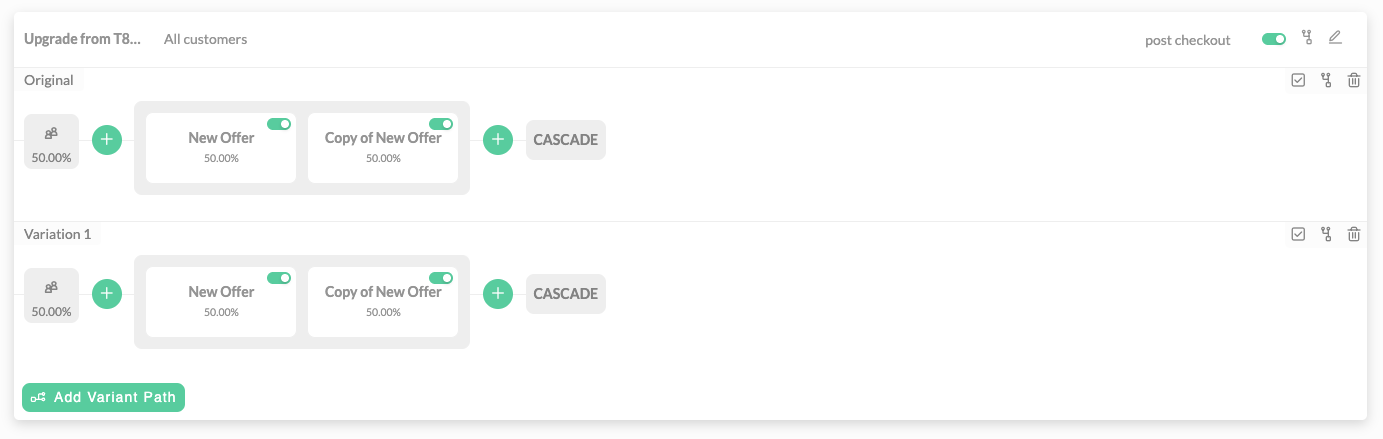
Select the promote tool on the winner. The losing variant is removed automatically.
Statistics
Enter a start and end date and select View.
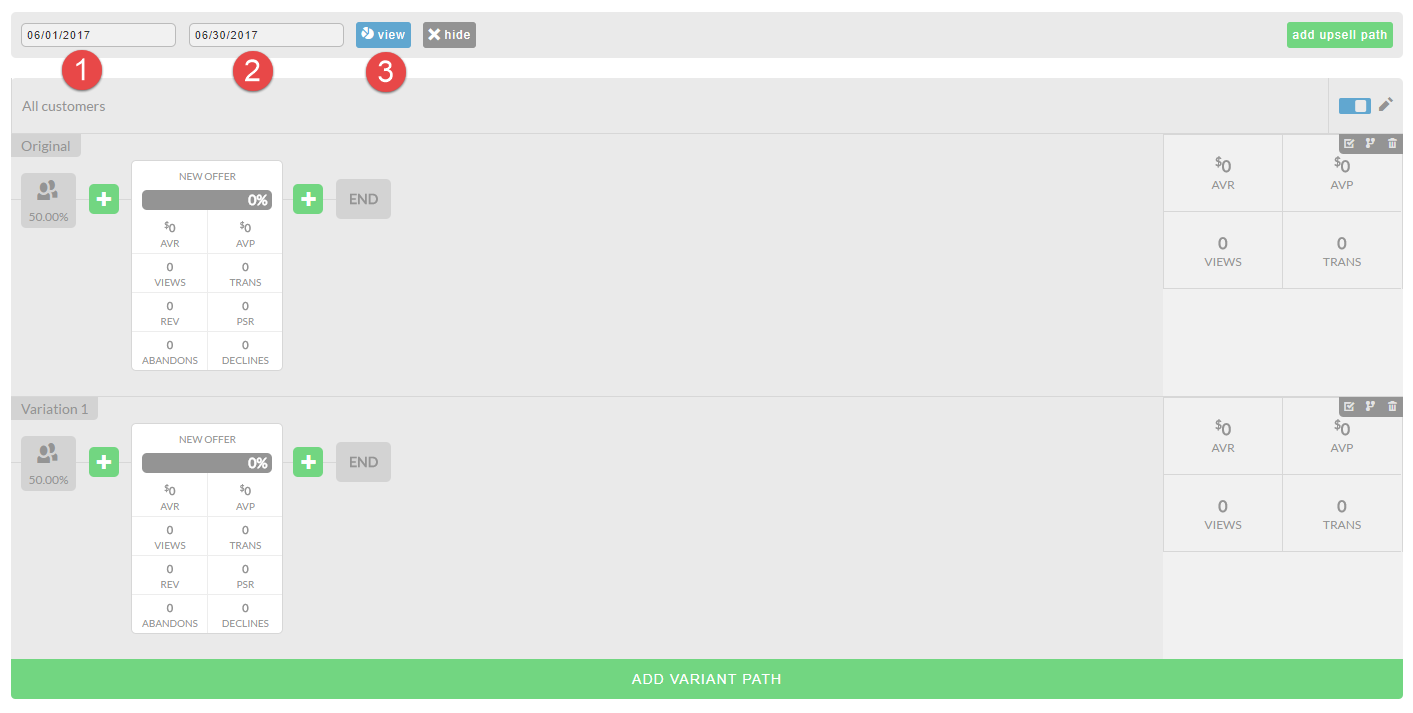
Per offer:
- Conversion percentage
- Average Visitor Revenue (AVR)
- Average Visitor Profit (AVP), which needs cost of goods sold configured on your items
- Views
- Transactions (TRANS)
- Revenue (REV)
- Per Sale Revenue (PSR)
- Abandons
- Declines, the number of people who selected no
Per path: Average Visitor Revenue, Average Visitor Profit, Views, and Transactions.
Abandons and refunds are tracked automatically, so the revenue figures reflect what you kept rather than what was initially accepted.
Custom yes and no buttons
To replace the default Yes and No buttons, edit the offer, highlight a button in the visual
editor, and select the settings icon or press S.
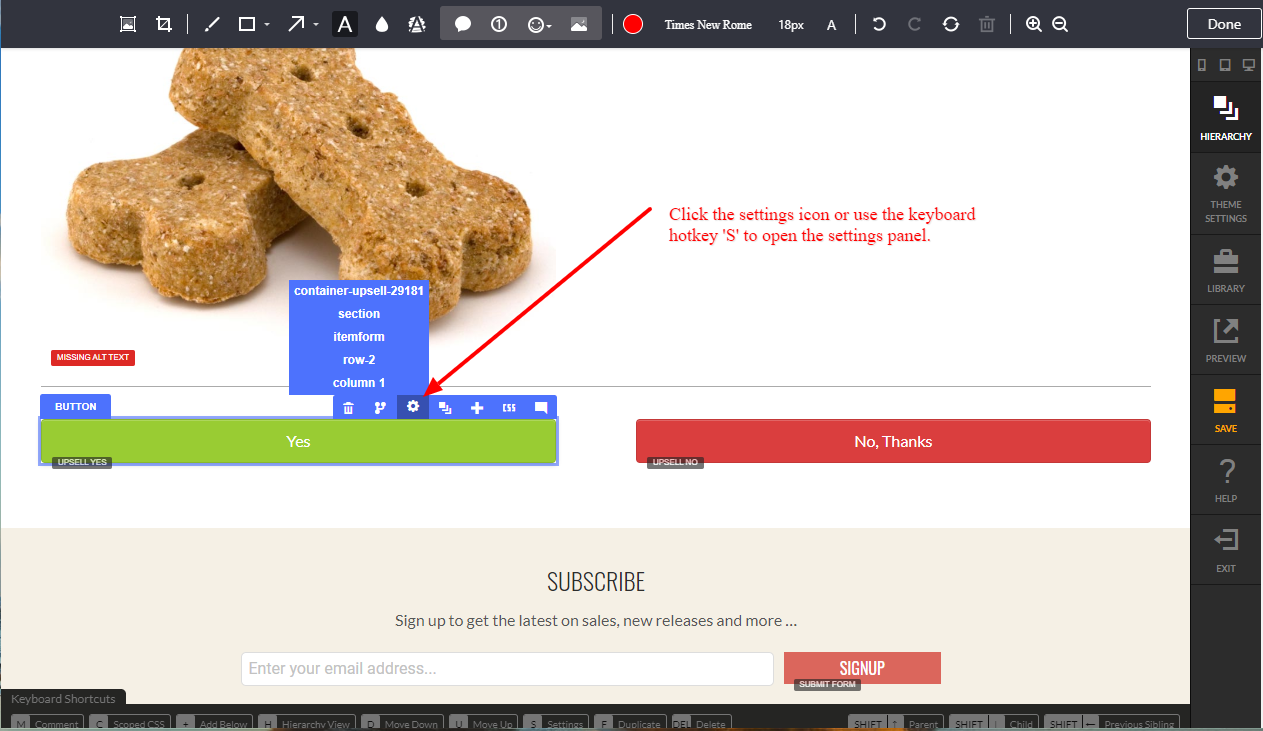
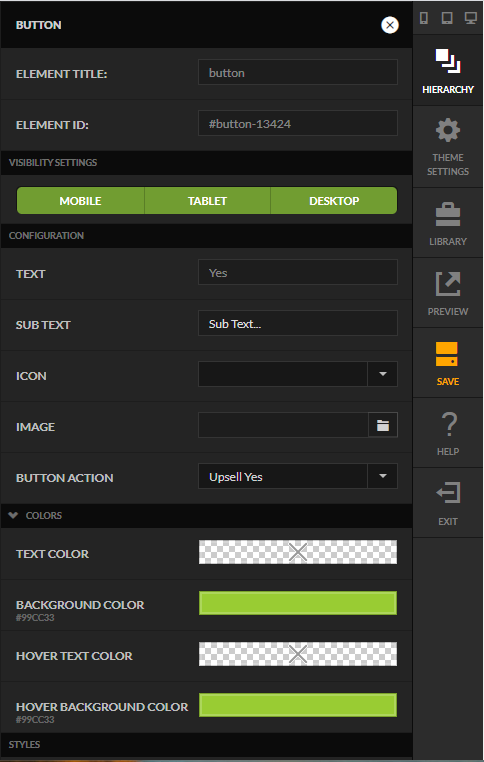
From the settings panel you can change the button text, text and background colors, add sub-text, apply an icon, or upload a custom image.
Offsite content
An offer can show a page you host yourself instead of a Visual Builder layout, so you can build it in any HTML tool. UltraCart still applies the path and offer triggers, adds the upsell item, and charges the customer when they accept. Offsite offers work only in Post Checkout paths, not in the pre-checkout modal.
Set up an offsite offer
- Go to StoreFronts, select the storefront, then Content → Upsells.
- Add or edit an upsell path. Leave Flow Location set to Post Checkout and set the path triggers.
- Select the plus button inside the path, leave the prompt on Offer, and select OK.
- Enter the offer name, the Upsell Item Id's, and any pricing or shipping settings you need, such as Arbitrary Unit Cost, Free Shipping, or Max Quantity.
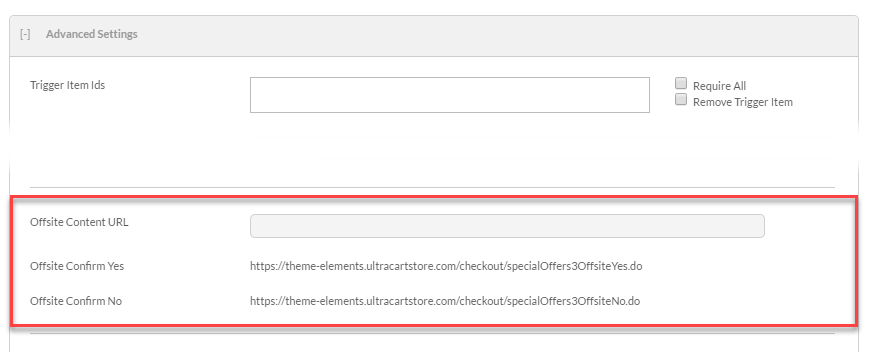
- In Offsite Content URL, enter the full URL of the external page.
- Save the offer. UltraCart generates the Offsite Confirm Yes and Offsite Confirm No URLs.
- On the external page, link the accept button to the Offsite Confirm Yes URL and the decline button to the Offsite Confirm No URL. These links tell UltraCart the customer's answer and move them to the next offer or the receipt. A plain link is enough; the page doesn't need a script or to be on the same domain as your storefront.
- Enable Test Orders Only, place a test order with the test credit card, and confirm both buttons work. Then clear Test Orders Only and set the offer Active.
When UltraCart sends the customer to your page, it appends storeFrontUpsellOfferOid,
cartIdToken, and other parameters to the Offsite Content URL. Leave them on the URL.
UltraCart uses them to work out which offer the customer is answering when they select Yes or
No.
Offer a choice of items
An offsite page can offer several items, for example one, three, or six bottles, each with its
own Add to my order button. By default the Offsite Confirm Yes URL adds the first item in
Upsell Item Id's. To add a different item, add an ADD parameter with that item ID to the
Yes URL:
<Offsite Confirm Yes URL>?ADD=BOTTLE-1
<Offsite Confirm Yes URL>?ADD=BOTTLE-3
<Offsite Confirm Yes URL>?ADD=BOTTLE-6
If the Yes URL already contains a ?, use &ADD= instead. The decline link stays the plain
Offsite Confirm No URL.
- List every item the page offers in Upsell Item Id's. The first one is added when the Yes
link has no
ADDparameter. - The Yes URL passes on only the
ADDparameter. It ignoresQUANTITY, options, and variations, so give each package its own item ID (a separate item or a kit) instead of linking to one item with different quantities. - Set the price on each item instead of using Arbitrary Unit Cost. Arbitrary Unit Cost gives every item added by the offer the same price.
- Each Yes link adds one item and ends the offer. To offer a second, unrelated product, such as an add-on, create another offer later in the path.
To compare layouts, create one offer per external page, each with its own Offsite Content URL. Each storefront has its own upsell paths, so different storefronts can use different pages.
| Field | What it does |
|---|---|
| Offsite Content URL | The URL of the external content. |
| Offsite Confirm Yes | Generated confirmation URL used when the customer accepts. Add ADD=<item ID> to choose which item is added (see Offer a choice of items). |
| Offsite Confirm No | Generated confirmation URL used when the customer declines. |
Offsite Content URL only appears in the offer editor when the path's Flow Location is set to Post Checkout.
Customer attributes with AtData
AtData, formerly TowerData, provides demographic and behavioral data about an email address, which you can then use as an upsell trigger. Age and gender are the two attributes UltraCart uses.
Set up an account
- Sign up at AtData.
- Configure an API key in their system. Each data point costs money, so enable only the attributes you plan to use.
- In UltraCart, go to Configuration → Integrations → AtData Email Intelligence, paste the API key, and save.
Use it in upsells
Age and gender become available as triggers on the path:
and on the offer, under Advanced Settings:
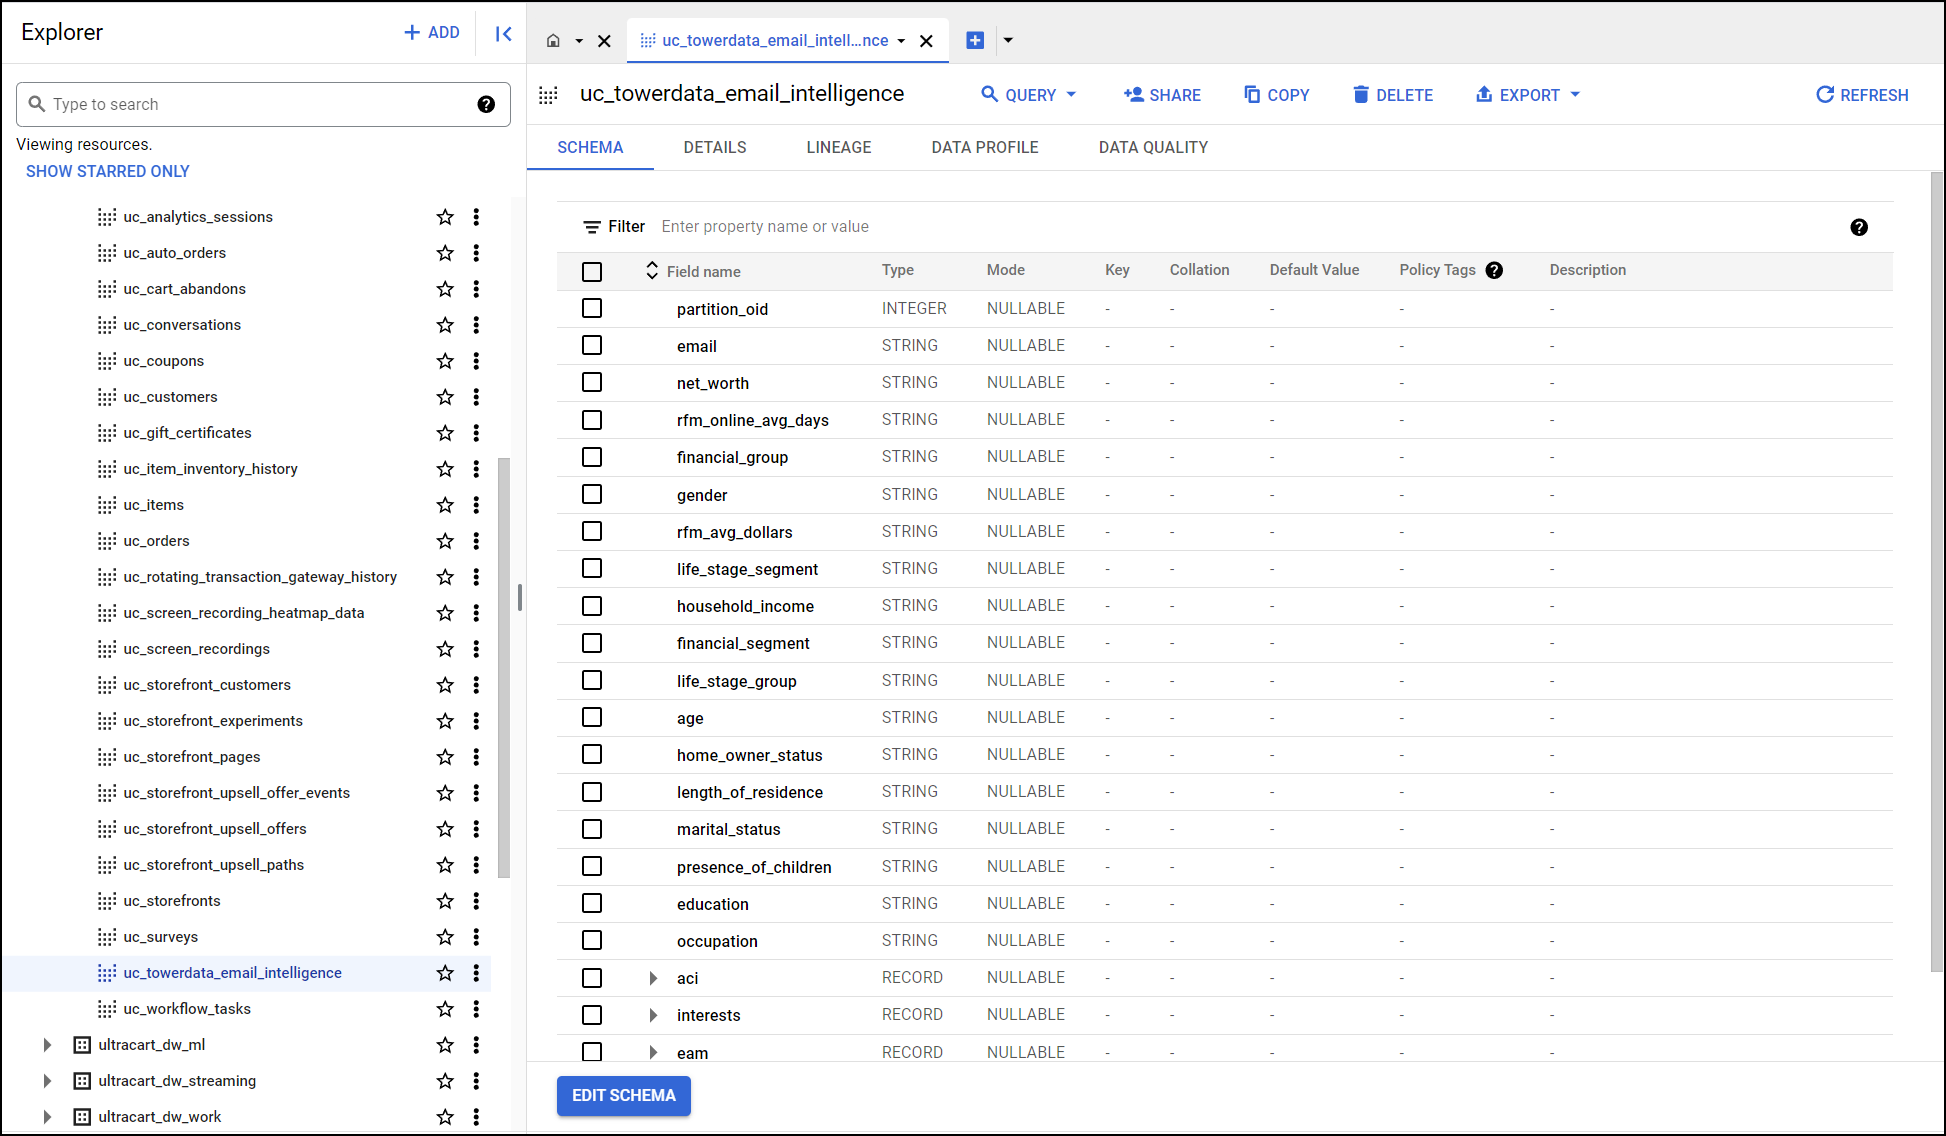
The data is also stored in the BigQuery Data Warehouse, so you can use it in your own analytics. Only the attributes you pay AtData for are populated.
How often is AtData queried for a given email? Once per year. After that, the next purchase by that customer triggers a fresh lookup.
Can data be back-filled? Yes. Some merchants buy bulk credits from AtData to cover their existing customer base. Contact UltraCart Support to arrange it.
Legacy checkouts without the Visual Builder
Upsell After also existed for legacy screen branding theme checkouts and storefronts without a Visual Builder theme. The page that documented it contained no content, only transclusion placeholders pointing at pages that no longer exist.