StoreFront Locations
Overview
StoreFront Locations is the built-in Store Locator: a page on your StoreFront where shoppers type a ZIP code or an address and see your nearest physical locations on a Google map. If you sell both online and in person, it closes the gap between the two, because a shopper who lands on your StoreFront can still find a real place to visit.
You manage the locations in the StoreFronts admin, on the Store Locator tab. The Store Locator page on your StoreFront reads them from there, so a location you add appears on the page without any change to the page itself.
The Store Locator is a good fit for:
- Retail chains, so a shopper in any city finds the nearest store.
- Franchise and dealer networks, so a shopper finds the nearest authorized franchisee or dealer.
- Showrooms, pickup counters and service centers, even without a traditional retail store.
- Seasonal and pop-up sellers, who add a location when a pop-up opens and delete it when it closes.
What shoppers can do on the Store Locator page
The page answers one question for a shopper: where is the nearest place I can go?
- Search from where they are. The browser asks to share the shopper's location. If they allow it, the page searches from there and fills the search box with their ZIP code or city.
- Search a ZIP code or an address. Typing one and pressing Enter, or clicking the search button, moves the search to that place.
- Limit the results by distance (for example 25, 50 or 100 miles) and by how many results to show, using the two drop-down menus.
- Filter by tag, when your locations carry tags. Tag check boxes appear automatically.
- See drive times. Each result shows the driving distance and drive time, and the list is ordered by drive time. This needs a Google service that not every key can use; see Connect Google Maps.
- Get directions. Get Directions on a result draws the route on the map with turn-by-turn steps. On a phone, Navigate opens Google Maps.
- Move the search point. Dragging the yellow "You are here" marker re-runs the search from where it is dropped.
The distance limit is a straight-line distance, while the row shows the driving distance, so a row can read "112 mi" under a 100-mile limit. That is expected.
Open the Store Locator
The Store Locator tab is where you add, edit and delete locations and enter your Google Maps API key. Go to Main Menu → StoreFronts, then click the Store Locator tab.
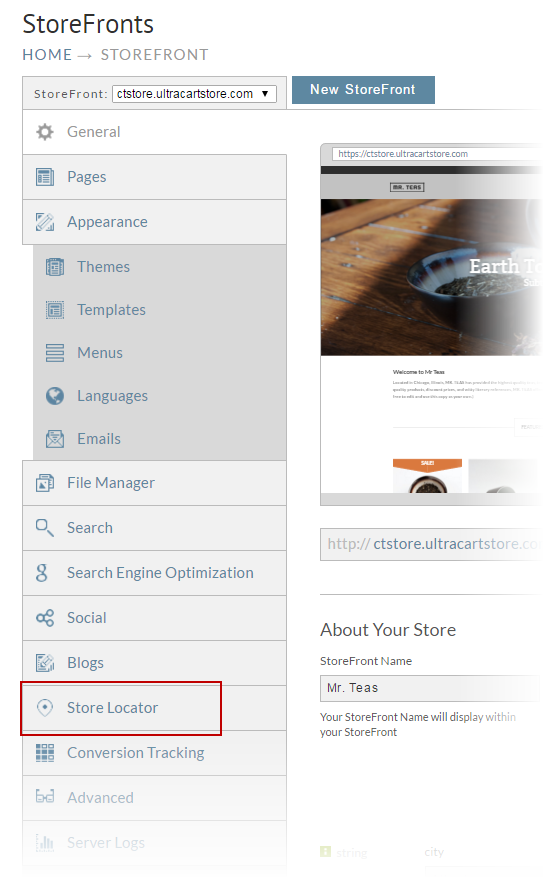
If you haven't added any locations yet, the screen shows a New Location button and a Settings button. Settings is where your Google Maps API key goes; see Connect Google Maps.

Add a location
Each location is one address, with the latitude and longitude that place it on the map. To add one:
- On the Store Locator tab, click New Location.
- Fill in the name, address and contact details. Shoppers see these in the results list and in the marker's pop-up on the map.
- Check the latitude and longitude. The window looks them up from the address as you type, using a small map beside the form.
- Add any tags you want shoppers to filter by. Pick each tag from the tag box's drop-down with your mouse: pressing Enter in the tag box closes the window without saving.
- Click save. The location appears in the list with edit and delete buttons.
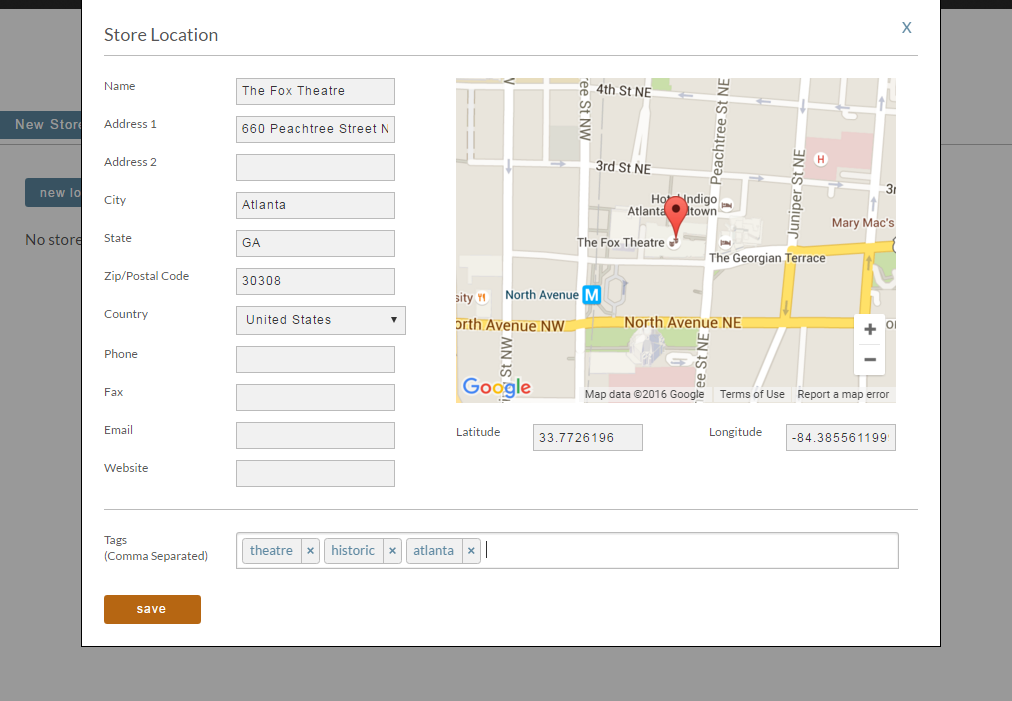
If the small map in the New Location window doesn't load, the latitude and longitude are not filled in for you. Look them up yourself: in Google Maps, find the address, right-click the spot, and click the coordinates at the top of the menu to copy them. Paste the two numbers into the latitude and longitude fields. A location with wrong coordinates appears in the wrong place and at the wrong distance.
Connect Google Maps
The Store Locator page draws its map, finds typed addresses, works out drive times and draws directions with Google Maps, so it needs a Google Maps API key: a code from your own Google Cloud account that Google bills your usage to.
On a *.ultracartstore.com or *.ultracartdev.com address with no key entered, the page uses a
shared UltraCart demo key, so you can try the Store Locator before you set anything up. The demo
key only works on those addresses. Once your StoreFront is on its own domain, the page shows
"Sorry, the Store Locator feature is not available on your StoreFront until you configure your
Google Maps API Key under StoreFront -> Store Locator -> Settings." until you add your own key.
1. Create a Google Cloud project with billing
In the Google Cloud console, create a project for your StoreFront, or use one you already have, and link a billing account to it. Google refuses address lookups from a project without billing, even when your usage stays within Google's monthly free credit.
2. Turn on the Google Maps APIs the page uses
In the project, go to APIs & Services → Library and enable:
- Maps JavaScript API, for the map and its markers.
- Geocoding API, for typed ZIP codes and addresses, and for filling the search box from the shopper's location.
- Routes API, for drive times on each result and for the route and turn-by-turn steps behind Get Directions.
An older project may already have the legacy Distance Matrix API and Directions API enabled. The Store Locator uses those when the Routes API isn't enabled, so an existing setup keeps working. Google no longer offers the legacy services to new projects, so enable the Routes API on any new project. Without either, the Store Locator still works: results show straight-line miles in nearest-first order, and Get Directions offers an Open in Google Maps link instead of drawing the route. The Store Locator Google Maps Services reference lists exactly what each one does and what shoppers see without it.
You don't need the Places API. The page loads Google's places library, but the Store Locator never calls it.
3. Create and restrict the API key
Go to APIs & Services → Credentials and create an API key, following Google's Use API Keys guide. Give it a name you will recognize later, then restrict it so that a key copied from your page source can't be used anywhere else:
-
Application restrictions: choose Websites, and add every address your Store Locator page is served on, with a
/*wildcard for the path. For example:https://www.example.com/*https://example.com/*https://demo4.ultracartstore.com/*Without the wildcard, Google refuses every page and the browser console shows
RefererNotAllowedMapError. Google ignores query strings and fragments when it matches, so links with UTM parameters match the same as a bare address. -
API restrictions: if you restrict the key to certain APIs, tick every API you enabled in step 2. An API that is enabled on the project but missing from this list is refused with "This API key is not authorized to use this service or API".
A new key, or a change to one, can take a few minutes to take effect.
4. Enter the key in UltraCart
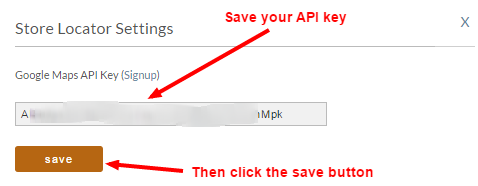
- Go to Main Menu → StoreFronts → Store Locator and click Settings.
- Select the StoreFront in the list. Each StoreFront has its own key, so repeat this for every StoreFront with a Store Locator page.
- Paste the key into the Google Maps API Key field and save.
5. Rebuild the Store Locator page
The key is built into the Store Locator page when the page is saved, so a page built before you changed the key keeps using the old one. Open the Store Locator page in the Visual Builder, make a small change, and save it. You can undo the change and save again afterwards.
6. Check that it works
Open your Store Locator page in a private browser window and check that:
- the map draws, with a marker for each location;
- typing a ZIP code and pressing Enter moves the search and updates the list;
- allowing the browser's location fills the search box with your ZIP code or city;
- results show drive times, and Get Directions draws a route with numbered steps, if you enabled the Routes API (or the legacy Distance Matrix and Directions APIs on an older project).
If something is missing, open the browser's developer console (F12) and compare the message with the Store Locator Google Maps Services reference.
Keep Google Maps costs under control
Google bills each map load, address lookup, drive-time request and route to your Google Cloud account, and Google has no hard spending cap. Two settings keep a surprise bill from happening:
- A daily limit per API. In APIs & Services, open each API, go to Quotas & System Limits, and lower the requests-per-day limit to what your traffic needs.
- A budget alert. In Billing → Budgets & alerts, create a budget for the project so Google emails you as spending approaches it.
The website restriction from step 3 also matters here: it stops other sites from running up usage on your key.
Mass import locations
For a large set of locations, email a spreadsheet of the locations to support@ultracart.com, with your UltraCart Merchant ID and a request to import them into your account. Allow 1 to 2 business days after you send it. UltraCart has no API for adding locations, so a spreadsheet import or the New Location window are the two ways to add them.
Related
- Store Locator Google Maps Services lists each Google service the page uses, what shoppers see without it, and the console messages to look for.
- StoreFront Menus covers adding a link to your Store Locator page from your StoreFront's navigation.
- StoreFront Search covers the product search box, which is separate from the location search on the Store Locator.