StoreFront Pages
Your StoreFront is a tree of pages: a home page, the pages under it, and the pages under those. Information pages such as About, Help, and Contact sit in the same tree as your shop pages and your blog, so you build marketing and information pages on the same screen you use for the rest of your store.
Each page has a template, and the template decides what the page renders. That is why a shop page lists products and a blog page lists posts without you laying either out by hand. Change the template and you change what the page does.
Navigate: Main Menu → StoreFronts → [select your StoreFront] → Content → Pages
The Pages screen
The screen shows your page tree, starting with Home. Each row shows the page title and its address, with buttons on the right:
| Button | What it does |
|---|---|
| edit this page (pencil) | Opens the page's settings and content below its row. |
| preview this page | Opens the page on your StoreFront in a new tab. |
| duplicate this page | Makes a copy of the page. |
| add a child page (+) | Adds a new page underneath this one. |
| delete this page | Deletes the page and every page under it. |
A blue icon on the left of a row means the page has child pages. Click it to show or hide them.
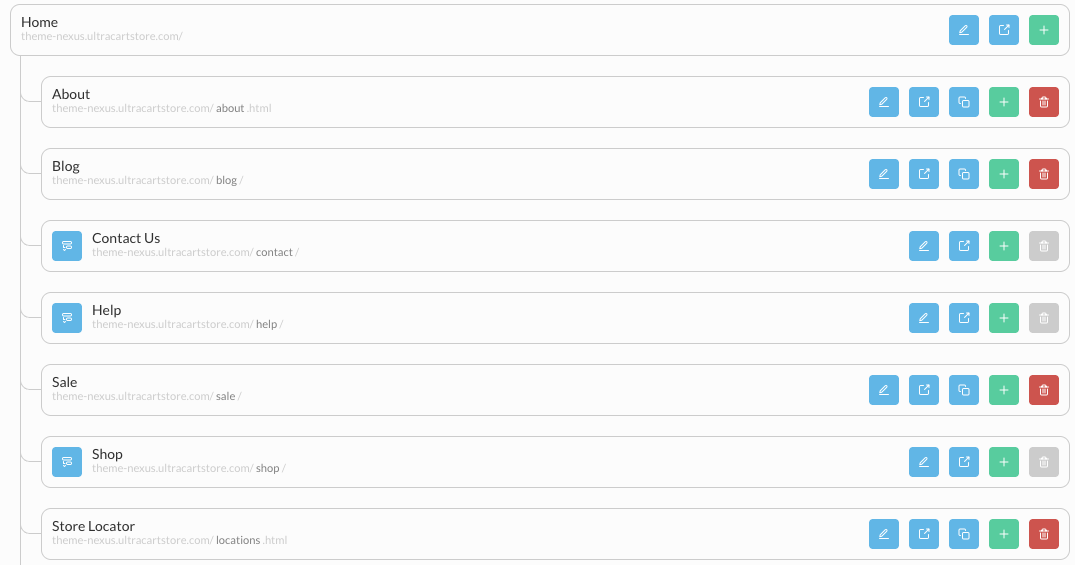
Home has no delete button, and some other pages show it greyed out. Those pages cannot be deleted from this screen.
Add a page
-
Find the page the new page should sit under. For a top-level page, use Home.
-
Click add a child page (+) on that row.
The new page is created straight away, named New Page, with an address such as
new_page_1and the parent's template. Its editor opens with the title selected.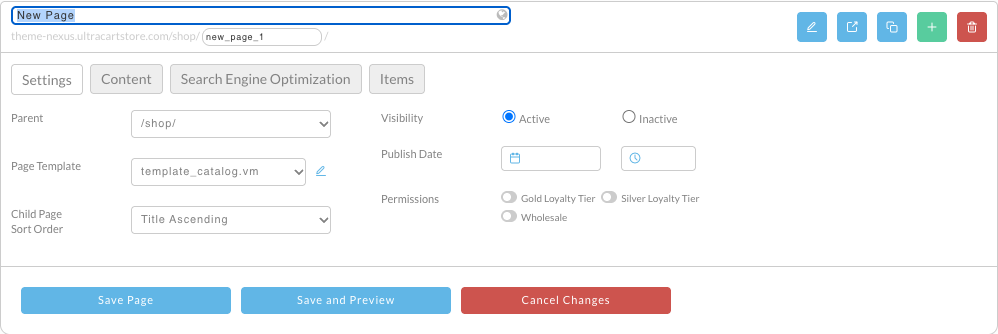
-
Type the page title, and change the address in the box below it.
-
Pick a Page Template if the page needs a different one. See Apply a different template.
-
Click Save Page, or Save and Preview to open the result in a new tab.
Cancel Changes does not remove the new page, because it already exists once you click +. If you added a page by mistake, delete it. See Delete a page.
Page settings
Click edit this page on a row to open its editor. The Settings tab holds the controls that apply to every page:
| Setting | What it does |
|---|---|
| Parent | The page this one sits under. Choose a different parent to move the page. |
| Page Template | The template that renders the page. The pencil beside it opens the template. |
| Child Page Sort Order | The order of the pages under this one. See Order child pages. |
| Visibility | Active shows the page. Inactive hides it. |
| Publish Date | A date and time for the page. |
| Permissions | One switch per pricing tier. See Restrict a page to a pricing tier. |
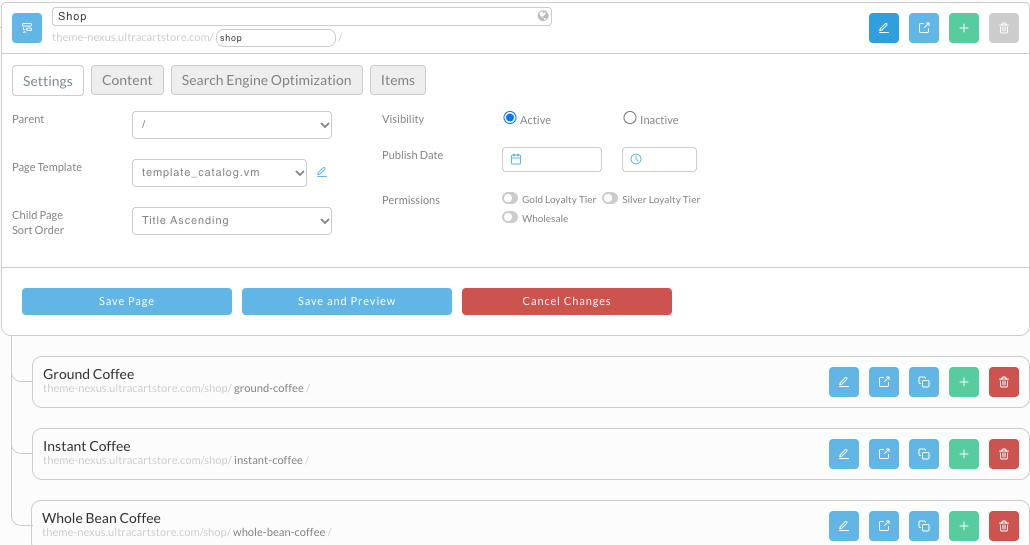
Changes on the Settings and Content tabs wait until you click Save Page or Save and Preview. Cancel Changes discards them and closes the editor.
Some pages have more tabs than others. A blog page adds Blog Posts, and a shop page adds Items. Every page has Content and Search Engine Optimization.
Apply a different template
- Click edit this page on the page's row.
- On the Settings tab, choose a template from Page Template.
- Click Save Page, or Save and Preview to see the result.
Hide a page
A page can exist without being visible. Hiding is useful for a page you are still building, or a landing page you only want reached from a campaign link.
- Click edit this page on the page's row.
- Set Visibility to Inactive.
- Click Save Page.
A hidden page stops appearing on your StoreFront and under its parent, but keeps its content and its address. Set it back to Active to show it again.
Order child pages
Child Page Sort Order controls the order of the pages under a parent. Set it on the parent, not on the children.
- Click edit this page on the parent page.
- Choose an order from Child Page Sort Order: Title Ascending (the default), Title Descending, Description Ascending, Description Descending, or Custom.
- Click Save Page.
Arrange child pages by hand
Choosing Custom lets you drag pages into the order you want.
- Set the parent's Child Page Sort Order to Custom and save.
- Click the blue icon on the parent's row to show its children.
- Drag a child page's row up or down to its new position.
The new order is saved as soon as you drop the row, with no need to save the page. Refresh your StoreFront to see it.
If you later switch the parent back to one of the other sort orders, that order takes over again.
Page order does not control your navigation menus. Menus are managed separately under Content → Menus.
Restrict a page to a pricing tier
Permissions limit a page and its content to customers in a particular pricing tier. There is one switch for each pricing tier on your account, so the switches only appear once you have at least one. See Pricing Tiers to set one up.
- Click edit this page on the page's row.
- Under Permissions, turn on the switch for each pricing tier that should have access.
- Click Save Page.
The page is then reachable only by a customer logged in under one of those pricing tiers.
Delete a page
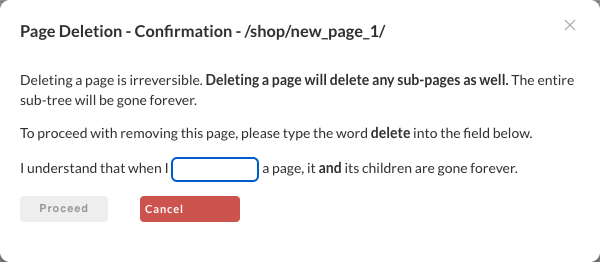
Deleting a page also deletes every page under it, and it cannot be undone.
- Click delete this page on the page's row.
- Type
deletein the confirmation box. Proceed stays unavailable until you do. - Click Proceed.
Edit a page's content
Your theme decides which content settings a page offers, and what kind of value each one takes. That is why two pages on the same StoreFront can show different settings.
-
Click edit this page on the page's row, then open the Content tab.
-
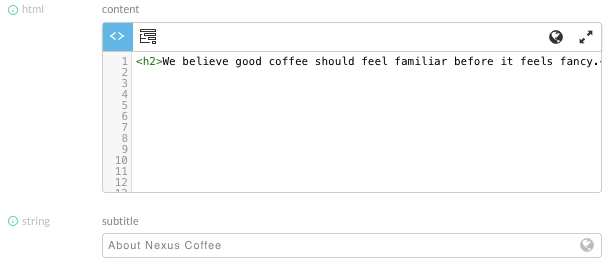
Fill in the settings. Each one is labelled on the left with its type: html for markup, string for a single line, and multiline for a few lines of plain text.
-
Click Save Page, or Save and Preview to see the result.
Use HTML only in an html setting. A string setting holds plain text.
A setting labelled orphan, outlined in red, has a value saved on the page that the current template no longer uses. This usually happens after a template change or a theme switch. An orphan setting is not shown anywhere on your StoreFront, so editing it changes nothing. Use the delete button beside it to remove it.
The globe icon on a setting opens its translations. See How to translate Page, Item or Blog Post text.
The HTML editor
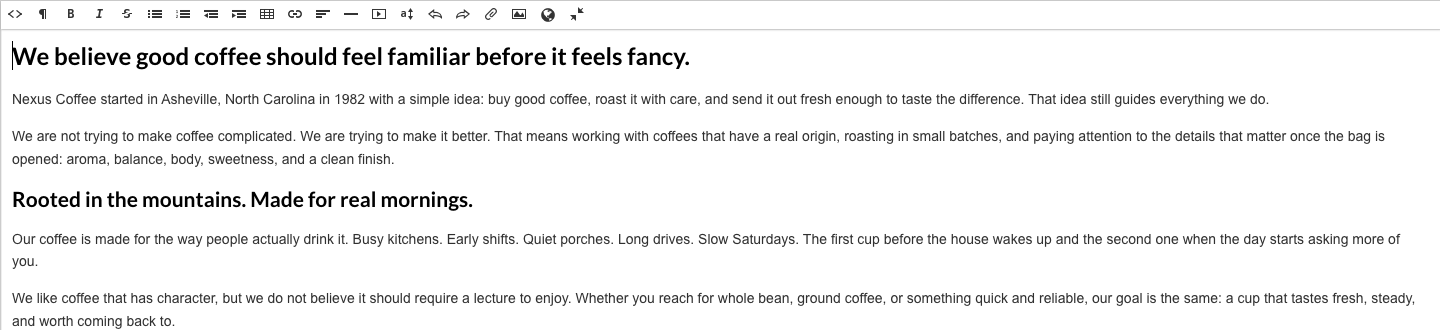
An html setting opens in a code editor with four buttons in its toolbar:
| Button | What it does |
|---|---|
WYSIWYG (<>, far left) | Switches between the code editor and a formatted, word-processor style editor. |
| Beautify | Tidies the indentation of the markup. |
| Translations (globe) | Opens the setting's translations. |
| Toggle Full-screen (far right) | Expands the editor to fill the browser window, and back. |
Fix mismatched HTML
On a responsive site, an unclosed div or one closing tag too many can break the whole page
layout. The code editor points these out by showing a tag with no partner in red.
- Click Toggle Full-screen in the editor's toolbar, so you can see the whole of the markup.
- Look for tags shown in red, and fix them.
- Click Toggle Full-screen again, then save the page.

If Save and Preview appears to do nothing, check that your browser is not blocking popups on
secure.ultracart.com. Blocked popups usually show a warning in the address bar.
"Parent page template does not support child pages"
This warning in the page editor means the parent's template does not automatically render links to its children. It is not necessarily a problem.
Templates differ in how they link onward. A home page template might contain four menus, whose links come from Content → Menus, plus one section listing the items assigned to the home page. None of those automatically pick up a new child page.
If you want the page linked from its parent, add it to one of the menus and the warning clears. If the page is a landing or promotional page you deliberately do not want linked, ignore the warning. That is a normal thing to want.
Home page slider
Some themes, including Mr. Teas, put a slider on the home page. You set it up on the Home page's Content tab, like any other page content: click edit this page on Home, then open Content and find the home slider setting.
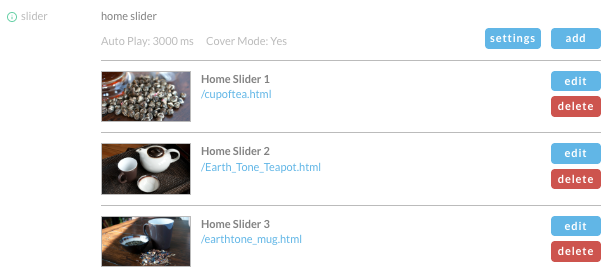
The setting shows its current options, then one row per slide.
- settings opens the slider's options.
- add adds a slide.
- edit on a slide opens the Slide Editor, and delete removes the slide.
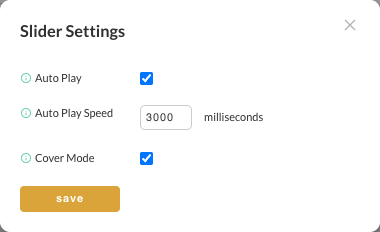
Slider settings
| Setting | What it does |
|---|---|
| Auto Play | Moves to the next slide on its own once the page loads. |
| Auto Play Speed | Time between slides, in milliseconds. 3000 is three seconds. |
| Cover Mode | Fills the whole slider area with each image. See below. |
Cover mode fills the slider area with the image whatever its dimensions, scaling it, keeping its aspect ratio, and centering it, without causing scrollbars. It crops to do this: a 500 x 1000 image is fitted to the full width and cropped top and bottom, and a 1000 x 500 image is fitted to the full height and cropped left and right. The cropping is recalculated as the browser or screen size changes.
Slide Editor
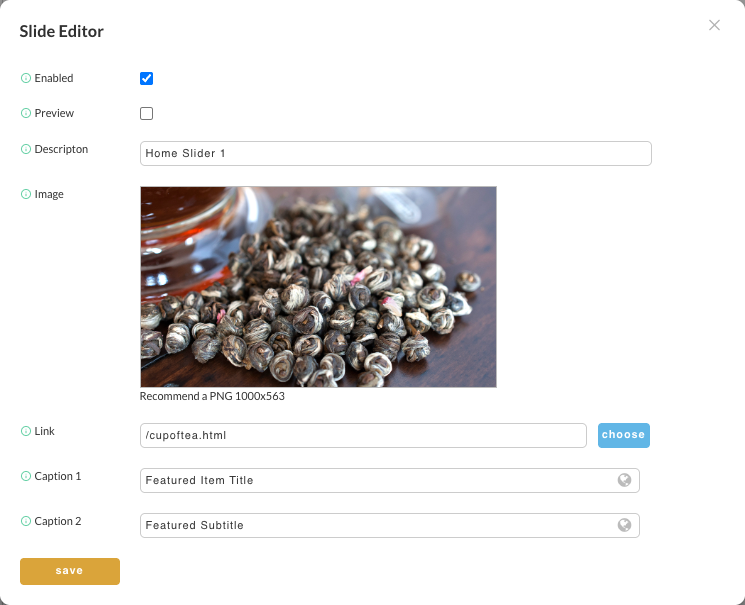
| Field | What it does |
|---|---|
| Enabled | Clear it to stop the slide from showing. |
| Preview | When checked, only you, signed in to UltraCart, can see the slide. Use it to test a new slide before customers see it. |
| Descripton | A name for the slide, shown in the slide list. The label is misspelled in the admin. |
| Image | The slide image. A PNG around 1000 x 563 pixels works well, and keep it no wider than 1920 pixels. |
| Link | The address a customer goes to when they click the slide. choose lets you pick it instead of typing it. |
| Caption 1 | The main text shown over the image. |
| Caption 2 | Secondary text shown over the image. |
Put words in the captions rather than into the image itself. Caption text can be translated, and you can change it without making a new image.
Next steps
- File Manager for the files behind these pages: templates, stylesheets, and images.
- How StoreFronts resolves a URL explains why a given address lands on a given page, which is worth knowing before you rename anything.
- Product and Group Pages for the pages StoreFronts creates from your catalog, rather than the ones you add by hand.
- Images for uploading artwork and the sizes each theme expects.