Scheduling Campaigns with the Campaign Calendar
Last Updated: June 9, 2026
The Campaign Calendar is a visual scheduling view for your email campaigns in StoreFront Communications. It shows every scheduled, sending, and sent campaign on a month, week, or agenda layout, marks holidays so you can plan around them, and surfaces each campaign's approval and activation status so you can tell at a glance whether a scheduled campaign will actually send. This guide covers how to schedule a campaign and how to use the calendar and the related "Upcoming" widget.
Overview
Scheduling lives in two places that work together:
-
The Campaign Calendar (the Campaign Calendar page), a full month/week/agenda view of everything on your sending schedule.
-
The Upcoming widget on the Communication dashboard, a short list of what is going out in the next 30 days.
Both show the same core information for each campaign: when it is set to send, whether it is recurring, and the all-important review status that tells you whether it is actually cleared to go out.
All times in the calendar and scheduling tools are shown in Eastern Time (ET). The calendar header displays "Times shown in ET" as a reminder.
Scheduled Does Not Mean It Will Send
This is the single most important thing to understand about scheduling. Picking a send date and time does not, on its own, guarantee a campaign goes out. Two separate gates must both be cleared first:
-
The email must be approved. Email campaigns are submitted to UltraCart for review. Until the email is approved, a scheduled campaign will not send.
-
The campaign must be activated. Even after the email is approved, the campaign itself has to be activated (out of draft). An approved but un-activated campaign will not send.
The calendar derives a single review status for each campaign from these gates and shows it everywhere the campaign appears. The flow looks like this:
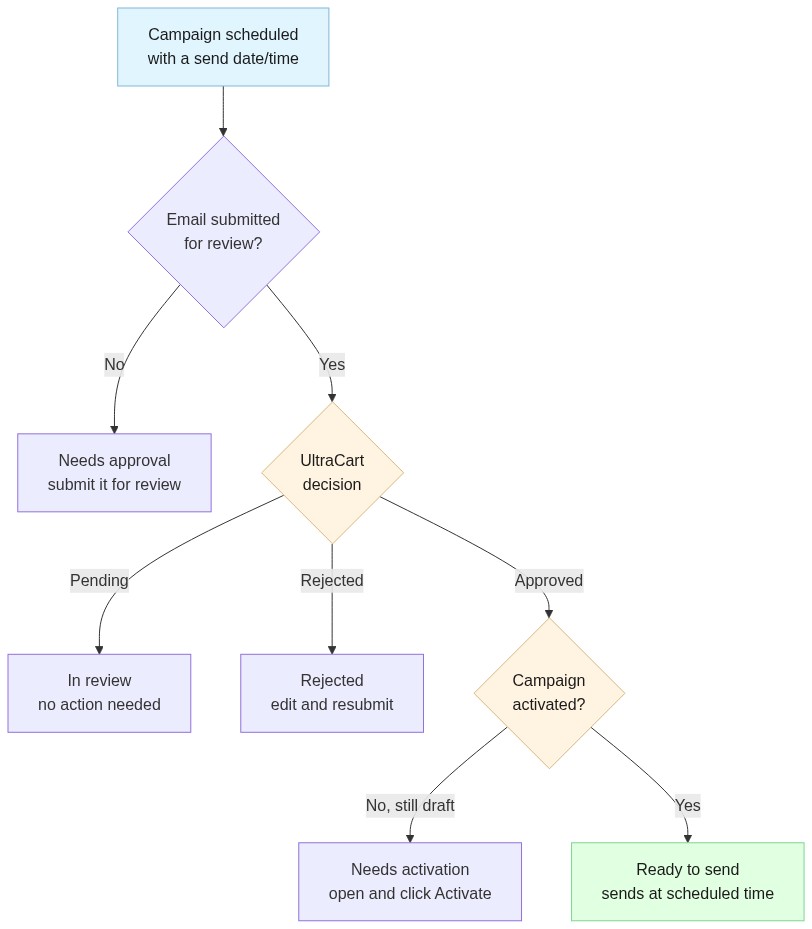
The takeaway: if a campaign shows Needs approval or Needs activation on the calendar, it will not send at its scheduled time until you act. See Reading Status at a Glance for every status and what to do about it.
Scheduling a Campaign
You set a send time on a campaign in the Add Campaign or Edit Campaign dialog.
-
Open a campaign (or create a new one) and find the field When should we send out this campaign?
-
Pick a date and time. The picker uses a 12-hour clock in 5-minute steps and will not let you choose a time in the past. Times are in Eastern Time.
-
Scheduling is optional. The field's helper text reads "Scheduling is optional"; a campaign with no send time stays a draft until you schedule or send it manually.
| Field | What it does |
|---|
| Control | What it does |
|---|---|
| Previous / Next | Move back or forward one month or week. |
| Today | Jump to the current date. |
| Month / Week | Switch the view (desktop). |
| New Campaign | Start a new campaign (see below). |
| Folder | Filter the calendar to a single campaign folder. Defaults to All. |
| Show sent | Include campaigns that have already gone out. Off by default. |
| Times shown in ET | A reminder that all times are Eastern. |
Campaign chips
Each campaign appears as a chip on its scheduled day (and hour, in week view). A chip shows:
-
The campaign name.
-
The send time, for example "9:30 AM".
-
A (recurring) label and a dashed border if it repeats.
-
A status dot whose color reflects the campaign's lifecycle (see Reading Status at a Glance).
-
A review badge when a scheduled campaign still needs attention before it can send.
Click a chip to open that campaign. Hover a chip (desktop, month or week view) to open a preview popover with the email image, the send time, the target lists, recurrence, and a plain-language explanation of the campaign's review status. The popover includes a Click to open link.
Creating a Campaign from the Calendar
There are two ways to start a campaign directly from the calendar:
-
New Campaign button (header): opens the new-campaign flow with no preset time.
-
Week-view time slot: in week view, hovering an hour slot reveals a Create Campaign button (a small plus on occupied slots, a full button on empty ones). Clicking it starts a new campaign pre-filled with that day and time as the scheduled send. The tooltip reads, for example, "Create campaign at Mon Jan 15, 9:00 AM".
This is the fastest way to slot a new campaign into an open time: find the gap in week view and click it.
Reading Status at a Glance
Two pieces of color-coding appear on the calendar.
Status dot (campaign lifecycle)
The colored dot on each chip reflects where the campaign is in its lifecycle:
| Dot color | Meaning |
|---|---|
| Gray | Draft |
| Blue | Scheduled |
| Orange | In flight (preparing or sending) |
| Green | Sent or completed |
| Red | Archived |
Review status (will it send?)
The review badge answers the more important question: is this scheduled campaign actually cleared to send? These are the possible states, the badge label you will see, and what to do:
| Badge | Color | Meaning | What to do |
|---|---|---|---|
| Checking status… | Gray | The status is still loading. | Wait a moment. |
| Needs approval | Red | The email has not been submitted for review yet. | Open the campaign and submit it for approval. It will not send until approved. |
| In review | Orange | Submitted and awaiting UltraCart review. | Nothing. UltraCart will approve it before the scheduled send time. If it is not approved in time, it will not send. |
| Rejected | Red | UltraCart rejected the email during review. | Edit the email and resubmit it for review. |
| Needs activation | Orange | The email is approved, but the campaign is still a draft. | Open the campaign and click Activate so it sends at the scheduled time. |
| Ready to send | Green | Approved and activated. | Nothing. The campaign will send at the scheduled time. |
| No email step | Gray | The campaign has no email step to review. | Add an email step to the campaign. |
A campaign only reaches Ready to send when every email in it is approved and the campaign has been activated. This is why a campaign can be scheduled and still show a warning badge.
Holidays on the Calendar
The calendar marks common United States holidays so you can plan sends around (or onto) them. Holidays appear as small labels on their day in every view. They are informational only: they do not block scheduling.
Holidays fall into three types, distinguished by their label color:
| Type | Examples |
|---|---|
| Public (federal) | New Year's Day, Martin Luther King Jr. Day, Presidents' Day, Memorial Day, Juneteenth, Independence Day, Labor Day, Columbus Day, Veterans Day, Thanksgiving Day, Christmas Day |
| Observance (cultural) | Valentine's Day, St. Patrick's Day, Easter, Mother's Day, Father's Day, Halloween |
| Retail (commercial) | Black Friday, Cyber Monday, Christmas Eve, New Year's Eve |
When a fixed-date public holiday lands on a weekend, the calendar also marks the observed date (for example, "Christmas Day (observed)" on the nearest weekday), shown with a dashed label.
The Upcoming Widget
On the Communication dashboard, the Upcoming widget gives you a quick read on what is going out soon without opening the full calendar.
-
It lists campaigns scheduled in the next 30 days, up to seven of them.
-
A headline reads "Next communication: [time until send] · [review status]", for example "Next communication: in 2 days · Needs activation".
-
Each row shows the campaign name, send time, a relative time ("in 2 days"), a (recurring) label where applicable, a status dot, and the same review badge used on the calendar.
-
Click any row to open that campaign.
-
The relative times refresh automatically each minute.
If nothing is scheduled, the widget reads "Nothing scheduled in the next 30 days." with View Calendar and Create Campaign buttons.
Verification
To confirm scheduling end to end:
-
Create or open a campaign and set When should we send out this campaign? to a near-future time.
-
Open the Campaign Calendar and confirm the campaign appears as a chip on the right day and time (switch to Week view to check the hour).
-
Read the review badge. Submit the email for approval and activate the campaign, then confirm the badge moves to Ready to send (green).
-
Check the Upcoming widget on the Communication dashboard and confirm the campaign appears with the same status.
-
Hover the chip (desktop) to confirm the preview popover shows the correct lists and send time.
Troubleshooting
A scheduled campaign did not send
Cause: The campaign was not at Ready to send. A scheduled time alone does not send a campaign.
Fix: Open the campaign and check its review badge. If it reads Needs approval, submit the email for review. If it reads Needs activation, click Activate. The campaign must be both approved and activated before the scheduled time.
My campaign reverted to draft
Cause: The scheduled date was cleared on a campaign that was in the scheduled status, which returns it to draft.
Fix: Re-set the send date, then re-activate the campaign so it returns to Ready to send.
The times look an hour or more off
Cause: All scheduling and calendar times are in Eastern Time (ET), not your local time zone.
Fix: Read and set times as ET. The calendar header shows "Times shown in ET" as a reminder.
A holiday is marked on the wrong day
This is expected for observed holidays. When a fixed-date public holiday falls on a weekend, the calendar marks the observed weekday with a dashed "(observed)" label in addition to the actual date.
Related Documentation
-
StoreFront Communications - The campaigns, flows, and email tools the calendar schedules.
-
Submitting Emails for Review - The approval step that gates whether a scheduled campaign can send.
-
Activating a Campaign - Taking a campaign out of draft so it sends at its scheduled time.