Overview
A flow is a communication sequence that is triggered by an event for an individual customer. This is primarily by email (“Email Flow”), however, there may also be postcard flows. Once triggered the flow will move through the defined sequence of steps to market to the customer. In the past the industry has referred to this type of marketing as “auto responders”.
Creating a Flow
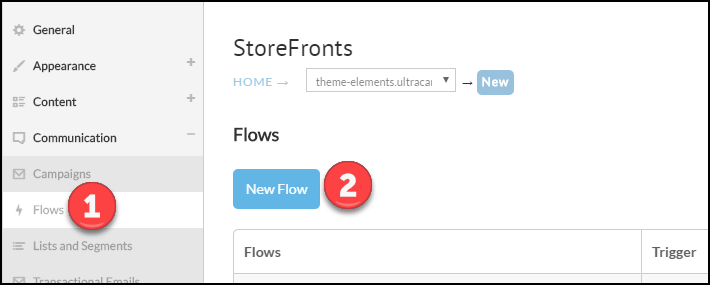
Navigate to the Flows sub-menu under Communications and click on New Flow as shown below.
The new flow dialog will appear as shown below.
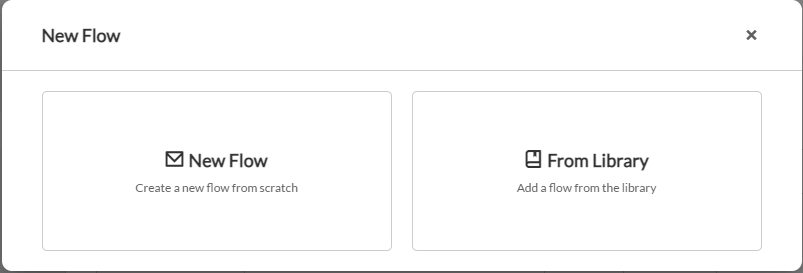
Choose to create a new flow from scratch or choose a built in flow from the Public Library.
For a new flow you’ll be presented with the following form:
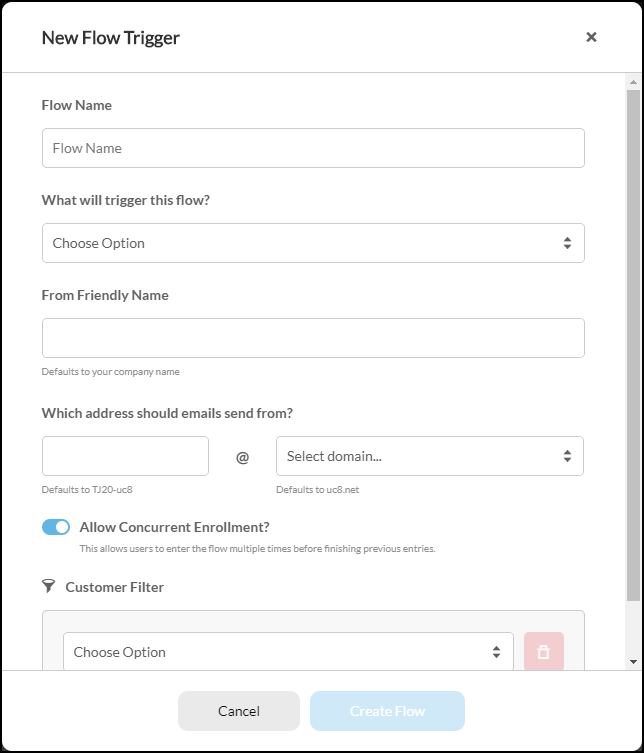
A description of all of the fields in the Flow Editor
| Field | Values | Description |
|---|
| Button | Description |
|---|---|
| Drain | Allows the Flow to stop accepting new entrants while continuing to process customers already in the Flow until completion. Useful for safely retiring a Flow without abruptly stopping in-progress communications. |
| Test Flow | Simulates the Flow logic using test data. This helps validate branching, timing, and conditions without impacting real customers. |
| Test Emails | Sends test versions of email steps within the Flow to a specified email address. This is useful for verifying formatting, content, and personalization variables. |
| Undo | Reverts the most recent change made in the Flow editor. Multiple undo actions may be available depending on session history. |
| Save | Saves all current changes to the Flow configuration. Changes are not applied until saved. |
| Take Offline | Immediately disables the Flow. No new customers will enter, and existing participants will stop progressing through the Flow. |
| Pause Flow | Temporarily pauses the Flow. Customers will continue to be enrolled into the first step for the flow. Existing customers remain in their current step but will not advance until the Flow is resumed. |
When to Use Each Action
-
Use Drain when replacing or retiring a Flow but you want existing customers to complete the sequence.
-
Use Pause Flow for temporary stops (e.g., promotions, troubleshooting).
-
Use Take Offline when you need to immediately halt all activity.
-
Use Test Flow / Test Emails before activating or modifying live flows to ensure correct behavior.
-
Use Save frequently to avoid losing configuration changes.
Flow Triggers
The trigger is the event that enrolls a customer in a flow. You choose it in the What will trigger this flow? field when you create the flow, and a customer filter on the flow can narrow who enters.
| Category | Trigger |
|---|---|
| Order | Order - When an order is shipped |
| Order | Order - When someone creates an order |
| Order | Order - When a payment fails to process |
| Order | Order - When a payment successfully processes |
| Order | Order - When someone purchases a product |
| Order | Order - When someone has reviewed an item |
| Order | Order - When someone has not reviewed an item |
| Order | Order - When an order is out for delivery |
| Order | Order - When an order is delivered |
| Order | Order - When an expected delivery date becomes available or changes |
| Auto Order | Auto Order - When someone subscribes to an auto order |
| Auto Order | Auto Order - When an auto order has a pre-shipment notice |
| Auto Order | Auto Order - When an auto order is cancelled |
| Auto Order | Auto Order - When an auto order is paused |
| Auto Order | Auto Order - When an auto order is resumed |
| Auto Order | Auto Order - When an auto order is disabled |
| Auto Order | Auto Order - When an auto order shipment is skipped |
| Auto Order | Auto Order - When an auto order shipment is rescheduled |
| Auto Order | Auto Order - When an auto order frequency is changed |
| Cart | Cart - When someone abandons a cart |
| Cart | Cart - When someone adds items to a wishlist without checking out |
| Cart | Cart - When someone's software will expire in one month |
| Cart | Cart - Auto order disable recovery |
| Cart | Cart - When an item comes back in stock |
| Cart | Cart - When an item should be replenished |
| Cart | Cart - When someone opts-in for marketing |
| Customer | Customer - Wholesale Signup |
| Customer | Customer - Wholesale Approval |
| Customer | Customer - Shared Coupon |
| Customer | Customer - Monthly store credit statement |
| Customer | Customer - When someone uses store credit |
| List | List - When someone is added to a list |
| List | List - When someone is removed from a list |
| Segment | Segment - When someone is added to a segment |
| Segment | Segment - When someone is removed from a segment |
| Survey | Survey - When someone has completed a survey |
Auto order changes made in My Account
Three auto order triggers respond when a customer changes their own subscription through My Account. Use them to confirm the change back to the customer, or to follow up on a skipped shipment before it turns into a cancellation.
-
Auto Order - When an auto order shipment is skipped: the customer skips an upcoming shipment.
-
Auto Order - When an auto order shipment is rescheduled: the customer moves the next shipment to a different date, including choosing to ship it now.
-
Auto Order - When an auto order frequency is changed: the customer changes how often the auto order ships.
These triggers fire for changes a customer makes through My Account, not for edits you make to the auto order in the back office.
The My Account request has to ask for the trigger. If you drive My Account through the REST API, add the fireFlowTrigger=true query parameter to the skip, reschedule and frequency change requests. Requests without it change the auto order but do not enroll the customer in the flow. StoreFront My Account pages do not send the parameter yet.
Flow Enrollment Settings
These settings control who stays in a flow and whether someone can enter it more than once. They appear in the flow dialog below the trigger, both when you create a flow with New Flow and when you click the pencil (Edit Flow) button on the first step of an existing flow.
| Setting | Default | Description |
|---|---|---|
| Remove customers on any purchase | Off | Stops the remaining steps for a customer as soon as they make any purchase. |
| Remove customers on purchase from this flow | Off | Stops the remaining steps for a customer after a purchase attributed to this flow. It is not shown for every trigger type. |
| Allow Concurrent Enrollment? | On for new flows | Lets a customer enter the flow again before they finish an earlier entry. |
| Re-entry | Allow re-entry anytime | Controls whether a customer who already entered the flow can enter it again later. See Limit how often a customer re-enters a flow. |
| Re-entry delay | 90 days | Shown only when Re-entry is set to Allow re-entry after a number of days. A whole number from 1 to 1095. |
The first step of the flow summarizes these settings, for example Concurrent Enrollments NOT Allowed and Re-entry Never.
Limit how often a customer re-enters a flow
Allow Concurrent Enrollment? only looks at entries that are still in progress. Once a customer finishes the flow, or is removed by one of the purchase settings, the next trigger enrolls them again. That is the right behavior for most flows, but not for a flow that hands out a one-time offer. A win-back flow triggered by Order - When someone creates an order would otherwise send the same single-use coupon to a customer every time they order, long after they have used it.
Re-entry closes that gap. Choose one of three options:
- Allow re-entry anytime: the customer enters every time the trigger fires, subject to Allow Concurrent Enrollment?. This is the default and matches how flows have always behaved.
- Allow re-entry after a number of days: the customer can enter again once Re-entry delay days have passed since their last entry.
- Never allow re-entry: the customer enters once and is not enrolled again.
A few details decide how the setting behaves in practice:
- History starts when you turn it on. UltraCart records entries only while Re-entry is set to something other than Allow re-entry anytime. Customers who went through the flow before you changed the setting can enter one more time, and are blocked after that.
- Never means 3 years. Entry history is kept for 3 years after a customer's most recent entry, so Never allow re-entry blocks a customer for 3 years from the last time they entered. The same limit is why Re-entry delay tops out at 1095 days.
- A blocked customer is not enrolled at all. They do not count toward
Total Startedand do not appear in theEmails skippedcount, because no step ran for them. - Switching back to anytime stops recording. Entries made while the flow is set to Allow re-entry anytime are not remembered if you restrict re-entry again later.
For a flow that gives out a one-time coupon, set Re-entry to Never allow re-entry before you activate the flow, so every customer who enters is recorded from the start.
How Image Processing Works
After an image is uploaded to an email flow, UltraCart performs background optimization and makes the image available via CDN. This process typically completes within one to two minutes. During this window:
-
The image URL is already embedded in the email template
-
A test email sent before processing completes will include the URL, but the image may not yet be fully available at that URL
-
Some email clients, particularly iPhone Mail, will fail silently or display a broken image when the asset is not yet available at delivery time
-
Desktop clients and some Android clients may render the image correctly because they are more tolerant of slow or delayed asset availability, or they re-fetch the image when the email is opened
Once processing completes and the CDN propagates the asset, subsequent test sends and all live sends will render correctly.
Best Practices
-
Wait at least one to two minutes after uploading any new image before sending a test email. This ensures the image has fully processed and is available on the CDN.
-
If a test email shows a broken image, send a second test before making any changes. Processing delay is the most common cause and requires no action.
-
Use JPEG or PNG formats for email images. Keep file sizes under 1 MB where possible to reduce processing time and improve email client load performance.
-
Test emails on both desktop and at least one mobile client (iPhone Mail and Gmail on Android cover most merchant customer bases).
Statistics
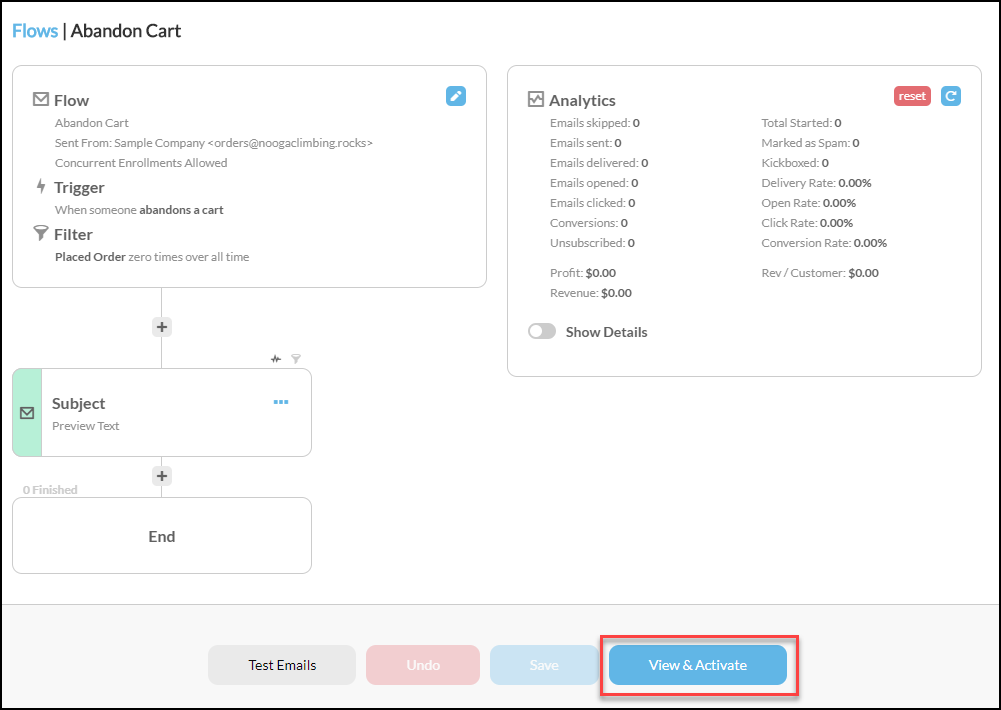
When you are ready to activate your flow, click the Review and Activate button as shown below.
Frequently Asked Questions
Question: How do I configure recipients to a flow?
Answer: You’ll set the flow trigger. Then you can apply additional filtering using customer filters, the same filter list documented on the Segments page.
Question: My flow sends a one-time coupon, and customers who already used it keep getting the offer again each time they order. How do I send it only once?
Answer: Set the flow's Re-entry setting to Never allow re-entry. Allow Concurrent Enrollment? only prevents overlapping entries, so a customer who finished the flow enters again on their next order. See Limit how often a customer re-enters a flow.
Question: When reviewing a flow, the statistics are set to “1 day”, however, when I view the number of “Sent” to the number of waiting at the first wait step, the number waiting does not match, why is there a discrepancy?
Answer: When setting the reporting interval to 1 day that represents the date range with starting date set to “00:00:00” and the ending date hours at “23:59:59”, whereas the wait step hourly for the past day is showing as of the current time of day when viewing it. So, for example, if the flow statistics are showing are “1 day = 08/17/2025 00:00:00 through 08/17/2025 23:59:59”, and you are viewing the the wait step at 10:33, then the wait step is reporting on “1 day = 08/17/2025 10:33:00 through 08/18/2025 10:33:00”. So, there is going to be some deviation between the two reporting statistics.
Question: We have a flow running, we have disabled a wait step that had 20 people waiting. Since the step is now disabled, will these customers be moved to the next step or will diabling the step only affect new customers that enter the flow?
Answer: Traffic that has already reached the wait step will continue to wait until the designated time even if you disable the step.
NOTE: You can however click on the triple dot button and select release to send them on their way.
Traffic that reaches the wait step that is already disabled will proceed straight through it with no pause.

Question: How do I disable a Flow that's triggered by expiring loyalty cashback?
Answer: Disable it the same way as any other Flow, using the toolbar buttons described above under When to Use Each Action: Take Offline to stop it immediately (no new entrants, and existing participants stop progressing), Pause Flow for a temporary stop (new customers still enroll in the first step, but nothing advances), or Drain to stop new entrants while letting already-enrolled customers finish.
Previous (Segments) - Next (Campaigns)