SMS Opt-In with One-Time Coupon
This guide walks through the two things you configure in your storefront to capture SMS opt-ins and send a welcome text with a unique coupon code:
-
The SMS Subscribe Form element in the Storefront Visual Builder (SFVB).
-
The welcome flow that fires when a customer joins your SMS list.
Overview
This setup pairs a storefront popup with a Storefront Communications flow so that when a shopper opts in to your SMS list, they immediately receive a welcome text containing a single-use coupon code. The popup collects a compliant SMS opt-in through the SMS Subscribe Form element, and the flow watches the list for new subscribers and sends the reward.
The result is a hands-off acquisition loop: a visitor joins your SMS list, gets a unique coupon by text, and the coupon auto-applies when they return to your store.
Prerequisites
Before you start, make sure you have:
-
An ESP list to enroll subscribers into (Admin, then ESP, then Lists). This guide uses a list named Twilio SMS Opt-ins.
-
A base coupon in your UltraCart coupon catalog with unique code generation enabled. The flow mints a single-use child code per subscriber from this base.
-
An ESP Twilio integration with an origination phone number configured.
If the base coupon does not exist with unique-code generation enabled, the SMS step in the flow will skip the send. Verify the coupon is in place before activating the flow.
How the Opt-In Works
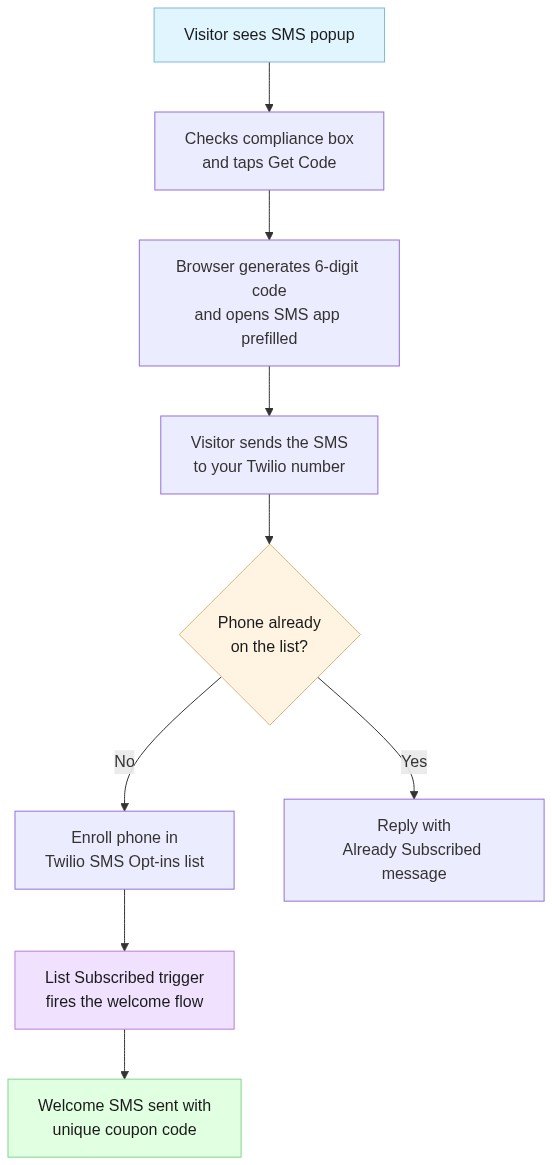
The diagram below shows the end-to-end path from popup submission to the welcome text:
Part 1: Storefront Element Setup (SFVB)
Add the SMS Subscribe Form to a modal in the Storefront Visual Builder.
Element Hierarchy
Here is the finished structure you are building toward. Refer back to this as you work through the steps below:
modal "SMS POPUP modal"
└── flex
    ├── button (close "X")
    └── panel
        ├── panel "active"                           (visible on load)
        │   ├── panel "panel content image"
        │   │   └── image (marketing image)
        │   ├── panel
        │   │   ├── textblock "SAVE 15%"
        │   │   └── textblock "ON YOUR ORDER"
        │   ├── textblock (headline copy)
        │   ├── panel "ERROR PANEL"                  (hidden, shown on validation error)
        │   │   ├── headline ("Sorry, please correct...")
        │   │   └── bulletlist (error messages target)
        │   └── panel "SMS SUBSCRIBE"
        │       ├── smssubscribeform
        │       │   ├── inputcheckbox (compliance opt-in)
        │       │   └── flex
        │       │       └── panel
        │       │           └── button "Get Code"    (submit)
        │       └── textblock (Privacy Policy / ToS links)
        └── panel "CONFIRMATION PANEL"               (hidden, shown on success)
            └── panel
                ├── panel "panel content image"
                │   └── image
                ├── panel
                │   └── textblock "Thank You!"
                └── textblock ("Please check your SMS messages...")
Key things to note:
-
The active and CONFIRMATION panels are siblings inside the outer panel. The form's Show These and Hide These settings swap which one is visible after submission.
-
The ERROR PANEL starts hidden. The SMS Subscribe Form unhides it and writes any validation errors into the bullet list child you wire up through the Error Bullet List setting.
-
The bulletlist inside the ERROR PANEL is the element you reference by ID in the form's Error Bullet List setting.
Build the Modal
-
In the Storefront Visual Builder, add a Modal to your page, or duplicate an existing popup.
-
Set the modal trigger. A 5-second timeout works well for an opt-in popup.
-
Inside the modal, create two panels:
-
An active panel with your marketing image, the SMS form, and a compliance checkbox.
-
A success panel that you switch to after the form is submitted.
-
Add the SMS Subscribe Form Widget
Drop the SMS Subscribe Form widget into the active panel and configure it:
| Setting | What to enter |
|---|---|
| Lists | Select Twilio SMS Opt-ins (the ESP list the subscriber should join) |
| Opt-In Message | Default is Claim special offer {{code}}. The {{code}} token is replaced with a 6-digit confirmation code |
| Already Subscribed Message | Shown if the phone is already on the list. Default: You're already subscribed to receive these messages. |
| Show These (on success) | The panel ID of your success panel |
| Hide These (on success) | The panel ID of your active panel |
| Error Bullet List | A bullet list element used to surface validation errors |
Add the Compliance Checkbox
The checkbox must be required and include full opt-in disclosure with STOP and HELP language. A common US and TCPA-compliant example:
Yes, I'd also like to receive marketing text messages from [Your Brand], including promotions and special offers, a few times per month. Opting in is not required to receive your discount. Message and data rates may apply. Reply STOP to unsubscribe or HELP for assistance.
Important: Have your legal team review the final compliance copy before publishing.
Form Submit Button
Set the submit button's action to Submit Form Action. Label it something action-oriented like "Get Code."
What Happens When the Customer Submits
-
The browser generates a 6-digit confirmation code and opens the customer's SMS app prefilled with your opt-in message (for example,
Claim special offer 859959) addressed to your Twilio number. -
The customer sends the SMS.
-
On receipt, the system matches the code, enrolls the phone in the list or lists you configured, and replies with either the welcome message (new subscriber) or your Already Subscribed message (existing subscriber).
-
The list membership change triggers the welcome flow described below.
Part 2: Welcome Flow Setup
Create a flow that fires whenever a customer is added to your SMS opt-in list, and have it send a one-time coupon.
Create the Flow
In Admin, then ESP, then Flows, create a new flow:
| Setting | Value |
|---|---|
| Name | Twilio SMS Welcome - 15% Off |
| Status | Active |
| Trigger Type | List Subscribed |
| Trigger Parameter | Select Twilio SMS Opt-ins (the same list used in the subscribe form) |
| End Once Customer Purchases | Enabled (recommended, stops the flow once they convert) |
| Re-entry | Never allow re-entry (recommended, so a customer who leaves the list and joins it again does not get a second welcome coupon). See Limit how often a customer re-enters a flow. |
Build the Steps
Use a simple three-step structure: Begin, then SMS, then End.
Configure the SMS Step
| Setting | What to enter |
|---|---|
| Name | For example, Welcome SMS |
| Message | Your SMS body using the tokens below. Example: Welcome! Use {{coupon}} for 15% off your order {{url}} Reply STOP to opt out. |
| URL Type | home, or whichever landing page you want {{url}} to resolve to |
| Coupon Code | The base coupon code from your UltraCart coupon catalog (must have unique code capability enabled) |
| Generate Unique Code | Enabled, mints a new child code per send |
| Reusable Unique Code | Disabled, makes each code single-use |
| Auto Apply | Enabled, applies the coupon automatically when the customer follows {{url}} |
| Unique Code Expiration (days) | For example, 7, how long the generated code stays valid |
Message Tokens
-
{{coupon}}is replaced with the freshly minted unique coupon code for that subscriber. -
{{url}}is your storefront URL based on the URL Type setting. Because Auto Apply is enabled, following this link drops the coupon into the customer's cart automatically.
Verification
-
Visit a page where the modal will trigger and submit the form.
-
Send the prefilled SMS from your phone.
-
You should receive the welcome SMS with a unique coupon code shortly after.
-
Following the URL in the message should auto-apply the coupon at checkout.
-
Re-submitting from the same phone should produce only the Already Subscribed reply. The flow will not re-enroll an existing subscriber.
Related Documentation
-
Flows - The Storefront Communications flow builder used in Part 2.
-
Issuing a unique coupon to customers to share and earn loyalty cashback - Another flow built around unique coupon codes.
-
Flow - Preshipment notice via SMS - A second example of an SMS-driven flow.
-
Lists - Managing the ESP lists that subscribers are enrolled into.