Steps
Overview
A marketing sequence, flow or campaign, is made up of a series of steps. These steps allow you to create more sophisticated marketing .
Adding a step
Within the campaign or flow editor, click on the plus button as shown below.
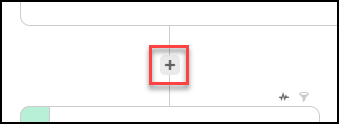
Next a dialog will appear asking for the type of step you want to add. Only the steps that are appropriate for the location will be displayed in the drop down list.
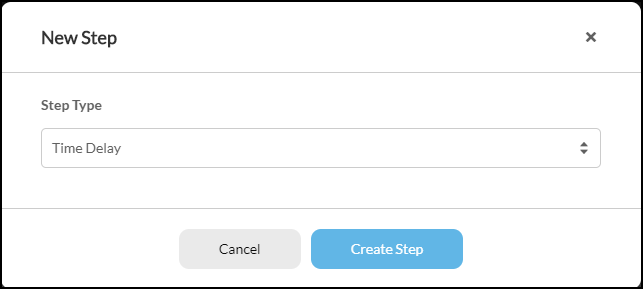
List of step types
Every step type you can add is listed below. The ones with a link have a section further down.
| Step type | What it does |
|---|---|
| Send Email | Sends an email to the customer. |
| Resend Email | Sends the earlier email again, optionally only to customers who did not open it. |
| Send SMS | Sends a text message to the customer. |
| Send Post Card | Sends a physical postcard to the customer. |
| Time Delay | Waits a set amount of time before the next step. |
| Conditional Delay | Waits until the customer matches a condition, rather than for a set time. |
| Rate Limiter | Controls how quickly customers move on to the next step. |
| Condition | Branches the sequence into a Yes and a No side. |
| Split | Branches the sequence into a Left and a Right side by percentage. |
| Experiment | Tests two or more email variants against each other. |
| Merge | Rejoins the two sides of a Condition or Split step. |
| InboxGeek | Branches on an InboxGeek engagement signal. |
| List Subscribe | Adds the customer to a mailing list. |
| List Unsubscribe | Removes the customer from a mailing list. |
| Update Profile | Creates, updates, or removes a property on the customer profile. |
| Loyalty Points | Awards loyalty points, store credit, or a loyalty tier. |
| Add Context Variables | Loads extra customer, order, or auto order data for later steps to use. |
| Setup / Modify Cart | Creates or changes a cart, including applying or generating coupons. |
| Send Webhook | Posts to a URL of your choosing. |
| Third Party | Subscribes, unsubscribes, or tags the customer with a connected provider. |
| Reviews.io | Sends a Reviews.io review invitation. |
| Workflow Task | Creates a task for someone on your team. |
| Sunset | Stops sending to a customer who has stopped engaging. |
Why a step type might not be in your list
The add-step dialog only offers steps that make sense where you are adding them, so the list you see may be shorter than the one above.
- Workflow Task appears in flows only, not in campaigns.
- Reviews.io appears only in a flow, only where an order is in context, and only once Reviews.io is configured for the StoreFront.
- Loyalty Points appears only when your loyalty program is set to points or cashback.
- Third Party appears only when a connected provider is set up.
- Some steps are also restricted by position. Merge only makes sense after a Condition or Split, for example.
If a step you expect is missing, check the conditions above before assuming something is broken.
Sending steps
Send Email
The send email step is the most important step to familiarize yourself with, since most campaigns and flows will contain one or more email steps. The first two fields are the most important piece text you will configure on your email. The subject and preview text are visible to the customer within their inbox. Write something catchy to get their attention.
Important Message Regarding Email Copy Review Requirement
Emails Require Approval by UltraCart
UltraCart uses Amazon SES for email delivery. Amazon has strict rules regarding email delivery. Therefore, UltraCart review new Emails for use in Email Campaigns, in order to keep SPAM to a minimum.
Helpful Tips for Approval
-
Subject Line - The subject line must contain your Company name for transparency.
-
Body Content - Should not contain high SPAM keywords.
The following services may be useful in testing out your email copy for email delivery:
-
https://www.mail-tester.com/
Simply send your email to the address listed, then click "Check Your Score." Mail-Tester will then give you a free email deliverability score based on the email that was sent to the unique email address. -
https://mailtrap.io/
This email testing tool that allows you to perform email experiments in a safe testing environment. -
https://spamcheck.postmarkapp.com/
Spamcheck tool allows you to paste a plain text message into a text box and analyze it for any language that might trigger spam filtering. You’ll receive a score based on what's included and not included in the email body
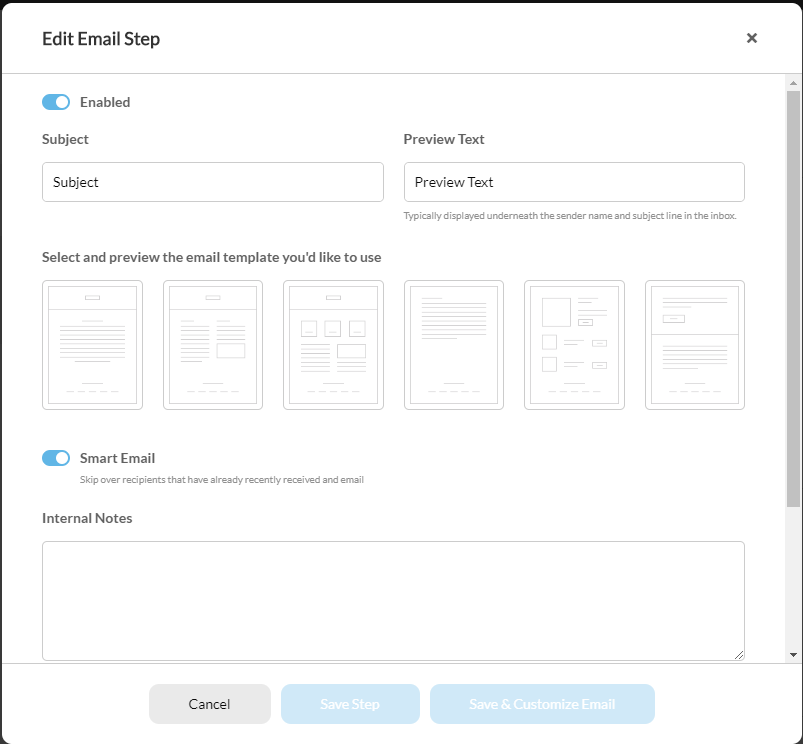
Next you’ll pick a template type. There are six different templates available to give you a variety of layouts to work with. The first three templates contain headers while the last three templates do not.
The smart email option will be enabled by default. When this option is enabled, if the customer has received an email within the last 24 hours then this email will be skipped to avoid annoying the customer with too many emails. Be careful turning off this setting.
Next click on “Save and Customize Email” to launch the StoreFront Visual Builder.
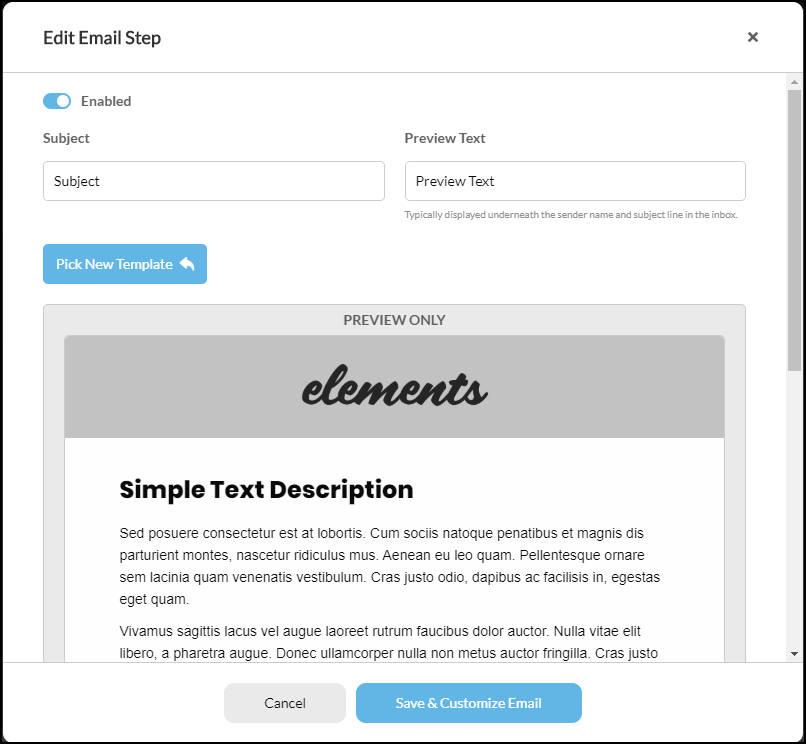
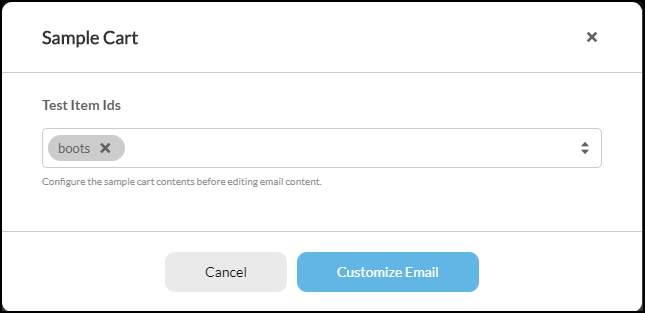
If your flow or campaign is utilizing either a cart or an order object, an intermediate dialog will appear for you to specify items or an order id. Selecting these values will allow the editor to show a contextually complete email to modify.
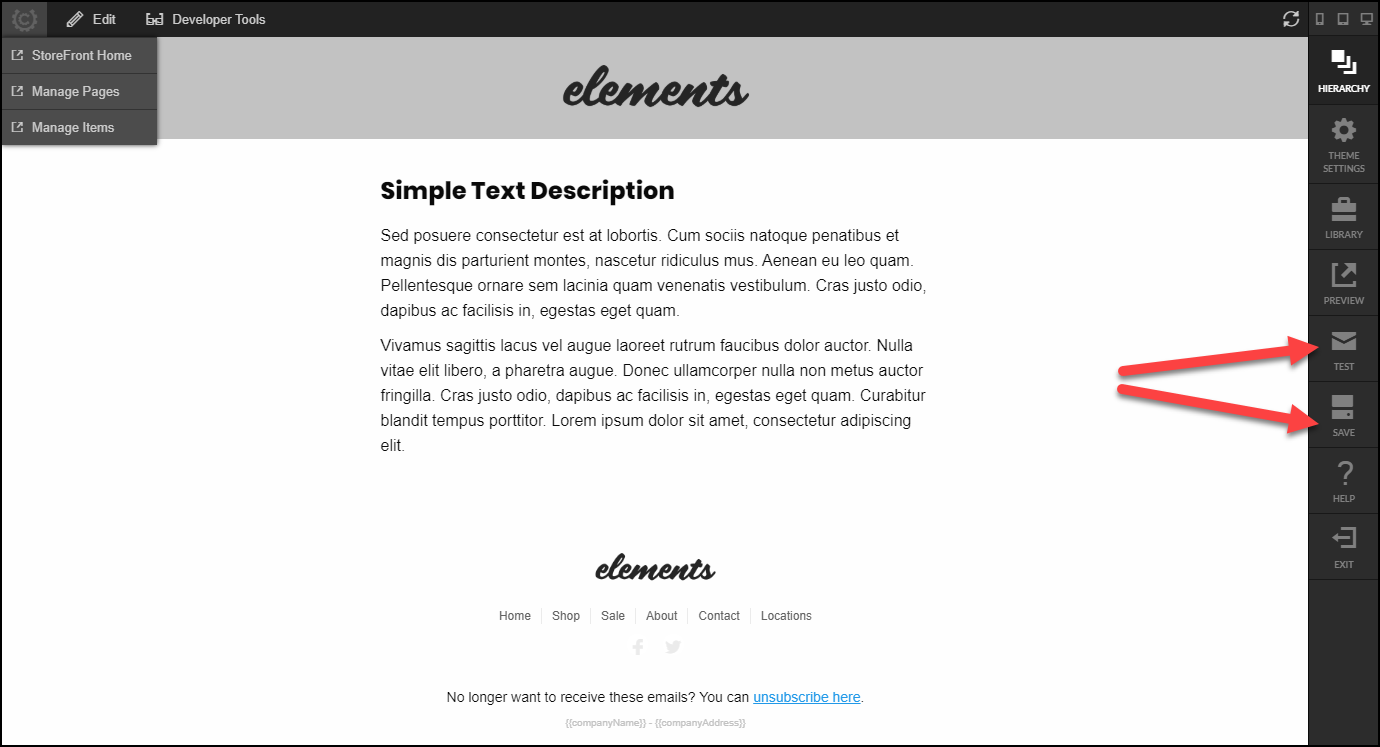
The standard StoreFront Visual Builder editor will appear. The screenshot below points out the Test button (will send a copy of the email to you) and the save button.
Turn on Magic Login Links on the Send Email step to log the customer straight into their profile when they click through from the email, so they land already authenticated instead of hitting a separate login or signup step first. This matters most when the link leads to an account action, for example submitting a product review or viewing My Account order history.
This is especially useful alongside Auto Establish Customer Profile: a customer who has no profile yet gets one created for them automatically, so with Magic Login Links also on, they never have to manually sign up or log in between clicking the email and completing the action.
Resend Email
The resend email step sends an earlier email in the sequence again. It is not a second Send Email step: it reuses the original email rather than asking you to build a new one.
| Setting | What it does |
|---|---|
| Enabled | Uncheck to skip the step without deleting it. |
| Resend if the customer did not open the email | Send again only to customers who did not open the first send. This is the reason most merchants use this step. |
| Override | Replace the subject and preview text on the resend. |
| Subject | The subject line to use when overriding. |
| Preview Text | The preview text to use when overriding. |
| Internal Notes | A note to yourself. Not visible to customers. |
Send SMS
The send SMS step sends a text message rather than an email. Sending SMS requires Twilio credentials on the StoreFront, configured under Communication → Settings.
| Setting | What it does |
|---|---|
| Enabled | Uncheck to skip the step without deleting it. |
| First Name Fallback | The word to use when the customer has no first name on file, so a message never opens with an empty space. |
| Include Item Image | Attach the item's image to the message. |
| Generate Magic Link | Include a link that logs the customer straight into their profile. |
| Generate Unique Code | Create a single-use coupon code for this customer. |
| Coupon Code | The coupon to include when you are not generating a unique one. |
| Auto Apply | Apply the coupon to the cart automatically when the customer follows the link. |
| Internal Notes | A note to yourself. Not visible to customers. |
For a worked example, see SMS opt-in with a one-time coupon and Preshipment notice via SMS.
Send Post Card
The send post card step sends physical mail. Unlike an email step, it costs money per piece and takes days rather than seconds to arrive, so test it before putting it in a live sequence.
| Setting | What it does |
|---|---|
| Enabled | Uncheck to skip the step without deleting it. |
| Name | A name for the postcard, used in the editor and in reporting. |
| Dry Run | Process the step without actually mailing anything. Use this while building. |
| Send Rendered Postcard To These Emails | Email a rendered PDF proof to the addresses you list, so you can check the artwork before it prints. |
| Internal Notes | A note to yourself. Not visible to customers. |
Use Preview postcard on the step's context menu to send yourself a PDF proof at any time.
Timing steps
Wait (Time Delay)
The second most common step in a sequence is the time delay step. The settings on a wait step are shown below.
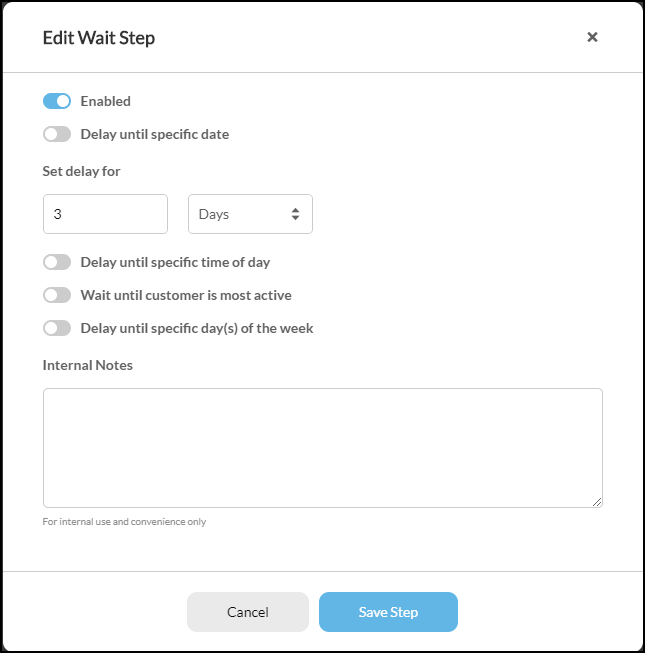
| Setting | Description |
|---|---|
| Enabled | If unchecked, the wait step will be skipped |
| Delay until specific date | Wait until a specific date |
| Set delay for | Wait a specific number of Minutes, Hours, Days, Weeks or Months. |
| Delay until a specific time of day | Wait until a specific time of day. All times are in EST. |
| Wait until customer most active | Waits until the customer’s most active time of day as determined by their interaction with your website. |
| Delay until specific day(s) of the week | Allow you to wait for a specific day of the week. Useful to make sure marketing interactions go out during business days for example. |
Wait Step Release Option
You may wish to bypass the wait step in order to immediate process the customers in the wait step.
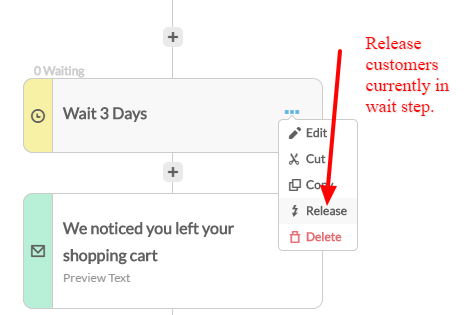
You can immediate release customers currently queued in a wait step by clicking the three-dots menu in the right side of the Wait Step bubble.
Conditional Delay
A conditional delay waits until the customer matches a condition, where a Time Delay waits a set amount of time. That is the whole difference, and it matters: a time delay always ends, a conditional delay ends only when the customer's profile matches.
| Setting | What it does |
|---|---|
| Enabled | Uncheck to skip the step without deleting it. |
| Customer filter | The condition to wait for, built with the same filter used by the Condition step. |
| Internal Notes | A note to yourself. Not visible to customers. |
Rate Limiter
The Rate Limiter step is one of the most sophisticated steps available. The settings for this step are shown below.
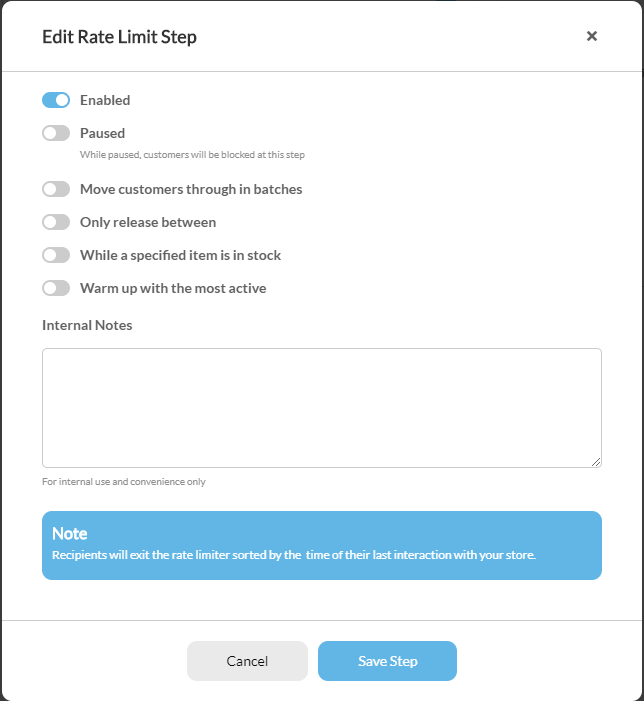
| Setting | What it does |
|---|---|
| Enabled | Uncheck to skip the step without deleting it. |
| Paused | Hold customers in the step without releasing any. |
| Only release between | Restrict releases to a window of the day, with a start and end time. |
| Warm up with the most active | Release your most engaged customers first, starting with a share of the total. Defaults to 10 percent. |
| Then release the others after | How long to wait after the warm-up group before releasing everyone else. Defaults to 1 hour. |
| Move customers through in batches | Release a fixed number per period. Defaults to 1000 per hour. |
| While a specified item is in stock | Keep releasing only while the items you name remain in stock. |
| Internal Notes | A note to yourself. Not visible to customers. |
The warm-up options exist for sending reputation. Releasing your most engaged customers first produces early opens and clicks, which helps the rest of the send land in inboxes.
Branching and testing steps
Condition
A condition step allows you to check the customer’s profile for a particular activity or property and then branch the sequence based upon matching the condition. The condition step settings allow you specify the customer filter and flip the yes/no sides.
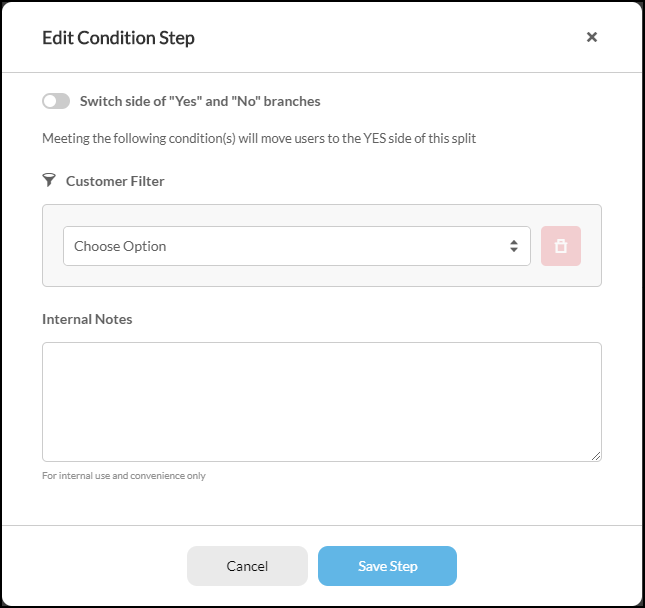
After creating a condition the sequence will look like the screenshot below. By default Yes is on the left and No is on the right. Use the optional setting to reverse that behavior. Click on the + button underneath either side to add additional steps.
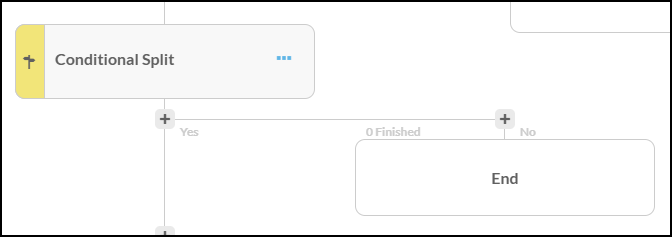
The merge step below will allow you to rejoin the Yes and No sides of the sequence.
Split
A split step divides customers into a Left and a Right side by percentage, where a Condition divides them by what is true about them. Use a split for an even sample, and a condition for a rule.
| Setting | What it does |
|---|---|
| Split Left | The share of customers sent down the left side. Defaults to 50 percent. |
| Split Right | The remainder, sent down the right side. |
| Internal Notes | A note to yourself. Not visible to customers. |
Use a Merge step to rejoin the two sides.
Experiment
An experiment step allows you to test one or more emails against each other. By default an experiment will have two variants split 50/50 as shown below.
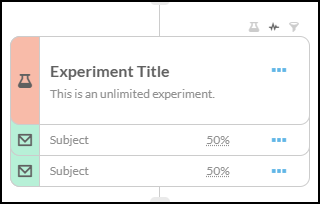
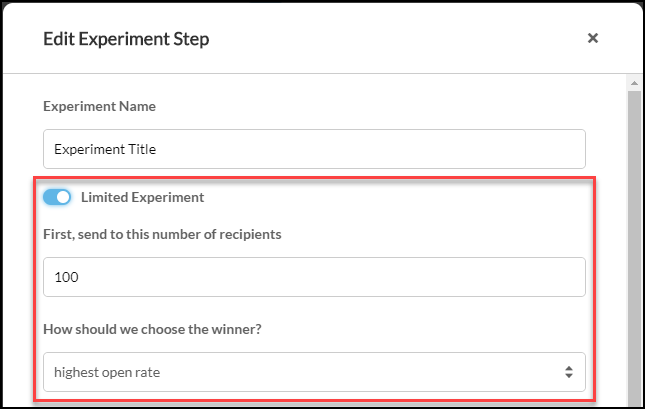
Within the settings of the experiment you have the option to perform a limited test. A limited test will send a particular number of customers through the experiment and then route the remaining customers to the winning variant. An experiment within a flow will use a fixed number of customers as shown below.
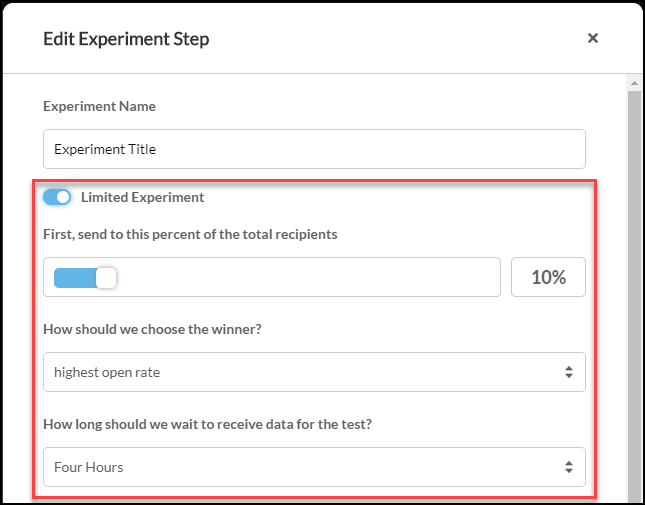
An experiment within a campaign, a certain percentage will be sent the email first and then after a set amount of time the variants are evaluated and the remaining customers are sent to the winner.
Merge
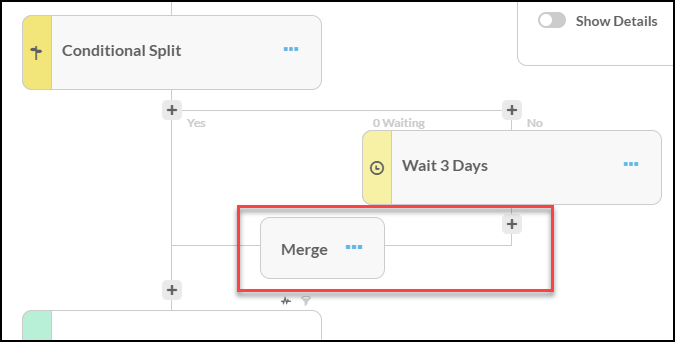
The merge step allows you to rejoin the Yes and No sides of a Condition step or Left and Right sides of a Split step. After the last step on the right side click on the plus button and then select the Merge step type. The two sides of the sequence will then rejoin as shown below.
InboxGeek
The InboxGeek step branches on an engagement signal from InboxGeek, a third-party service. It waits for that signal for a number of days before continuing.
| Setting | What it does |
|---|---|
| Max Wait Days | How long to wait for the signal before moving on. Defaults to 1 day. |
List and profile steps
List Subscribe / List Unsubscribe
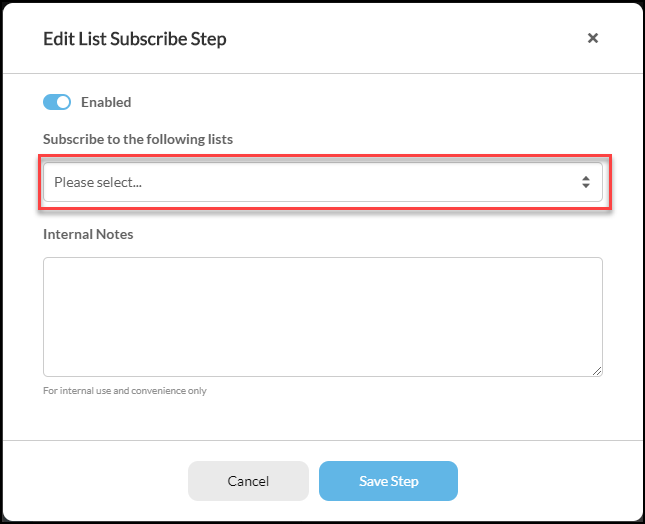
The list subscribe step will place the customer on the specified list. For example at the end of a campaign you might have a conditional step that evaluates the customers behavior and then decide to subscribe them to a list.
Likewise, the List Unsubscribe button will allow you to remove a customer from a list.
Update Profile
The update profile step writes to the customer's profile, so that later steps, segments, and conditions can act on what you stored.
Each row on the step defines one property change:
| Setting | What it does |
|---|---|
| Action | Create New Property, Update Existing Property, or Remove Existing Property. |
| Property Name | The name of the property to write. |
| Property Value | The value to store. Not used when removing. |
| Property Type | Text, Number, Date, or Boolean. A boolean value is True or False. |
| Internal Notes | A note to yourself. Not visible to customers. |
Pick the type deliberately. A date or number stored as text will not compare correctly in a later condition.
Loyalty Points
The loyalty step rewards the customer. It appears only when your loyalty program is set to points or cashback.
| Setting | What it does |
|---|---|
| Add Loyalty Points | The number of points to award. |
| Add Store Credit | An amount of store credit to award. |
| Set Loyalty Tier | Move the customer to a loyalty tier. |
| Description | The reason shown against the award on the customer's profile. |
| Expiration | When the award expires. |
| Prevent rapid credit accumulation | Guards against the same customer being awarded repeatedly in a short window. |
If the customer has no profile yet, this step creates one, along with a magic login link. That is a side effect worth knowing about before you put this step early in a flow.
Add Context Variables
This step does not contact the customer. It loads extra data into the sequence so that later steps can reference it, for example putting order details into an email or branching on an auto order.
| Setting | What it does |
|---|---|
| Include Customer | Load the customer record. |
| Customer Expansion | Which parts of the customer record to load. |
| Include Orders | Load the customer's orders. |
| Orders Expansion | Which parts of each order to load. |
| Include Auto Orders | Load the customer's auto orders. |
| Auto Orders Expansion | Which parts of each auto order to load. |
| Include Trigger | Load the data that triggered the flow. |
| Custom Function | Compute additional values. |
| Step Description | A label for the step, so its purpose is readable in the sequence. |
Load only what you need. Each expansion adds work to every customer passing through the step.
Cart steps
Setup / Modify Cart
The cart step creates or changes a cart for the customer. It is the step behind coupon delivery in abandoned cart recovery: it puts the coupon on the cart the customer returns to, rather than only naming the code in the email.
| Setting | What it does |
|---|---|
| Clear Cart | Empty the cart before making other changes. |
| Add Items | Put specific items in the cart. |
| Remove Items | Take specific items out of the cart. |
| Apply Coupons | Apply existing coupon codes to the cart. |
| Generate Unique Coupon | Create a single-use coupon for this customer instead of a shared code. |
| Unique Coupon Expiration (days) | How long that generated coupon stays valid. |
| Override Return URL | Send the customer somewhere other than the default cart page. |
| Affiliate Id | Attribute the cart to an affiliate. |
| Affiliate Sub Id | The affiliate's sub-identifier. |
| Internal Notes | A note to yourself. Not visible to customers. |
Prefer Generate Unique Coupon over a shared code in a recovery flow. A shared code that leaks can be used by anyone.
Integration steps
Send Webhook
The webhook step posts to a URL you choose. It is the programmatic escape hatch in a sequence: use it to tell another system that a customer reached this point.
| Setting | What it does |
|---|---|
| URL | Where to send the request. |
| HTTP Method | The method to use. |
| Format | The payload format. |
| Payload | The body to send. |
| Expansion Options | Which related records to include in the payload. |
| Internal Notes | A note to yourself. Not visible to customers. |
The receiving endpoint needs to be reachable from the internet and should return quickly. A slow endpoint holds up the sequence.
Third Party
The third party step acts on a connected provider, subscribing or tagging the customer there. It appears only when a provider is connected.
| Setting | What it does |
|---|---|
| Enabled | Uncheck to skip the step without deleting it. |
| Provider | Which connected provider to act on. |
| Subscribe to the following lists | Lists to add the customer to at the provider. |
| Unsubscribe from the following lists | Lists to remove the customer from. |
| Add the following tags | Tags to apply at the provider. |
| Remove the following tags | Tags to remove. |
| Internal Notes | A note to yourself. Not visible to customers. |
Which of these options appear depends on what the provider supports.
Reviews.io
The Reviews.io step sends a review invitation through Reviews.io.
| Setting | What it does |
|---|---|
| Type | The kind of invitation to send. |
| Reviews.io Template Id | The template to use, taken from your Reviews.io account. Required. |
| Internal Notes | A note to yourself. Not visible to customers. |
This step appears only in a flow, only where an order is in context, and only once Reviews.io is configured for the StoreFront. If you cannot find it, check those three things first.
Workflow Task
The workflow task step creates a task for someone on your team rather than contacting the customer. Use it where a sequence needs a human to do something, such as reviewing a wholesale signup.
| Setting | What it does |
|---|---|
| Enabled | Uncheck to skip the step without deleting it. |
| Task Name | The task's title. |
| Details | The task body. |
| Assigned To | Who the task goes to. |
| Priority | 1 - low, 2 - medium, 3 - high, or 4 - critical. Defaults to low. |
| Due Days | Days from creation until the task is due. |
| Expiration Days | Days until the task expires. |
| Tags | Tags to apply to the task. |
This step is available in flows only. It does not appear in campaigns.
Ending a sequence
Sunset
The sunset step stops sending to a customer who has stopped engaging. It has a single Enabled setting: the behaviour is the step's purpose rather than something you configure.
Sunsetting protects your sending reputation. Continuing to mail people who never open lowers deliverability for everyone else on your list.
Step context menu
Every step has a context menu on the three-dots button. Which options appear depends on the step type.
| Menu Option | Steps | Description |
|---|---|---|
| Edit | All | Edit the settings associated with the step |
| Cut | All | Remove the step from this spot in the sequence. Click the + button somewhere else in the sequence to paste the step. |
| Copy | All | Copy the step. Click the + button somewhere else in the sequence to paste the step. |
| Delete | All | |
| Edit Content | Email, Postcard | Open the visual builder to edit the content |
| Send Test Email | Send a test email | |
| Start Experiment | Transform an email into an experiment. A duplicate copy will automatically be created for the second variant | |
| Preview postcard | Postcard | Sends a rendered preview of the postcard to your email as PDFs. |
| Add Variant | Experiment | Create a new variant of the email for testing within the experiment |
| Declare Winner | Experiment | Make the variant the winner of the experiment. Transforms the experiment step back to a single email step. |
| Delete Email | Experiment | Remove the variant from the experiment. |