Introduction
UltraCart’s Storefront Communications platform centralizes your marketing and transactional communications—emails, flows, and postcards—within your StoreFront.
This quick start guide walks you through configuring your email sending domain, creating mailing lists, building automated flows, running campaigns, and managing your communications plan usage.
Tip: This setup should be completed by an account admin or a user with the Edit Service Plan and Communications permissions.
Prerequisites
Before beginning setup:
-
Access to your StoreFront with admin permissions
-
Access to your domain DNS management panel (for domain verification)
-
An active Storefront Communications plan
Step 1: Configure Email Sending Domains
Configuring your email sending domain allows UltraCart to send communications on your behalf, improving deliverability and tracking open, click, and bounce metrics.
-
Navigate to:
Main Menu → StoreFronts → [Your StoreFront] → Communications → Settings -
Add your domain:
-
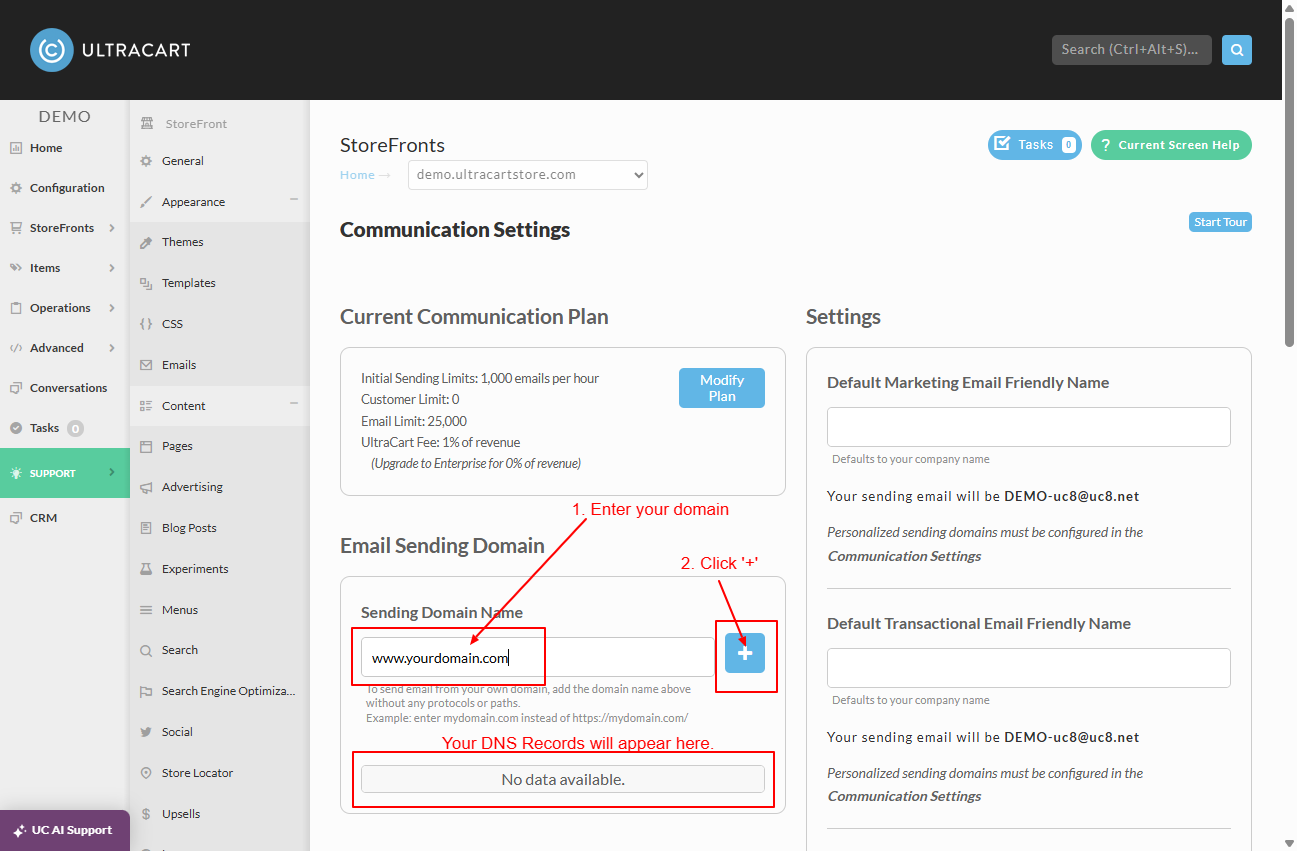
In the Email Sending Domain section, enter your domain name and click +.
-
A New Sending Domain dialog appears. Choose a Provider: UltraCart, or Mailgun if you have your own Mailgun account and API key. The DNS records in the next step are issued for the UltraCart provider only.
-
-
Configure DNS records:
-
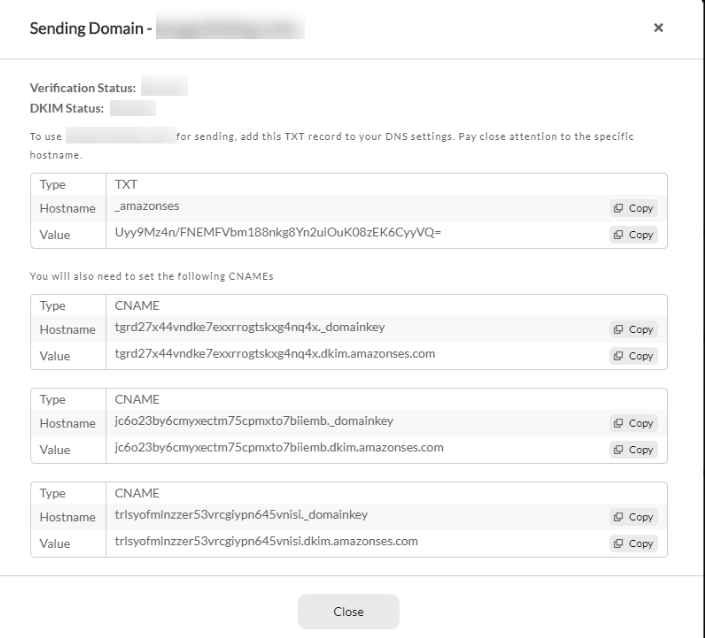
A dialog appears with a verification TXT record and a set of CNAME records for DKIM. The number of CNAMEs comes from the provider.
-
The same dialog offers an optional SPF TXT record. Skip it unless you know you need it: the dialog itself warns against adding it otherwise.
-
Add these records to your DNS host.
-
UltraCart will also email the DNS information for forwarding to your IT team if needed.
-
-
Validate configuration:
-
Validation typically completes within one hour.
-
A green dot next to your domain indicates success.
-
-
Set default addresses:
- After validation, set your Default Marketing Email and Default Transactional Email friendly names and addresses. There is no Reply-To setting.
Note: Proper DNS configuration ensures messages are authenticated (SPF, DKIM, DMARC) and prevents delivery issues.
Step 2: Create a Mailing List
Mailing lists represent static groups of customers to whom campaigns are sent.
-
Navigate to:
Main Menu → StoreFronts → [Your StoreFront] → Communications → Lists & Segments -
Create a new list:
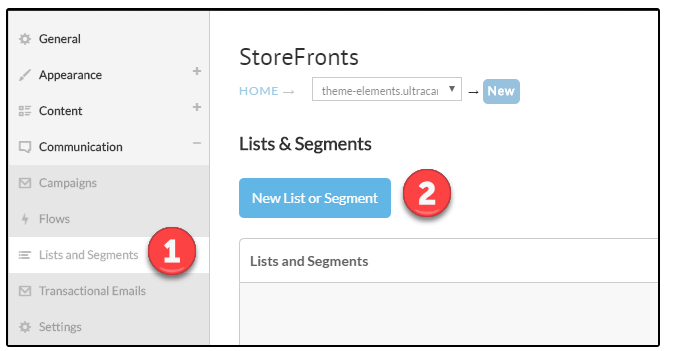
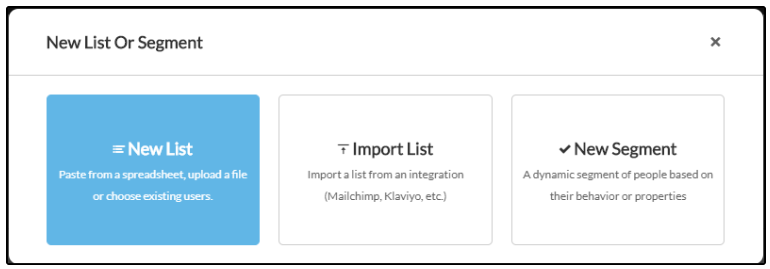
- Click New List or Segment, then New List.
-
Name your list:
- Example:
General Mailing List.
- Example:
-
Optional public settings:
-
Enable Allow members to configure their membership to make it a public list.
-
Add a public description if desired.
-
-
Add initial members:
- Import manually or upload a CSV file.
Tip: Whenever possible, use Segments instead of static lists. Segments are dynamic and automatically update based on customer activity.
Step 3: Create an Abandon Cart Flow
Flows automate communication sequences triggered by events (e.g., cart abandonment or post-purchase).
-
Navigate to:
Main Menu → StoreFronts → [Your StoreFront] → Communications → Flows -
From Library:
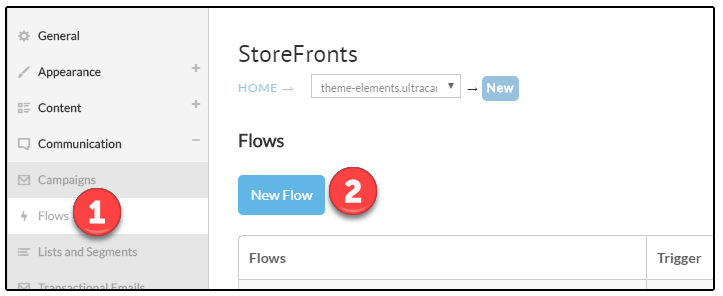
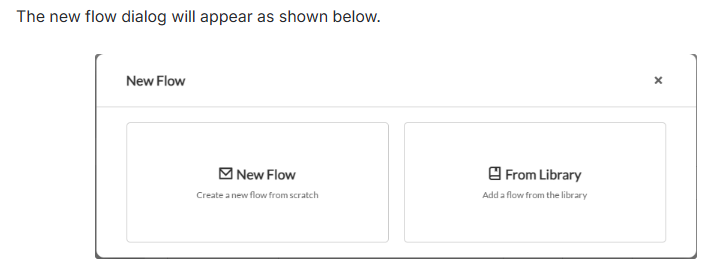
- Click New Flow, then choose the From Library card.
-
Install a predefined flow:
-
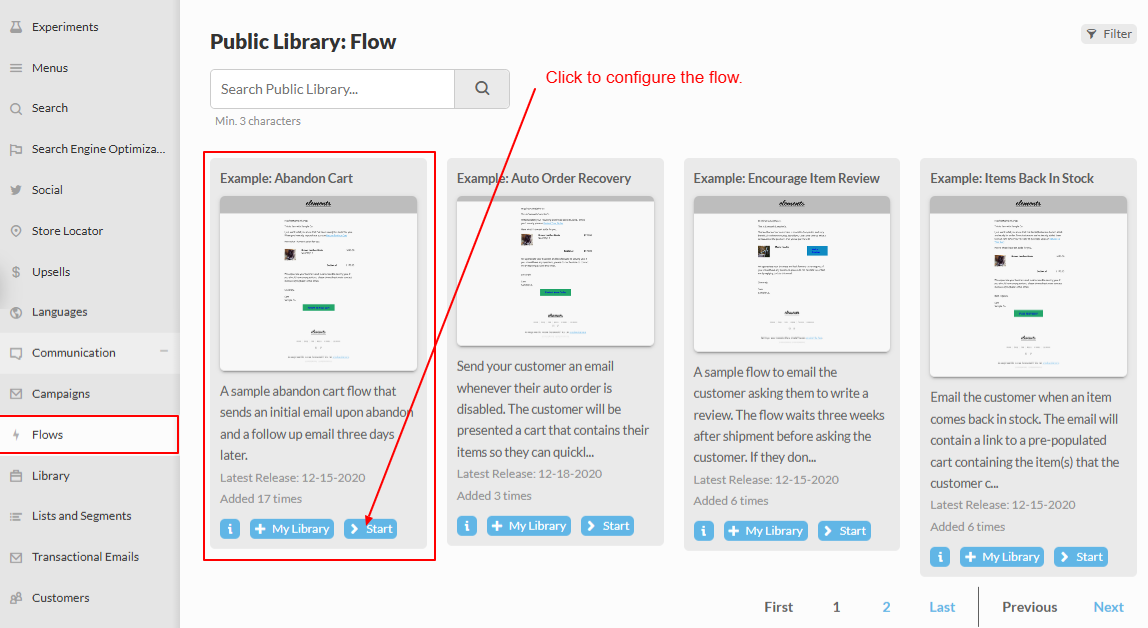
Select Abandon Cart Flow from the public library.
-
Click Install → (then confirm in dialog window).
-
This flow sends an immediate abandonment email and a follow-up three days later.
-
-
Edit the email step:
-
Customize the Subject Line and Preview Text.
-
Open the Visual Builder to personalize message content.
-
Preview at least one product in the cart before editing.
-
-
Activate the flow:
- Click View & Activate, then Activate Flow in the dialog. (Campaigns use Review & Activate; flows use View & Activate.)
Tip: Include the customer’s first name and cart contents dynamically to increase recovery rates.
Step 4: Create an Email Campaign
Campaigns are scheduled communications sent to one or more lists or segments.
-
Navigate to:
Main Menu → StoreFronts → [Your StoreFront] → Communications → Campaigns -
Create new campaign:
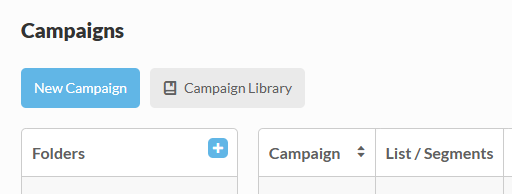
- Click New Campaign, enter a name, and set scheduling preferences.
-
Configure settings:
- Adjust sender details, subject line, and optional parameters.
-
Select target audience:
- Choose one or more lists/segments to include or exclude.
Note: Once a campaign has started, you cannot edit its audience. To resend, duplicate the campaign.
Step 5: Understanding Step Types
Flows and campaigns use step types to control message delivery and logic. The eight below are the ones you will reach for first. There are 23 step types in total, including Send SMS, Send Webhook, Rate Limiter, Resend Email, Conditional Delay, List Subscribe and List Unsubscribe, Loyalty Points, Update Profile, Sunset, and Workflow Task.
See Steps for the full reference and the settings on each one.
| Step Type | Description | Key Details |
|---|---|---|
| Send Email | Sends an email message to the customer. | Smart Email skips recipients who have recently received an email. Subject must be 5 to 150 characters. |
| Wait (Time Delay) | Delays the next step. | Choose minutes, hours, days, weeks, or months—or target the customer’s most active time. |
| Condition | Adds logic branching. | Defines Yes/No paths based on customer data or behavior. |
| Split | Splits audience randomly. | Typically for A/B testing; adjustable percentage split. |
| Merge | Rejoins branches. | Combines Condition or Split branches into a single flow. |
| Experiment | Tests variants. | Compares performance between message versions. |
| Setup / Modify Cart | Creates or edits a cart. | Common for coupon delivery in Abandon Cart recovery. |
| Send Post Card | Sends a physical postcard. | Design using Visual Builder; dry-run available ($0.65/postcard). |
Step 6: View Statistics and Manage Delivery
Viewing Storefront Statistics
Main Menu → StoreFronts → [Your StoreFront] → Communications
-
Access the Dashboard:
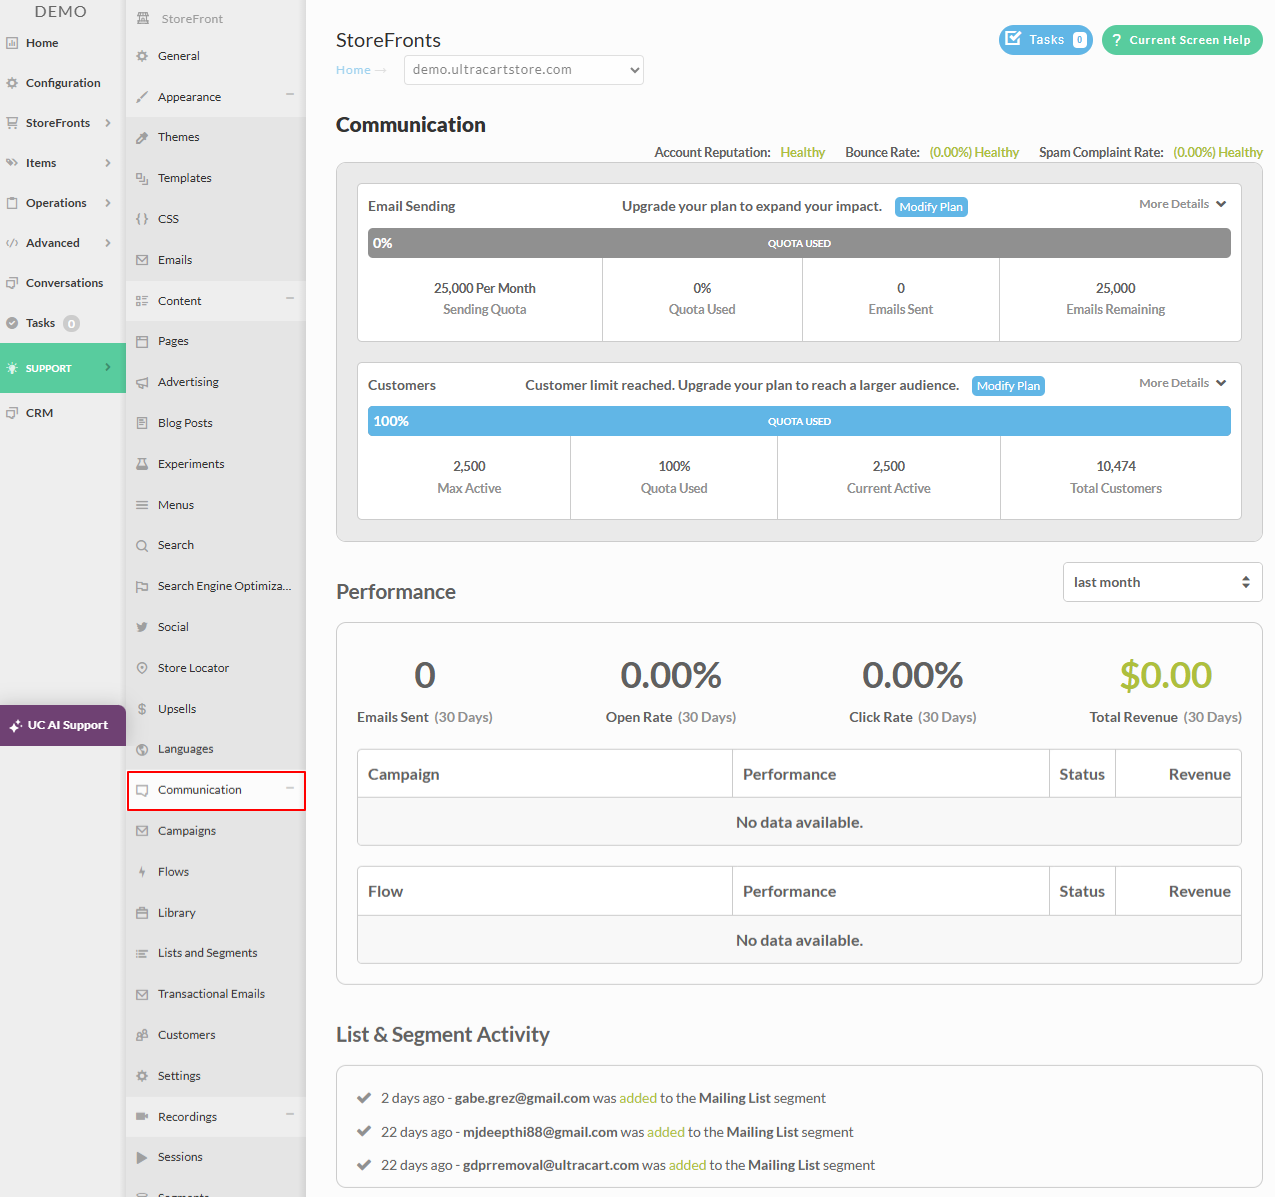
- The Communications dashboard displays plan usage, delivery health, and campaign performance.
-
View performance metrics:
- By default, statistics show the past 30 days.
-
Expand detailed analytics:
- For step-level stats, open the flow or campaign and turn on Show Step Analytics on its Begin step. This is not on the dashboard.
-
Receive emailed reports:
- Sent automatically to users with the Edit Service Plan permission.
Managing Email Delivery (SPAM Thresholds)
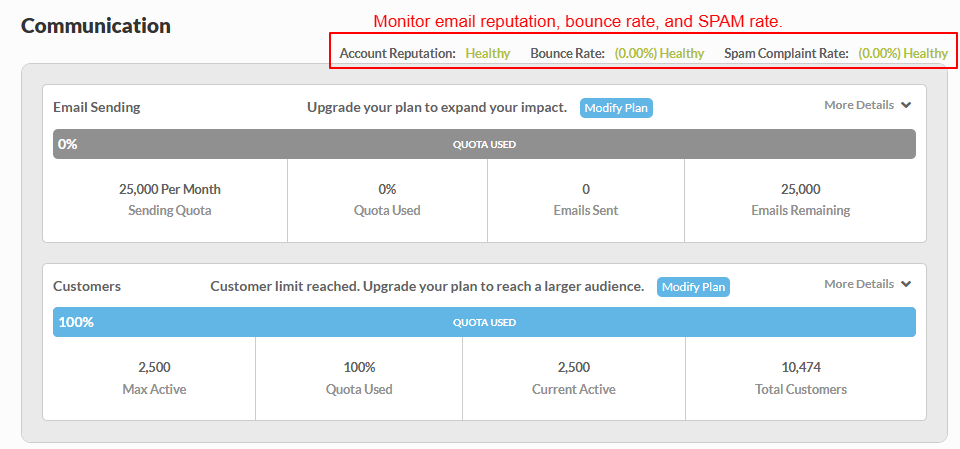
UltraCart suspends sending when your SPAM complaint rate goes above 0.1%. This is your account's overall rate, not one campaign's, and the suspension stops all campaign sending until the rate falls back below 0.1%. You also cannot activate a flow while the account is paused for SPAM.
The Communication dashboard shows the rate against two thresholds: it warns from 0.1% and marks the account critical from 0.2%. Treat 0.1% as the ceiling, not a target.
- Mailgun Alternative:
Merchants may connect Mailgun to remove the SES limit.
However, merchants must manage their own sender reputation.
Warning: Always maintain a clean sending reputation. Use confirmed opt-ins and avoid sending to inactive addresses.
Managing Customer Plans
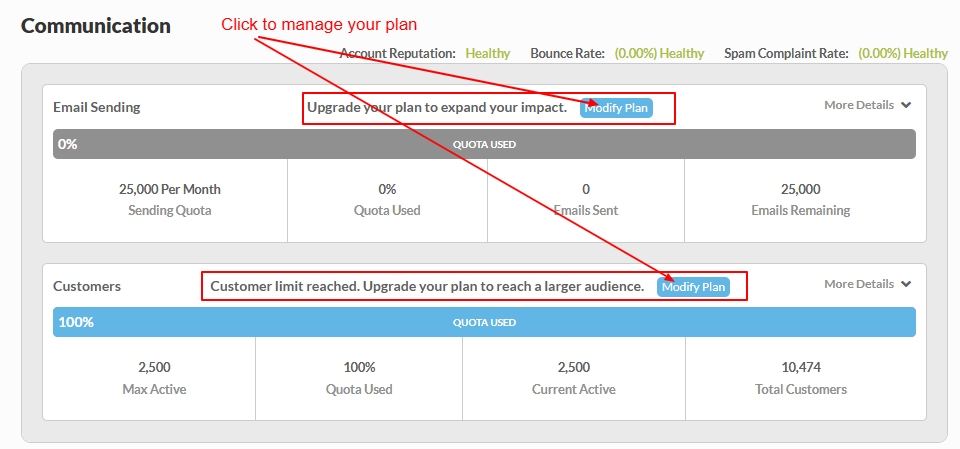
Your plan determines how many customers you can message and how many total emails may be sent each month.
-
Quota Example:
Large Plan = 2,500 customers + 25,000 free monthly emails -
Flows vs. Campaigns:
Quotas affect flows too. A flow that hits the limit shows Limit reached in the In-Progress column and stops enrolling new customers, so abandoned cart recovery does not keep running once you are maxed out. -
Review Active Range:
Click More Details under Customers to view a histogram of active customer coverage. -
Upgrade as Needed:
Click Modify Plan to increase coverage or email quota. A plan change can take up to 24 hours to take effect, so resize a day ahead of a large send.
Tip: For stores using multiple segments and historical targeting, a plan covering 6–12 months of customer history is ideal.
FAQ
Q: My sending was paused for exceeding the 0.1% SPAM threshold. What should I do?
A: As transactional emails process they will contribute to reduce the SPAM percentage. This will take some time. Consider sending smaller batches. Consider switching to Mailgun for greater flexibility.
Q: Can I use my own SMTP server instead of Amazon SES or Mailgun?
A: Not at this time. UltraCart supports only the integrated services to ensure deliverability tracking and compliance.
Q: Why is my domain not validating?
A: Check that all TXT and CNAME records exactly match those provided in the DNS setup dialog. DNS propagation may take up to 24 hours depending on your host.
Q: How are Segments different from Lists?
A: Lists are static collections of emails, while Segments are dynamic groupings that automatically adjust based on real-time customer activity or filters.
Q: What happens when my customer quota is full?
A: UltraCart will continue to process Flows (like Abandon Cart) but will limit new Campaigns to the most recent active customers. Upgrade your plan to expand coverage.
Q: I changed my plan. Why are my limits the same?
A: A plan change can take up to 24 hours to take effect. Your current customer and email limits stay in place until the new plan is applied, so check the Communication dashboard again the next day.
Q: How can I test an email before sending it to all customers?
A: Use the Experiment step type in a campaign to A/B test subject lines or content, or send to a small test list first.
Q: How do I re-engage inactive subscribers?
A: Create a Re-engagement Flow using conditional steps to target customers who haven’t opened emails within a specified period.
Conclusion
You’ve now configured your Storefront Communications setup—validated your sending domain, created lists, built a flow, launched a campaign, and reviewed delivery metrics.
This foundation allows you to build advanced automated marketing sequences and scale your communication strategy directly within UltraCart.