Introduction
Many merchants choose to create and host a custom thank you screen for their customers. This guide explains how to configure UltraCart to redirect customers to your custom thank you screen after completing an order.
Prerequisites
-
An active UltraCart StoreFront.
-
A hosted custom thank you screen (preferably SSL-secured).
Warning: If your thank you screen is not SSL-secured, you must check Omit Order Data to prevent exposing sensitive information.
Configuring a Custom Thank You Screen
-
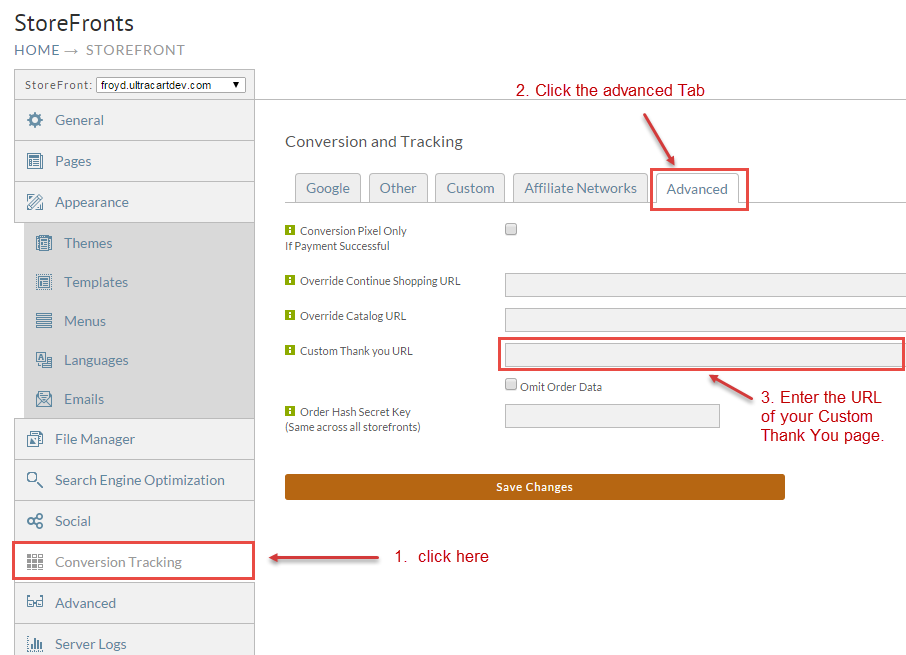
Navigate to StoreFronts → Conversion Tracking → Advanced.
-
Enter the URL of your custom thank you screen.
-
If the thank you screen is not secure (SSL), select Omit Order Data.
-
Click Save Changes.
Coding Your Custom Receipt Page
To display receipt details on your thank you page, add the following script to your receipt.html page:
Note: The
orderTextvalue is decoded twice because it is often double-encoded during redirection. This prevents corruption of the URL.
Snippet to place your thank you page to render receipt details
<script type="text/javascript" language="JavaScript">
function gup( name )
{
name=name.replace(/[\[]/,"\\\]").replace(/[\]]/,"\\\]");
var regexS = "[\\?&]"+name+"=([^&#]*)";
var regex = new RegExp( regexS );
var results = regex.exec( window.location.href );
if( results == null )
return "";
else
return results[1];
}
document.writeln("<PRE>" + decodeURIComponent(decodeURIComponent(gup("orderText"))).replace(/\+/g," ") + "</PRE>");
</script>
Passing Additional Information to the URL
You can pass tokens to your thank you page URL. For example:
¤tstage=[currentstage]
This allows you to display the current order stage.
You may also pass custom fields using [customfield1] through [customfield7].
Order Tokens for Tracking Pixels and Scripts
The following tokens are supported and can be used within tracking pixels and scripts on your thank you page:
-
[ActivationCodes=<ItemId>] -
[AffiliateId] -
[AffiliateSubId] -
[AffiliateCustomHtml] -
[BillingFirstName],[BillingLastName],[BillingCompany] -
[BillingAddress1],[BillingAddress2],[BillingCity],[BillingState],[BillingPostalCode],[BillingCountry] -
[BillingDayPhone],[BillingEveningPhone] -
[ChargeAppearsOnStatementAs] -
[Commission] -
[Coupon] -
[CouponForNewAffiliate=CODE] -
[CurrentStage] -
[CustomField1]through[CustomField7] -
[DirectTrackProducts] -
[Email] -
[GrossProfit] -
[IfPurchased=<ItemId>]...[/IfPurchased] -
[IfPaymentMethod=<Method>]...[/IfPaymentMethod] -
[IfShippingMethod=<Method>]...[/IfShippingMethod] -
[OmnitureProducts] -
[OrderId],[OrderHash] -
[PaymentMethod],[PaymentProcessed] -
[ProductIds],[ProductQuantities],[ProductCosts],[ProductCostsWithoutDecimal],[ProductDescriptions],[ProductQuantity1] … [ProductQuantity#] -
[ShippingFirstName],[ShippingLastName],[ShippingCompany] -
[ShippingAddress1],[ShippingAddress2],[ShippingCity],[ShippingState],[ShippingPostalCode],[ShippingCountry] -
[ShippingDayPhone],[ShippingEveningPhone] -
[Shipping] -
[SubtotalAndShipping],[Subtotal],[SubtotalBeforeDiscount],[SubtotalDiscount] -
[Tax] -
[Total],[TotalQuantity]
Best Practices
-
Place conversion pixels inside UltraCart whenever possible.
-
If external trackers are required, ensure you pass the
[currentstage]token and confirm it equals:-
SD= Shipping Department -
CO= Completed Order
-
This prevents firing pixels for orders still pending Accounts Receivable fraud review.
Conclusion
By configuring and coding a custom thank you screen, you can provide a fully branded post-purchase experience while integrating your own analytics and tracking needs.
Next Steps
-
Learn more about Conversion Tracking.
-
Review Custom Fields Documentation.