Overview
UltraCart's Visual Builder provides a powerful and intuitive way to create and manage upsell and downsell funnels. This functionality allows you to design post-checkout offers visually, without needing to write any HTML, CSS, or JavaScript.
The Visual Builder is a significant upgrade that empowers you to maximize incremental revenue from your existing customer base. It offers a streamlined, drag-and-drop interface that simplifies the entire process, from designing your offers to analyzing their performance.
Key Benefits
-
Visual Design Interface: Build your upsell pages with a visual editor, eliminating the need for coding.
-
Drag-and-Drop Configuration: Easily configure and reorder your offer paths and specific offers with a simple drag-and-drop system.
-
A/B Experimentation: Quickly create and run A/B experiments on different paths and individual offers to optimize performance.
-
Responsive Design: All upsell pages created with the Visual Builder are fully responsive and mobile-friendly, ensuring a seamless experience for all customers.
-
Integrated Video Support: Effortlessly embed videos from popular services like YouTube, Vimeo, and Wistia to enhance your offers.
-
Real-time Performance Metrics: Track key metrics in real time, including true net incremental revenue, so you can understand the direct impact of your funnels.
-
Advanced Analytics: The system automatically tracks critical data points such as abandons and refunds, providing a complete picture of your funnel's performance.
-
Easy Duplication: Copy entire upsell paths between multiple StoreFronts, saving you time and effort when managing multiple brands.
To get started, expand the Content section (Tab) of your StoreFront and click on Upsells. If you do not see Upsells, then you are not running a theme that supports them.
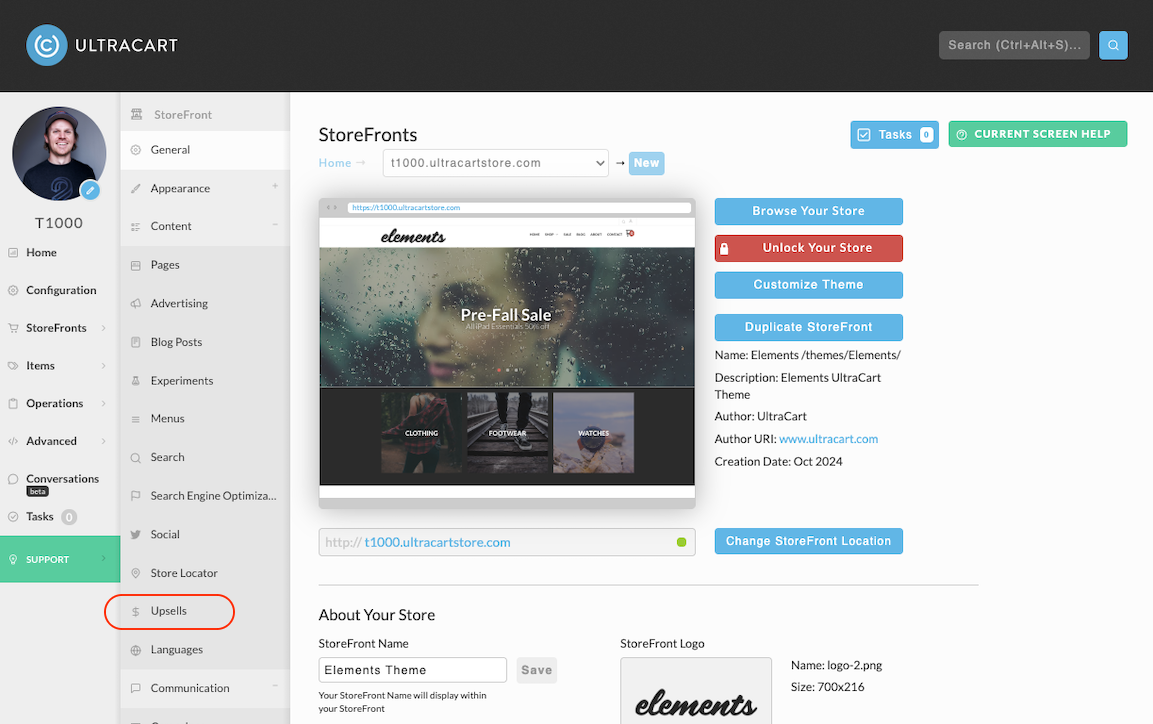
Create a Path
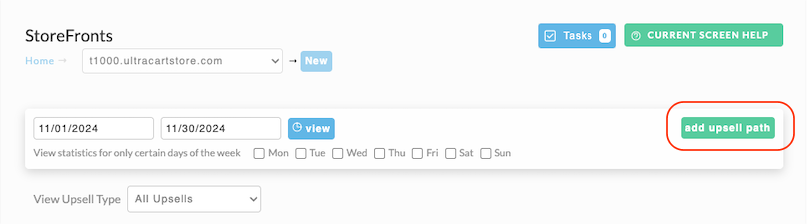
The first thing that you want to do is create a path by clicking on the Add Upsell Path button. A path is a sequence of offers that a customer will experience during the checkout if they have an item in their cart that triggers the path. A customer will go through each path that they qualify for starting at the top of the page and working their way to the bottom.
Path Settings
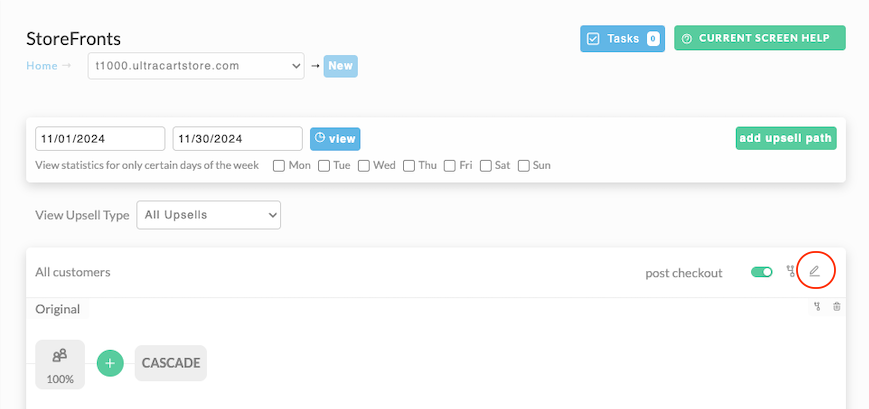
Once you have created a Path you can also configure Path settings to trigger what path a customer might see based on different factors. To view the Path settings simply click on the Pencil Icon on the right.
This will open the Upsell Path Editor.
This will open the Upsell Path Editor.
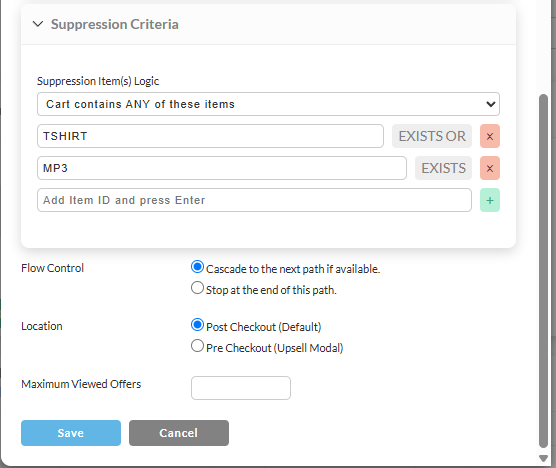
Upsell Path Editor Settings
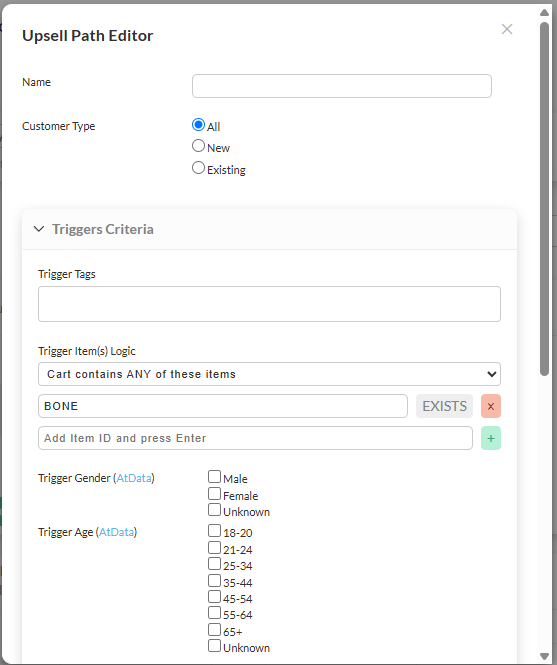
The Upsell Path Editor controls when a path activates, when it is suppressed, where it appears in the checkout flow, and how many offers a customer may view. All settings are configured in a modal dialog.
Important: Items with the 'Exclude from search' setting enabled cannot be added as a trigger item or suppression item.
The editor contains the following fields:
| Field | Options / Type | Description |
|---|---|---|
| Name | Text input | Internal name for the path (not shown to customers). |
| Customer Type | Radio buttons: All (default), New, Existing | Determines whether the path can be shown to all customers, only new customers, or only existing customers (based on email address history). |
| Trigger Tags | Text input | Triggers the path when cart items carry any of the specified product tags. |
| Trigger Gender | Checkboxes (requires Tower Data / AtData) | Triggers the path for customers matching the selected gender values (Male, Female, Unknown). |
| Trigger Age | Checkboxes (requires Tower Data / AtData) | Triggers the path for customers matching the selected age ranges: 18-20, 21-24, 25-34, 35-44, 45-54, 55-64, 65+, Unknown. |
| Trigger Item(s) Logic | Dropdown (see options below) | Logic used to evaluate the list of Trigger Items against the current cart. |
| Trigger Items | Item ID list (add and press Enter) | One or more Item IDs that participate in the Trigger Item(s) Logic evaluation. |
| Suppression Item(s) Logic | Dropdown (see options below) | Logic used to evaluate the list of Suppression Items. When the cart satisfies the suppression criteria the path is skipped. |
| Suppression Items | Item ID list (add and press Enter) | One or more Item IDs that participate in the Suppression Item(s) Logic evaluation. |
| Flow Control | Radio: Cascade to the next path if available (default), Stop at the end of this path | Controls whether the customer continues to the next qualifying path after completing this one. |
| Flow Location | Radio: Post Checkout (Default), Pre Checkout (Upsell Modal) | Sets the presentation location. Externally hosted offers are only supported in Post Checkout mode. |
| Maximum Viewed Offers | Number input | Optional limit on the number of offers the customer can be shown inside this path. |
Trigger Item(s) Logic Options
The Trigger Item(s) Logic dropdown organizes evaluation rules into two groups.
Quantity-based (New)
-
ALL items must meet their quantity (AND) — Every listed item must be present in the cart and meet its individual quantity threshold.
-
ANY item meets its quantity (OR) — The path triggers when at least one listed item meets its quantity threshold.
-
Total quantity across all items — The path triggers when the combined quantity of all listed items reaches the required total.
Presence-based (Legacy)
-
Cart contains ANY of these items — The path triggers when the cart contains at least one of the listed Item IDs.
-
Cart contains ALL of these items — The path triggers only when the cart contains every listed Item ID.
Suppression Item(s) Logic Options
The Suppression Item(s) Logic dropdown uses the identical set of options as Trigger Item(s) Logic.
Quantity-based (New)
-
ALL items must meet their quantity (AND)
-
ANY item meets its quantity (OR)
-
Total quantity across all items
Presence-based (Legacy)
-
Cart contains ANY of these items
-
Cart contains ALL of these items
When the current cart satisfies the selected suppression logic, the entire path is suppressed and the customer proceeds to the next path (if any).
Simply click Save at the bottom of the modal to persist changes.
Creating an Upsell Offer
Click on the + button to create your first step.
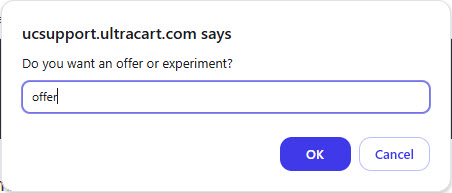
A prompt will appear on the screen. We're going to create an Offer so click on OK as shown below.
When the editor appears, there are 5 minimum things that you must complete. They are:
-
Give the offer a meaningful name (not visible by the customer)
-
When ready, set the offer to active.
-
Choose the item(s) that are being upsold to the customer.
-
Pick one of the pre-defined layouts that you want to start with. After selecting your layout click on the preview of the offer to launch the visual editor for the upsell. Make whatever content adjustments to the offer that you want. Note that the first two pre-defined layouts use a textblock of "lorem ipsum" as a placeholder. So make sure you change that to some meaningful marketing verbiage.
-
Save
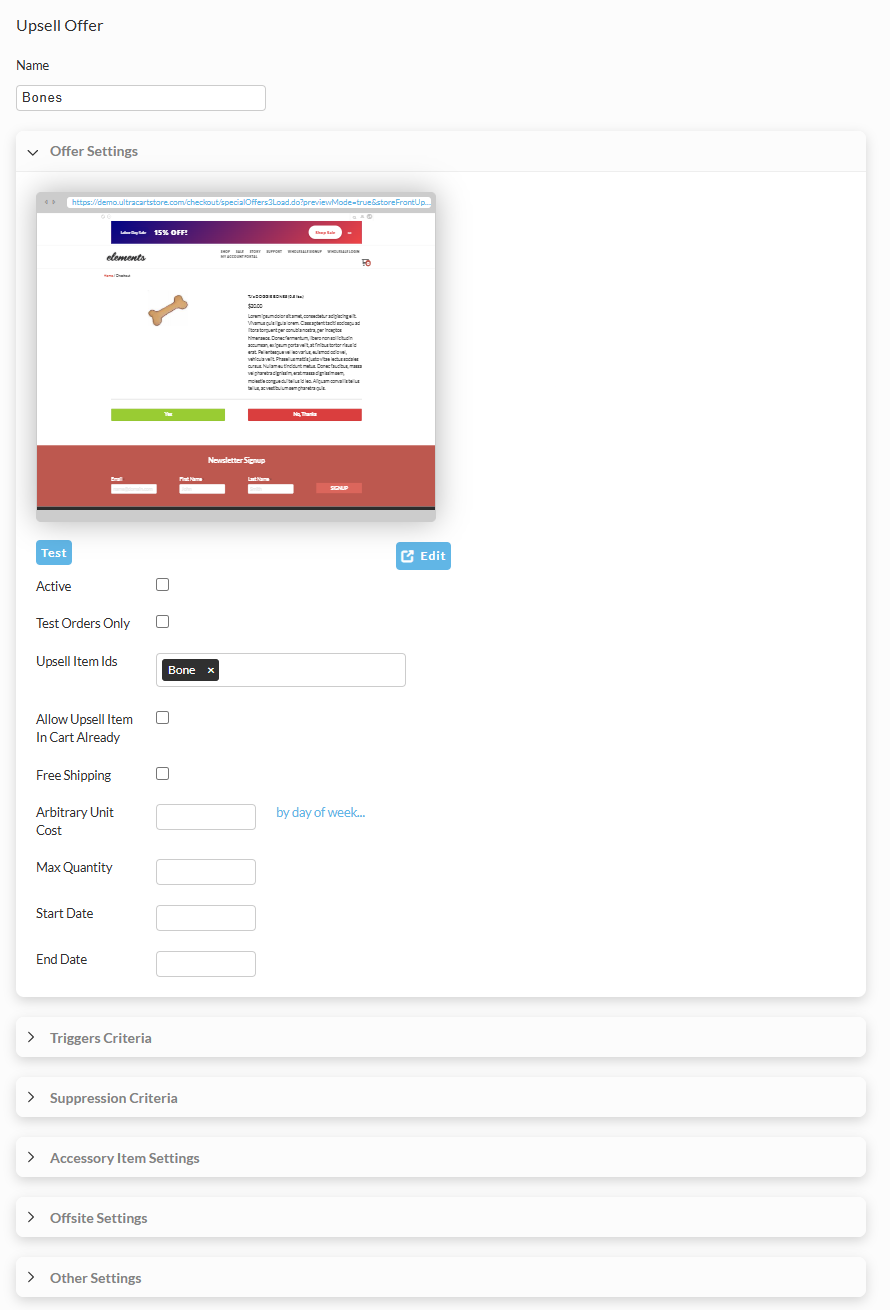
Offer Settings
| Field | Description |
|---|---|
| Active | If Check, the offer is active. |
| Test Orders Only | If selected the offer will only appear when the test credit card is used during the placement of the order. |
| Upsell Item Id's | The item(s) added to the order if the customer selects 'yes' for the offer. |
| Allow Upsell Item In Cart Already | Select this when the upsell Item ID is already in the cart prior to the display of this offer. |
| Free Shipping | Flags the upsell item as a free shipping item in the offer even if the item normally charges for shipping. |
| Arbitrary Unit Cost | If you are selling the item blow the cost configured on the item, then enter the new lower unit price here. Optional Setting: "By Day of Week" → Allows for a different arbitrary unit cost for each day of the week. |
| Max Quantity | Sets a max quantity for the upsell item. |
| Start Date | Sets the Starting date for this offer (this is useful for setting time sensitive offers (like a Memorial Day special, for example.) |
| End Date | Sets the end date for this offer (this is useful for setting time sensitive offers (like a Memorial Day special, for example.) |
Advanced Settings
Triggers Criteria
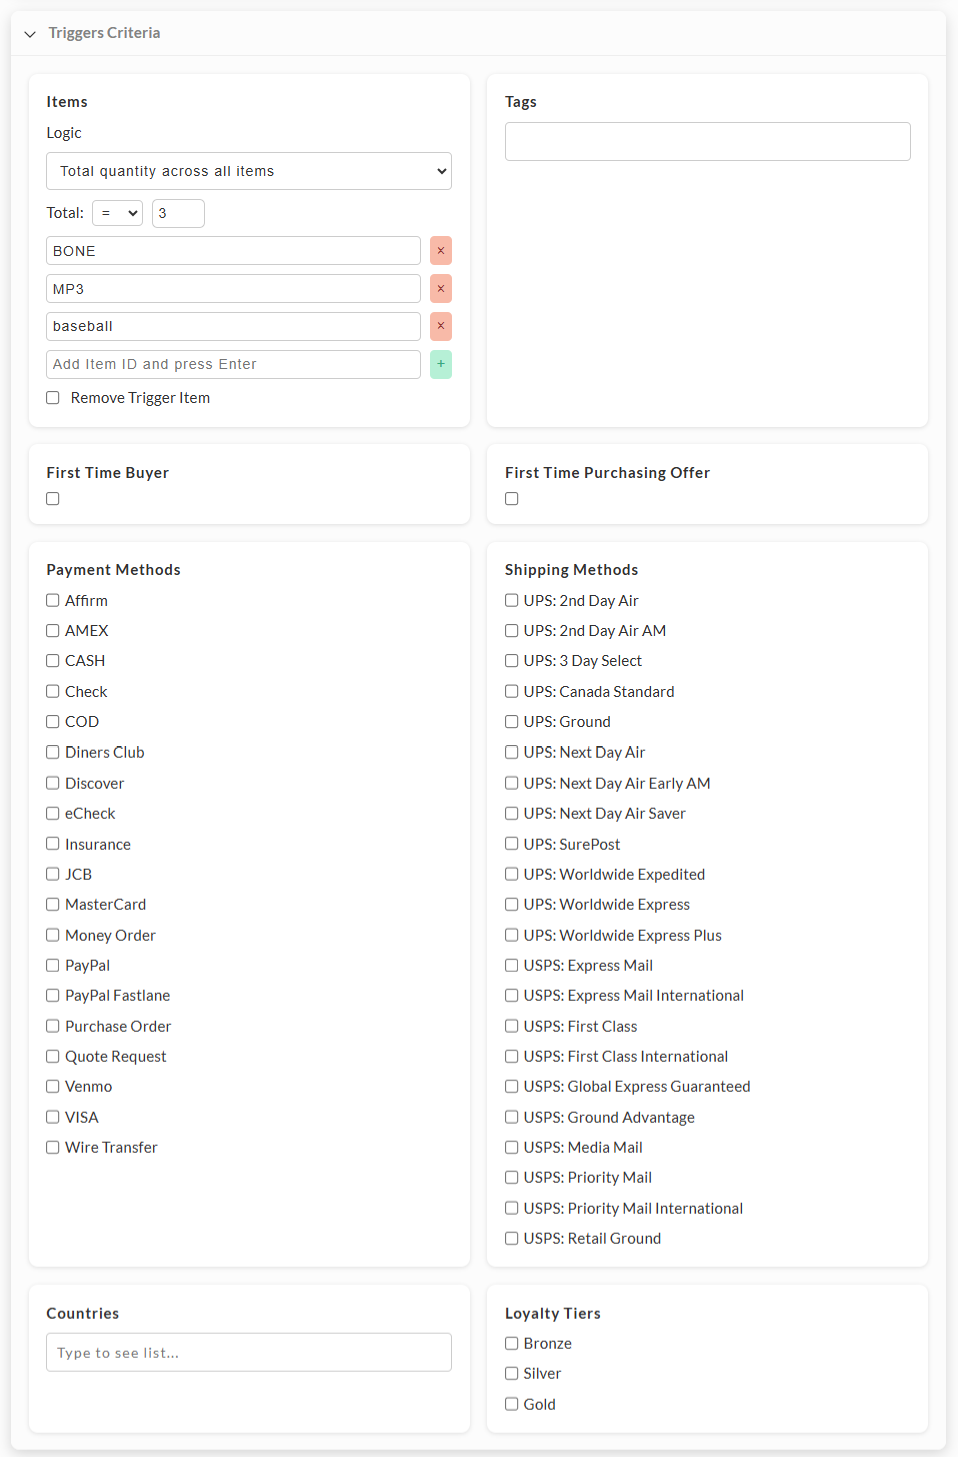
| Field Name | Description |
|---|---|
| Items (Logic) | Defines logic for evaluating items in the cart. Options include "Total quantity across all items," etc. |
| Total | Condition for total item quantity. Example: = 3. |
| Item IDs | Specific item IDs added to the trigger. Merchants can enter multiple item IDs (e.g., BONE, MP3, baseball) to define trigger criteria. |
| Remove Trigger Item | The "Remove Trigger Item" option in the upsell offer editor's trigger criteria settings in UltraCart is a feature that allows merchants to automatically remove the original trigger item from the customer's cart when they accept the upsell item. This is particularly useful when the upsell offer is intended to replace the trigger item with a different or upgraded version. Leave this checkbox unchecked when you want the selected upsell offer items combined with the existing trigger item in the customer’s shopping cart at checkout. |
| Tags | Enter one or more tags to filter or trigger based on assigned order/customer tags. |
| First Time Buyer | Checkbox to apply trigger criteria only to first-time buyers. |
| First Time Purchasing Offer | Checkbox to apply trigger criteria only when a buyer is using a first-time purchase offer. |
| Payment Methods | Trigger applies if the customer pays using one or more specified payment methods. Merchants may configure options such as credit cards (VISA, MasterCard, AMEX, etc.), PayPal, eCheck, Affirm, Venmo, wire transfer, and others. |
| Shipping Methods | Trigger applies if the order uses a specified shipping method. Merchants may configure options such as UPS (Ground, 2nd Day Air, Worldwide Express, etc.) and USPS (Priority Mail, First Class, Ground Advantage, etc.). |
| Countries | Field to type and select one or more countries for trigger criteria. |
| Loyalty Tiers | Trigger applies if the customer belongs to a selected loyalty tier (e.g., Bronze, Silver, Gold). |
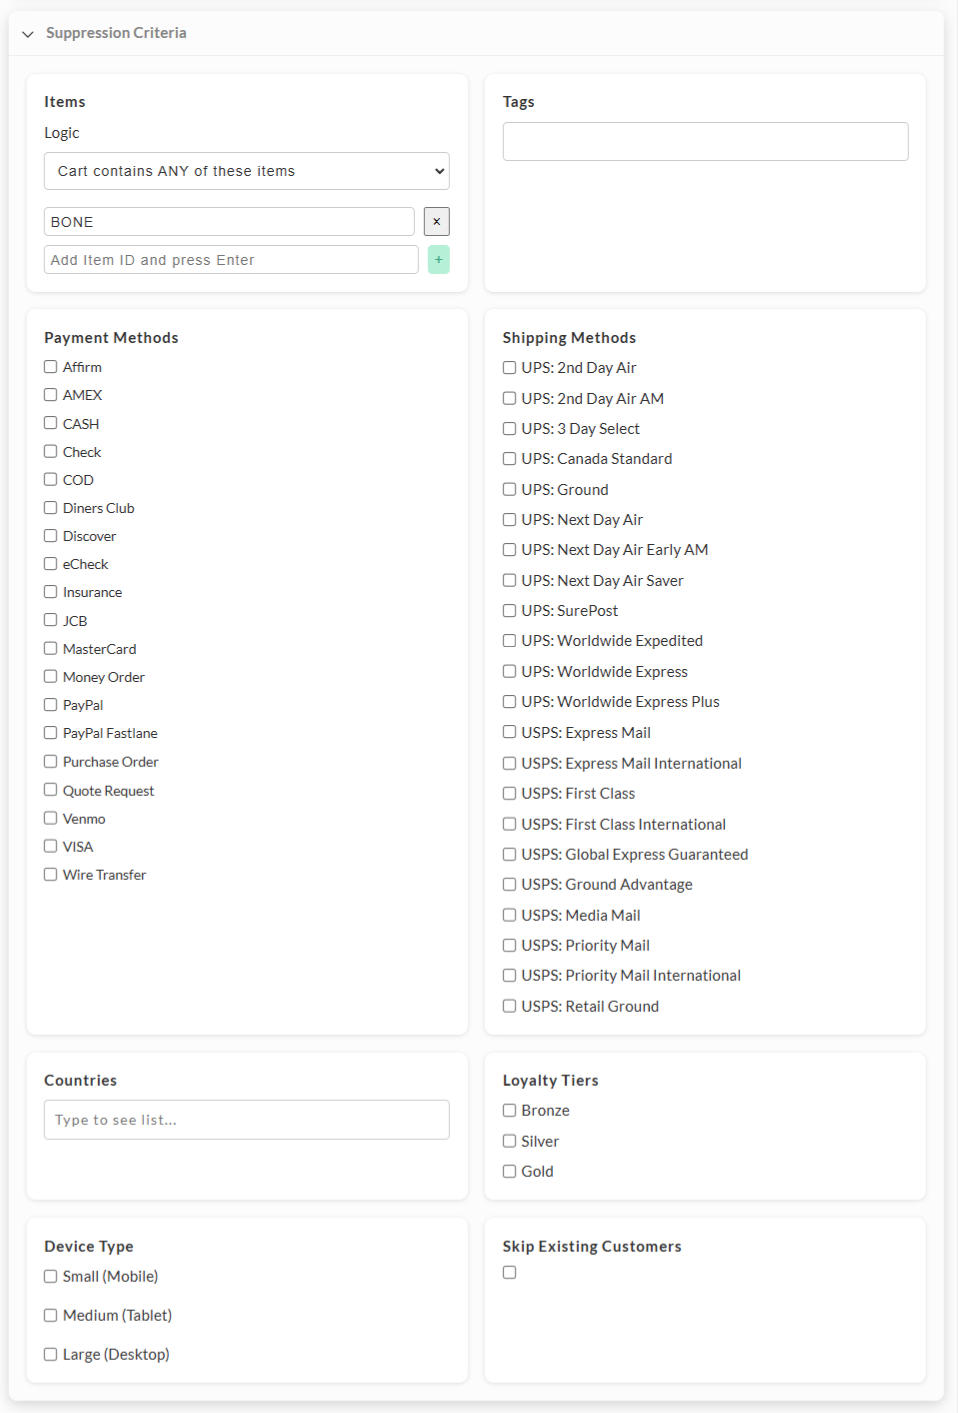
Suppression Criteria
| Field Name | Field Description |
|---|---|
| Items - Logic | Dropdown to set the rule for cart items (e.g., "Cart contains ANY of these items"). |
| Items - Item ID | Input to add specific item IDs to the suppression criteria. |
| Tags | Input field to add tags that are part of suppression criteria. |
| Payment Methods | List of available payment methods that can be selected (e.g., AMEX, PayPal, VISA). |
| Shipping Methods | List of available shipping methods (e.g., UPS, USPS, Ground, Priority Mail). |
| Countries | Input field to specify countries for suppression criteria. |
| Field Name | Field Description |
|---|---|
| Accessory Item Ids - Add | Input field to specify accessory item IDs to be added. |
| Accessory Item Ids - Remove | Input field to specify accessory item IDs to be removed. |
| Migrate Accessory Item Ids - From | Input field to specify the original accessory item ID to migrate from. |
| Migrate Accessory Item Ids - To | Input field to specify the new accessory item ID to migrate to. |
Offsite Settings
noteffbde8fbcc70
Important Note regarding External Upsell Offers
PLEASE NOTE: The **Offsite Content URL **will only appear in the upsell offer editor when the Upsell Path is set to 'Post Checkout' flow location.
Important Note regarding External Upsell Offers
PLEASE NOTE: The **Offsite Content URL **will only appear in the upsell offer editor when the Upsell Path is set to 'Post Checkout' flow location.
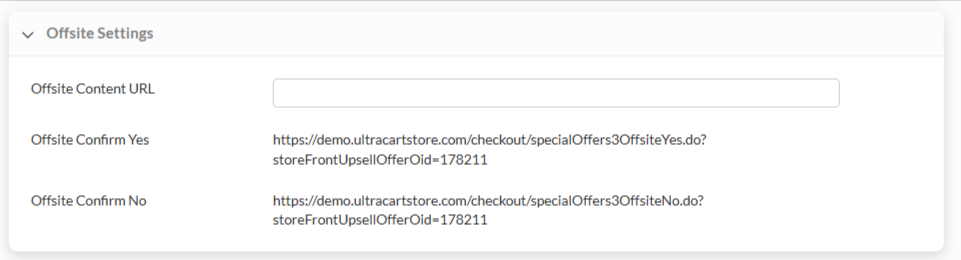
| Field Name | Field Description |
|---|---|
| Offsite Content URL | Input field to specify the URL of external/offsite content. |
| Offsite Confirm Yes | Auto-generated confirmation URL if the customer accepts the offsite offer. |
| Offsite Confirm No | Auto-generated confirmation URL if the customer declines the offsite offer. |
Other Settings
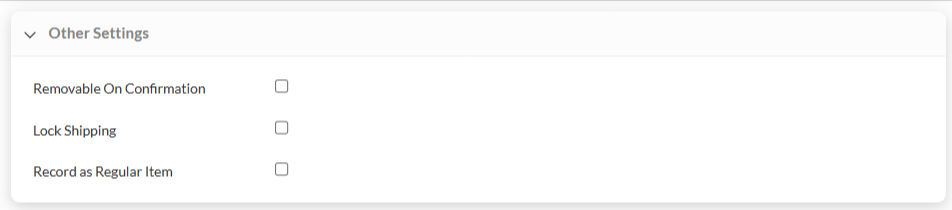
| Field Name | Field Description |
|---|---|
| Removable On Confirmation | Checkbox option to allow the item to be removed when confirmation occurs. |
| Lock Shipping | Checkbox option to lock the shipping method so it cannot be changed. |
| Record as Regular Item | Checkbox option to record the item as a standard/regular item in the system. |
Path View
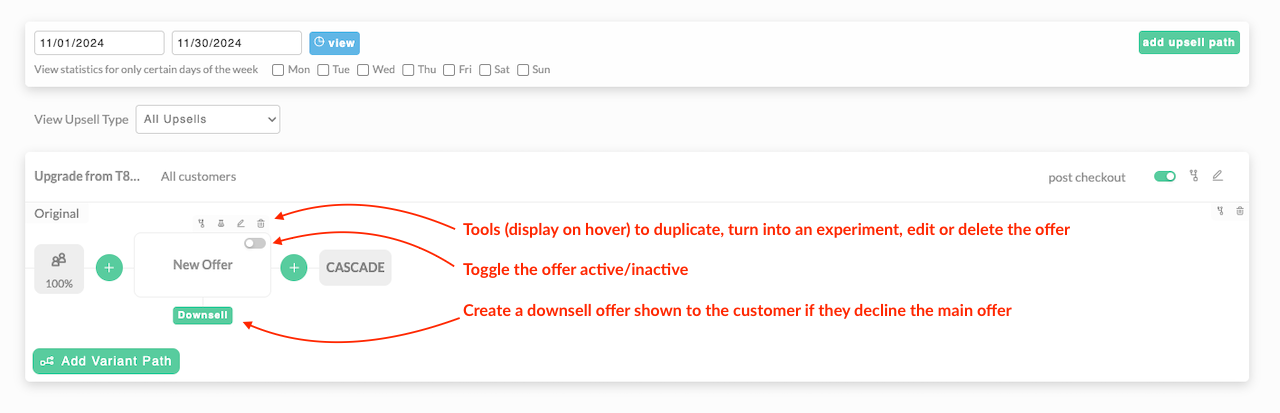
Now that we have our first offer created, let's look at how it shows in the path. When you hover over the offer you will see a grey popup set of tool icons along with a DOWNSELL option. There is also a quick toggle to make the offer active (blue) OR inactive (grey).
View Upsell Type
You can now sort your upsells by Pre and Post upsell after, this will allow you to filter your upsells to see just the offers that are offered post checkout or one that may be offered Pre checkout.

-
All Upsells - This will simply show all the offers currently configured
-
Post Checkout - This will allow you to filter to only see Post Checkout upsells.
-
Pre Checkout - This will allow you to filter to only see Pre Checkout upsells.
Upsell Status
You can use the “Upsell Status” drop-down list to filter your upsell offers between “Active”, “All”, and “Archived”. This will be useful when you have a large number of upsell offers.

-
Active - will display all offers that are not archived. NOTE: This includes both path’s and offers that have the have not been marked as archived via the three doth menu, so these will include both active and inactive offers, so longs as they have not been archived.
-
All - This will display all of the paths and offers, both active and archived.
-
Archived - Will display archived Path’s/Offer's.
Upsell Pagination
The Upsell page will now show up to 50 offers, anything over 50 offers will be split out into additional pages. Each page will display 50 offers, in the example below we have 83 offers so we would see 50 offers on page 1 and 33 offers on page 2.

Upsell Archive
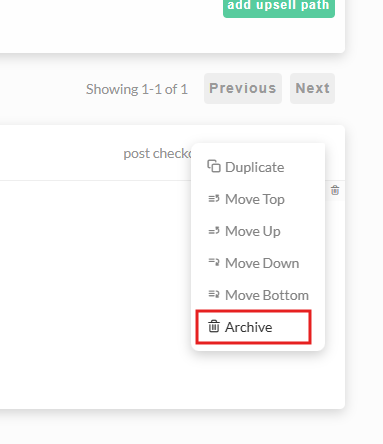
With the new Upsell Status system we are also introducing the ability to Archive upsell paths, this will allow upsells to be hidden from view to reduce confusion and clutter on the Storefronts Upsell Screen. You can archive an upsell by hovering over the 3 dots to the right of the Path and clicking on Archive as shown below.
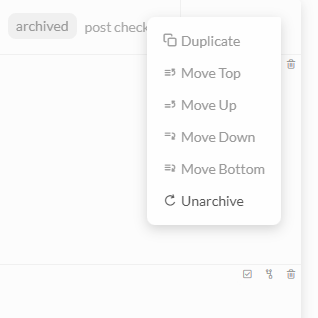
Once a path has been archived it will only be viewable by changing the Upsell status mentioned above to either All or Archived. You can also remove an Path from the Archive by again hovering over the 3 dots and clicking on Unarchive as shown below. You will also notice a new Archived status display for any Paths that are currently archived.
Editing the Path Settings of an Existing Path
Clicking the pencil in the top right corner of the path row will open this dialog window:
Path Settings
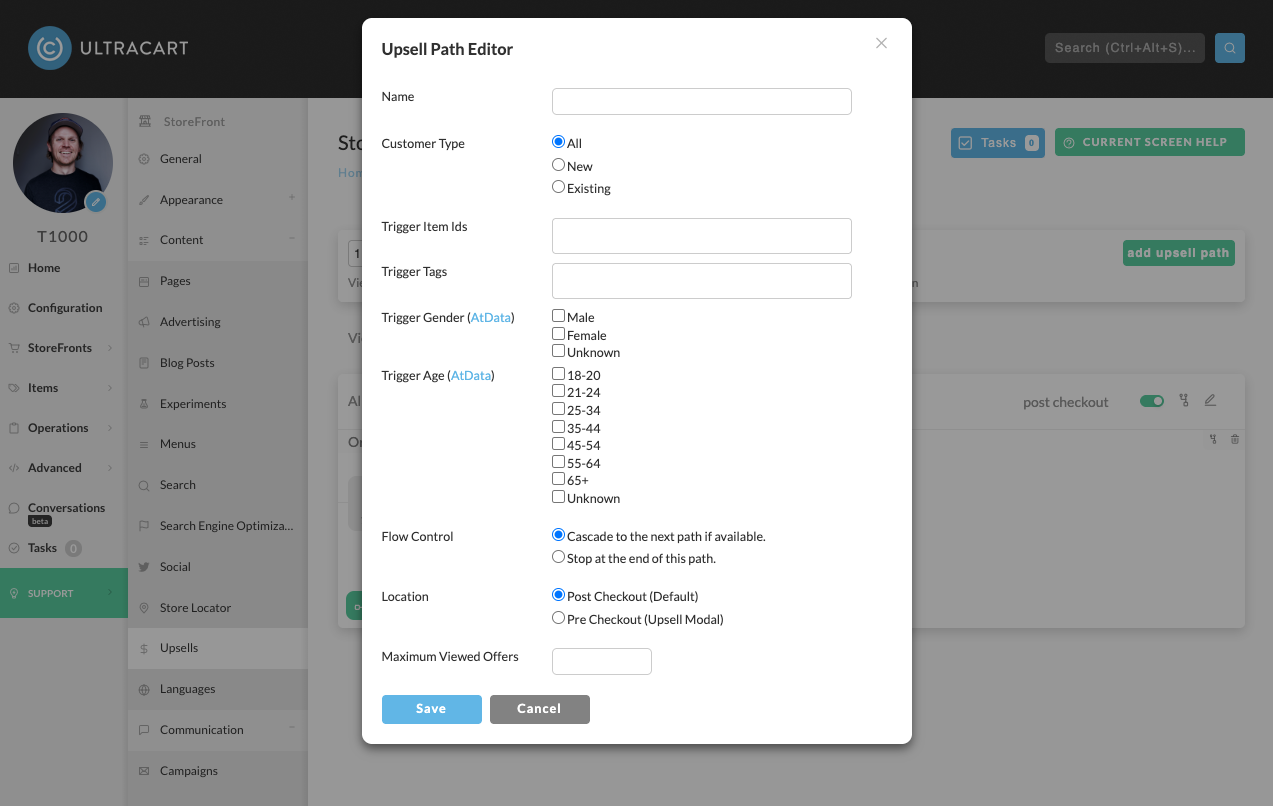
You can edit the:
| Upsell Path Field Names | Description |
|---|---|
| Name | Allow you to name the path. |
| Trigger Item IDs | Allows you to trigger the Upsell Path based on the items in the cart. |
| Trigger Tags *New | Allows you to trigger the Upsell Path based on the Product Tags for the items in the cart. |
| Trigger Gender *New | Allows you to trigger the Upsell Path based on the customer Gender *Requires AtData |
| Trigger Age *New | Allows you to trigger the Upsell Path based on the age of the customer *Requires AtData |
| Flow Control | This allow you to tell the Upsell Path to stop after this path is complete or continue to the next path in the list. |
| Maximum Viewed Offers | Allows you to set a limit to the number of offers a customer can see within the Path. |
Creating an Offer Experiment
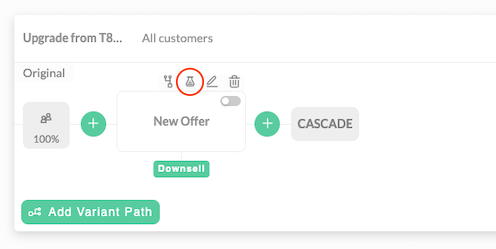
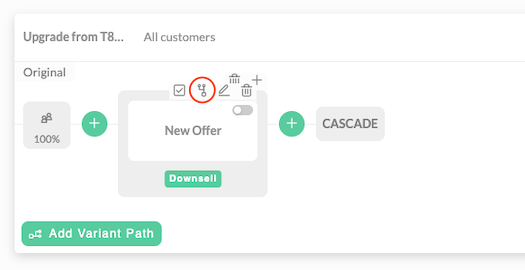
Hover over an offer and click the experiment icon as shown below.
Now that the single offer is contained in an experiment we can hover over the offer and use the duplicate tool as shown below.
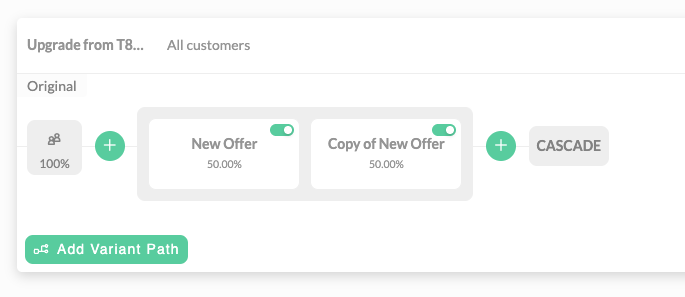
We now have two offers within an experiment. Since there are two offers, each one will receive 50% of the traffic. If there were three offers in an experiment then each one would receive 33.33%, etc. (Please note that the traffic percentage is fixed between the experiment offers.)
notefc22c0d2ab9e
Experiment Initialized
A border around an upsell offer indicates that an experiment has been initialized. If the user hovers over the bordered area, a trash can icon (delete) and plus '+' symbol appear in the top right, to add an offer to the experiment.
Mousing over an offer within the experiment, there is a menu with 4 options: promote offer, duplicate, edit, and delete.
Experiment Initialized
A border around an upsell offer indicates that an experiment has been initialized. If the user hovers over the bordered area, a trash can icon (delete) and plus '+' symbol appear in the top right, to add an offer to the experiment.
Mousing over an offer within the experiment, there is a menu with 4 options: promote offer, duplicate, edit, and delete.
 note29059c2d7252
Winning Offer
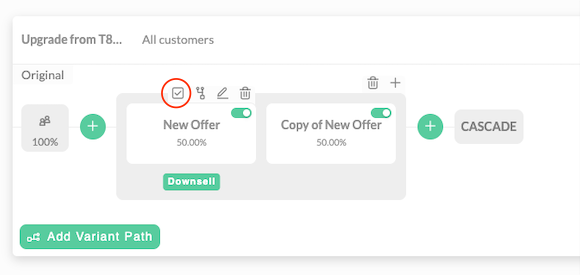
When you've decided on the winning offer in an offer experiment, hover over that offer and click the promotion tool as shown below.
Once done, only the winning offer will remain.
Winning Offer
When you've decided on the winning offer in an offer experiment, hover over that offer and click the promotion tool as shown below.
Once done, only the winning offer will remain.
How long should I run my offer experiment?
For a meaningful split test, aim for a minimum of 1-2 weeks of testing, ensuring you've reached a statistical significance of 95-99%, and ideally, run the test for 1-2 business cycles to account for variations in user behavior and seasonality.
Creating a Path Experiment
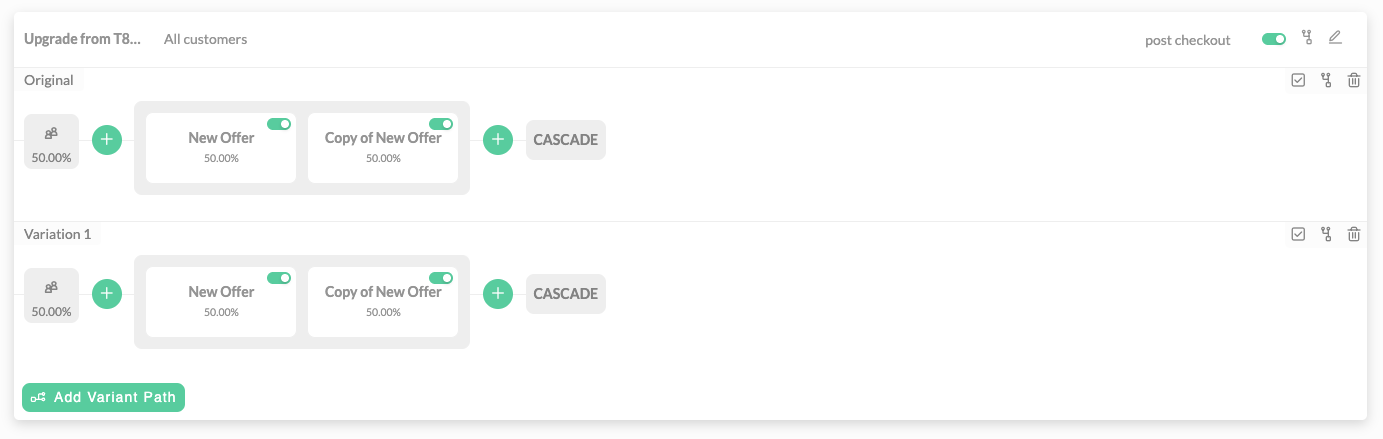
You can also create A/B tests for a particular path. These can be used to test different sequences or combinations of offers to see what is the optimal arrangement. To create a test you can either click the "Add Variant Path" button or duplicate an existing path as shown below.
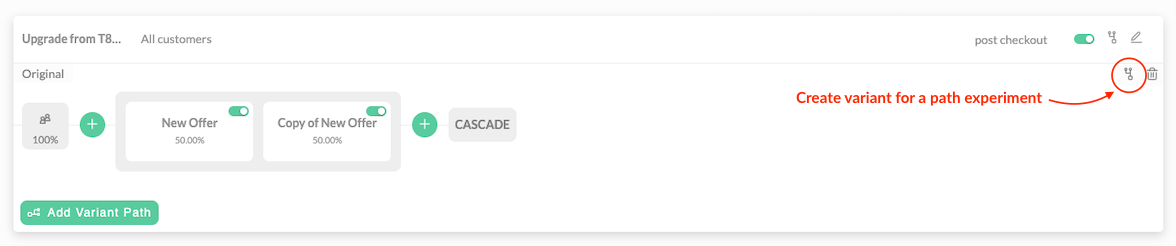
Once you have two or more variants to a path, you will see that the traffic is going to be split between the variant paths.
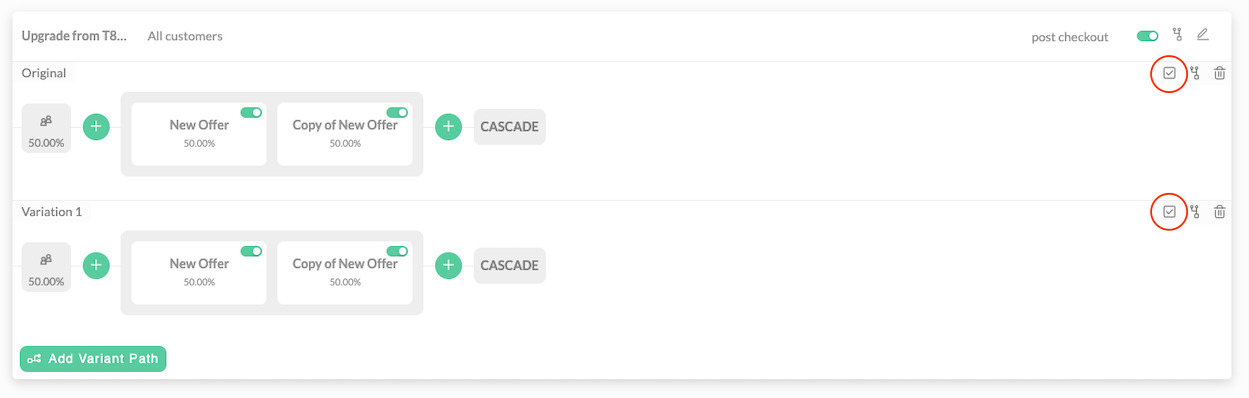
After a winner has been determined you can click the promote tool for the variant path winner. The looser will automatically be removed.
Drag and Drop
You can drag and drop offers/experiments to rearrange their position within the path or move them into new paths. You can also drag and drop offers into or out of an experiment. See the video below.
Viewing Statistics
To view the statistics enter the start/end dates and then click the view button as shown below.
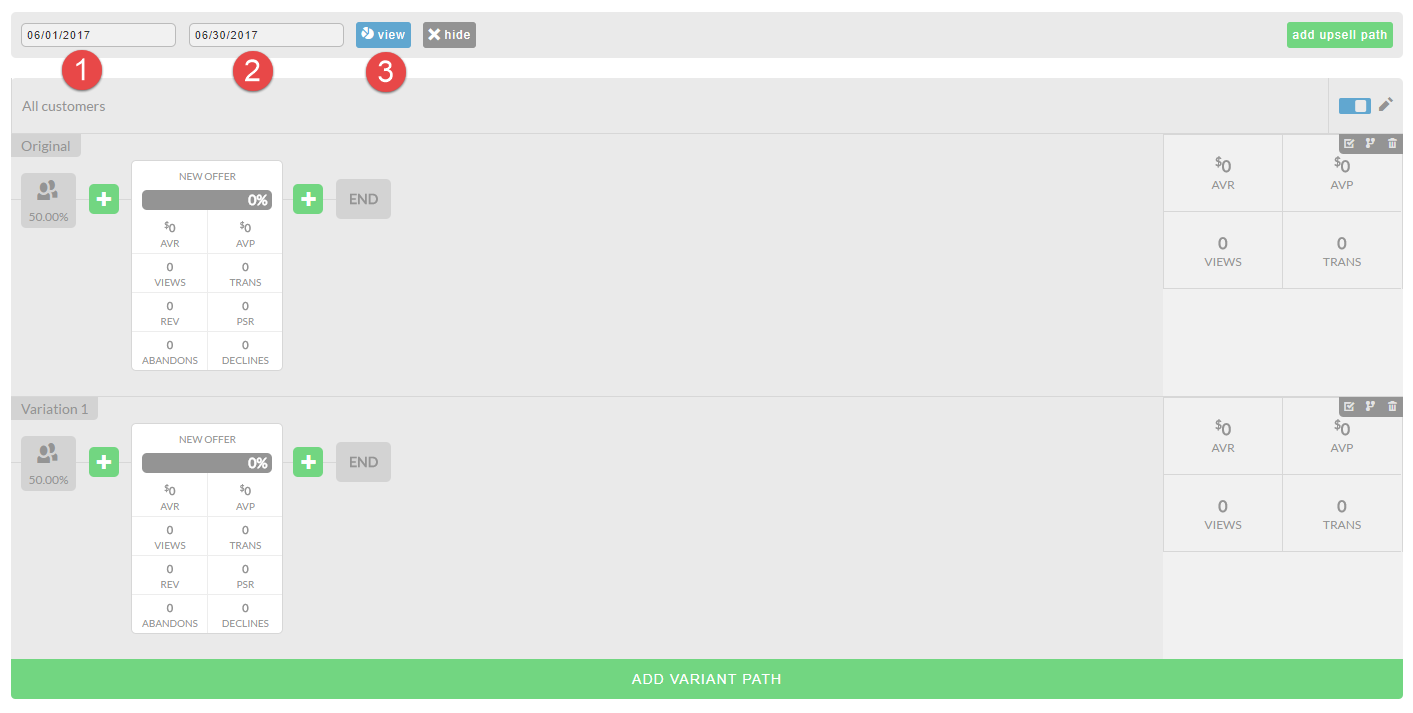
For each offer you will see the following statistics
-
Conversion percentage
-
Average Visitor Revenue (AVR)
-
Average Visitor Profit (AVP) - requires configuration of cost of goods sold (COGS) on your items
-
Views
-
Transactions (TRANS)
-
Revenue (REV)
-
Per Sale Revenue (PSR)
-
Abandons
-
Declines - number of people that clicked no to the offer.
For each of the paths you will also see:
-
Average Visitor Revenue (AVR)
-
Average Visitor Profit (AVP)
-
Views
-
Transactions (TRANS)
Webinar Video: Upsell After Visual Builder
Advanced Topics
Replacing default Yes-No buttons with custom Yes-No buttons
Using custom buttons in place of the defaulted 'Yes'& 'No' buttons for your upsell offer is a simple process.
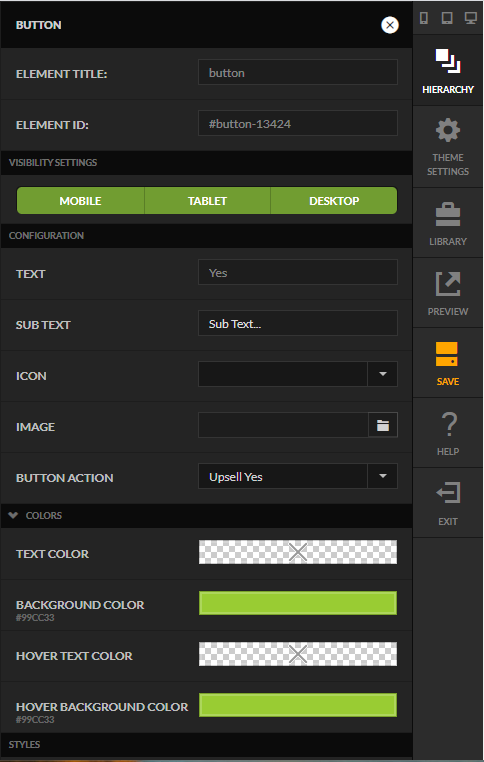
To modify the button images, edit your upsell offer, then highlight a button in the Visual Editor then clicking the "setrtings" icon or clicking the 'S' hotkey:
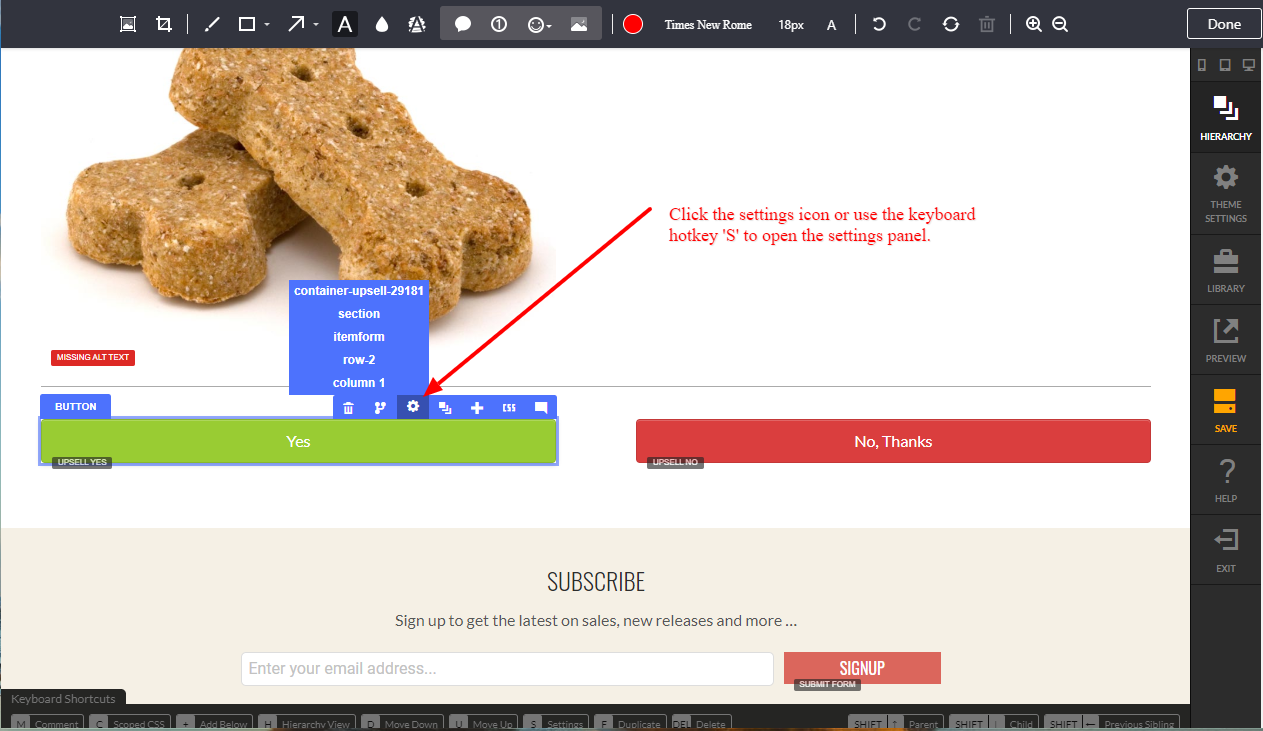
In the settings panel that opens you can edit the button by:
-
Changing the default button text and customizing the text and background colors, etc.
-
Adding sub-text
-
Applying an icon
-
Uploading a custom image
Offsite Content
One of the advanced features of the StoreFront Upsell system is the ability to have an offsite page as part of the upsell sequence. Below is a screenshot of the portion of the advanced configuration associated with offsite content.
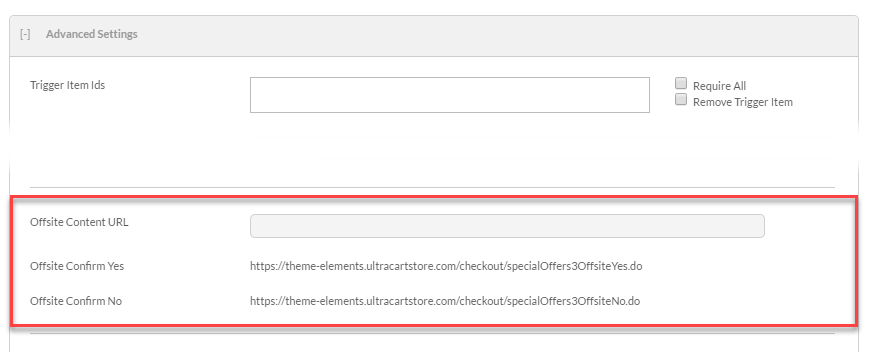
Here is what the three fields represent:
| Setting | Description |
|---|
| Original Item | Upsell Item |
|---|---|
ITEM-A | ITEM-B |
Workflow:
-
Customer purchases
ITEM-A -
Upsell offer for
ITEM-Bis displayed -
Customer accepts the offer
-
UltraCart removes
ITEM-Afrom the order -
UltraCart adds
ITEM-Bto the order
This configuration is commonly used for:
-
Product upgrades
-
Premium versions
-
Subscription tier upgrades
-
Warranty/service upgrades
-
Bundle upgrades