StoreFront Checkout
UltraCart’s checkout customization tools empower merchants to design a seamless and optimized checkout experience that aligns with their business needs and customer expectations. Whether you're looking to improve conversion rates, reinforce branding, or collect key customer data, the Visual Builder allows deep customization—all without writing a single line of code.
At the core of this system is the StoreFront Visual Builder, a drag-and-drop interface that lets you rearrange components, change layout structure, add conditions, and preview in real time.
Important: Checkout is one of the most critical parts of your store. While UltraCart offers full control, editing checkout improperly can lead to broken user flows or lost conversions. Always test thoroughly.
Prerequisites:
-
An existing item or live storefront to trigger checkout
-
Store administrator access
Step-by-Step Instructions
1. Launching the Visual Builder for Checkout
-
Log into your UltraCart account.
-
Navigate to your StoreFront and add any product to your cart to initiate checkout.
- If your StoreFront is in Checkout Only mode, go to Items → Item Management, click the link icon next to an item, then select Open in a new window under Basic Link.
-
Once in the checkout page, click the Edit button in the top-left corner of the page. This opens the Visual Builder.
2. Understanding the Visual Builder
-
The Hierarchy Panel on the right shows the structural layout of your checkout.
-
Checkout elements are grouped under the CHECKOUTFORM container.
This container must remain intact. It provides cart context and handles logic for items, payments, error modals, shipping, and customer input fields.
3. Editing Checkout Components
-
Select any component (e.g., Contact Info, Shipping, Cart Summary) to:
-
Move it up/down the page
-
Show/hide elements based on conditions
-
Rename labels, update placeholders
-
Add/removal optional sections (gift options, marketing checkboxes)
-
Tip: You can use Conditional Visibility to show/hide sections based on logic (e.g., show pickup options only if certain item types are in the cart).
4. Shipping Method Element Settings
The shipping method list at checkout is the CHECKOUTSHIPPINGMETHOD element, inside the CHECKOUTFORM container. It appears on the checkout page under Shipping Preferences.
Finding the element
Pointing at the shipping method list on the page doesn't always select it. The Hierarchy panel is the more reliable way in:
-
Click Hierarchy in the toolbar on the right side of the Visual Builder.
-
Type
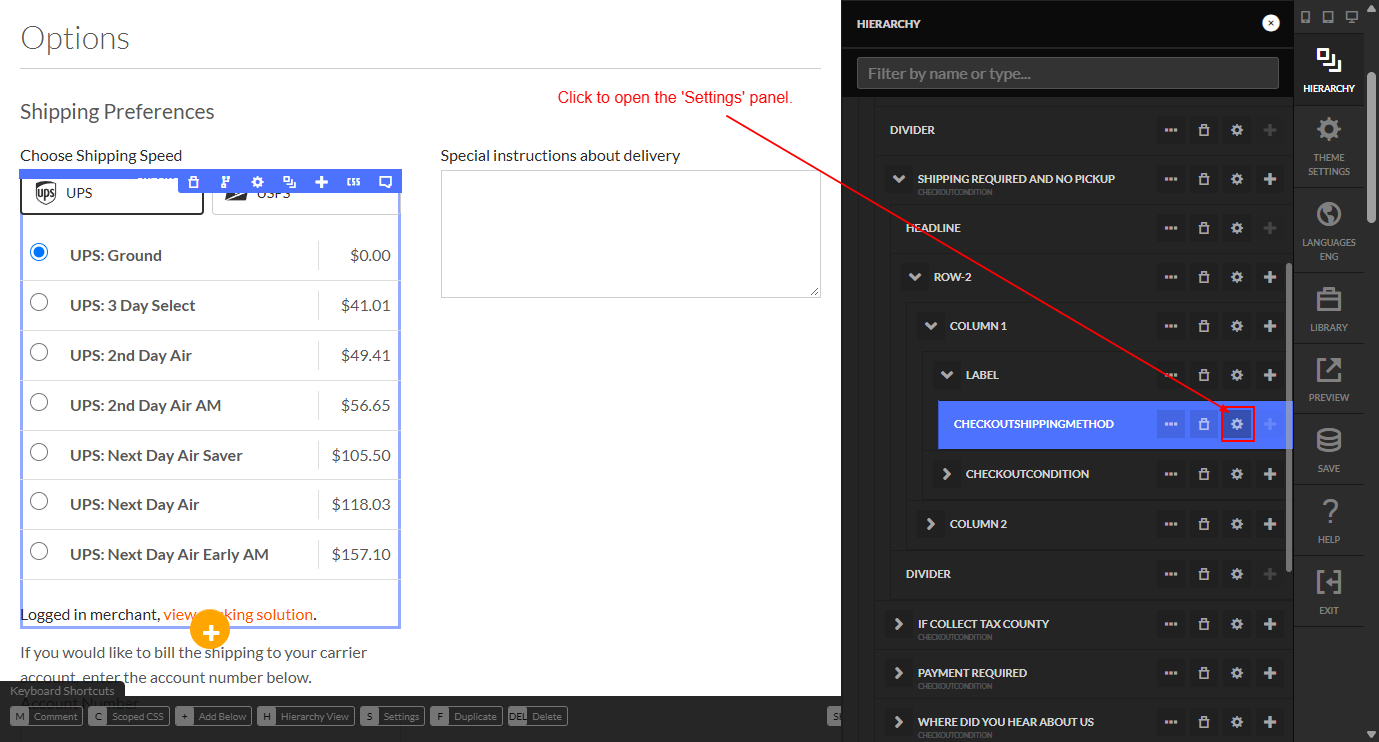
checkoutshippingmethodinto the Filter by name or type box at the top of the panel, or expand the containers down to it. In one theme, the path is Shipping Required and No Pickup (a CheckoutCondition) → Row-2 → Column 1 → Label → CHECKOUTSHIPPINGMETHOD. Your theme may nest the element differently; the filter box finds it either way. -
Click the gear icon on the CHECKOUTSHIPPINGMETHOD row to open its settings.
Settings
-
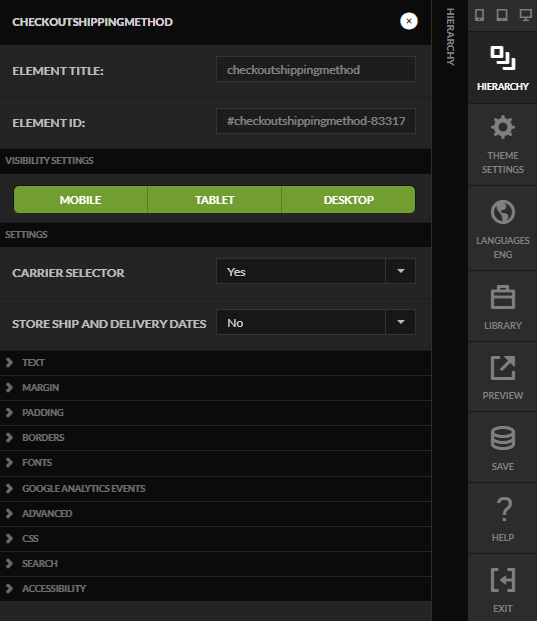
Carrier Selector (Yes / No). Set to Yes, the checkout shows a button for each carrier (for example UPS and USPS) above the method list, labeled Choose Shipping Speed. The customer clicks a carrier to see that carrier's methods, including any free methods it offers. Set to No, the carrier buttons disappear and the customer sees every available method from every carrier in one list.
-
Store Ship and Delivery Dates (Yes / No). Set to Yes, the ship date and delivery date the customer selects at checkout are saved on the order. This is the same as turning on the ship date and delivery date calendars in the shipping Checkout Options (Allow customers to select ship date / Allow customer to select delivery date). Use it when an order must ship on an exact date, for example perishable products.
Troubleshooting: If a customer reports that a shipping option, such as a free shipping method, disappears after they click a carrier button, set Carrier Selector to No as a quick check. If the option appears in the single list, the method is being rated correctly and the problem is in the carrier grouping. Contact UltraCart support in that case.
After changing a setting, click Save in the right-side toolbar and place a test order.
5. Save and Test
-
After editing, Save your changes.
-
Place test orders using different:
-
Devices (mobile, tablet, desktop)
-
Browsers
-
Item types (digital vs. physical)
-
Payment methods
-
Best Practices & Tips
-
Keep it simple. Don’t clutter checkout with unnecessary content.
-
Test on all device types. Many customers complete purchases on mobile.
-
Retain essential elements. Never remove the
CHECKOUTFORMcontainer or required fields like billing/shipping info. -
Use conditions wisely. Show or hide sections based on customer input or cart contents to streamline the experience.
Related Documentation
- Estimated Delivery - Configure ship and delivery date options, which interact with the shipping methods this checkout element displays.