Building a Variation Picker with Item Offer
Last Updated: June 9, 2026
This guide walks through building a variation picker in the Storefront Visual Builder (SFVB) using the Item Offer element family. Item Offer turns a product's variations (Format, Size, Strength, Quantity, and so on) into an interactive picker of styled buttons, cards, or swatches instead of a plain dropdown, with live pricing, savings callouts, and an optional subscribe-and-save choice that update as the shopper chooses.
Overview
When a product has variations, the classic approach is the Item Variations dropdown: one Please select... menu per variation. It works, but it hides your pricing and your best offer behind a select box.
Item Offer replaces that dropdown with a fully merchant-styled variation picker. Each variation becomes a row of buttons, cards, or swatches. Each choice can carry its own icon, image, price, and savings callout, and the price you show is the real price of the resolved child item, recalculated as the shopper changes any choice. You can add a subscribe-and-save option, low-stock urgency, "Most Popular" badges, and rules that reveal extra content when a particular choice is made.
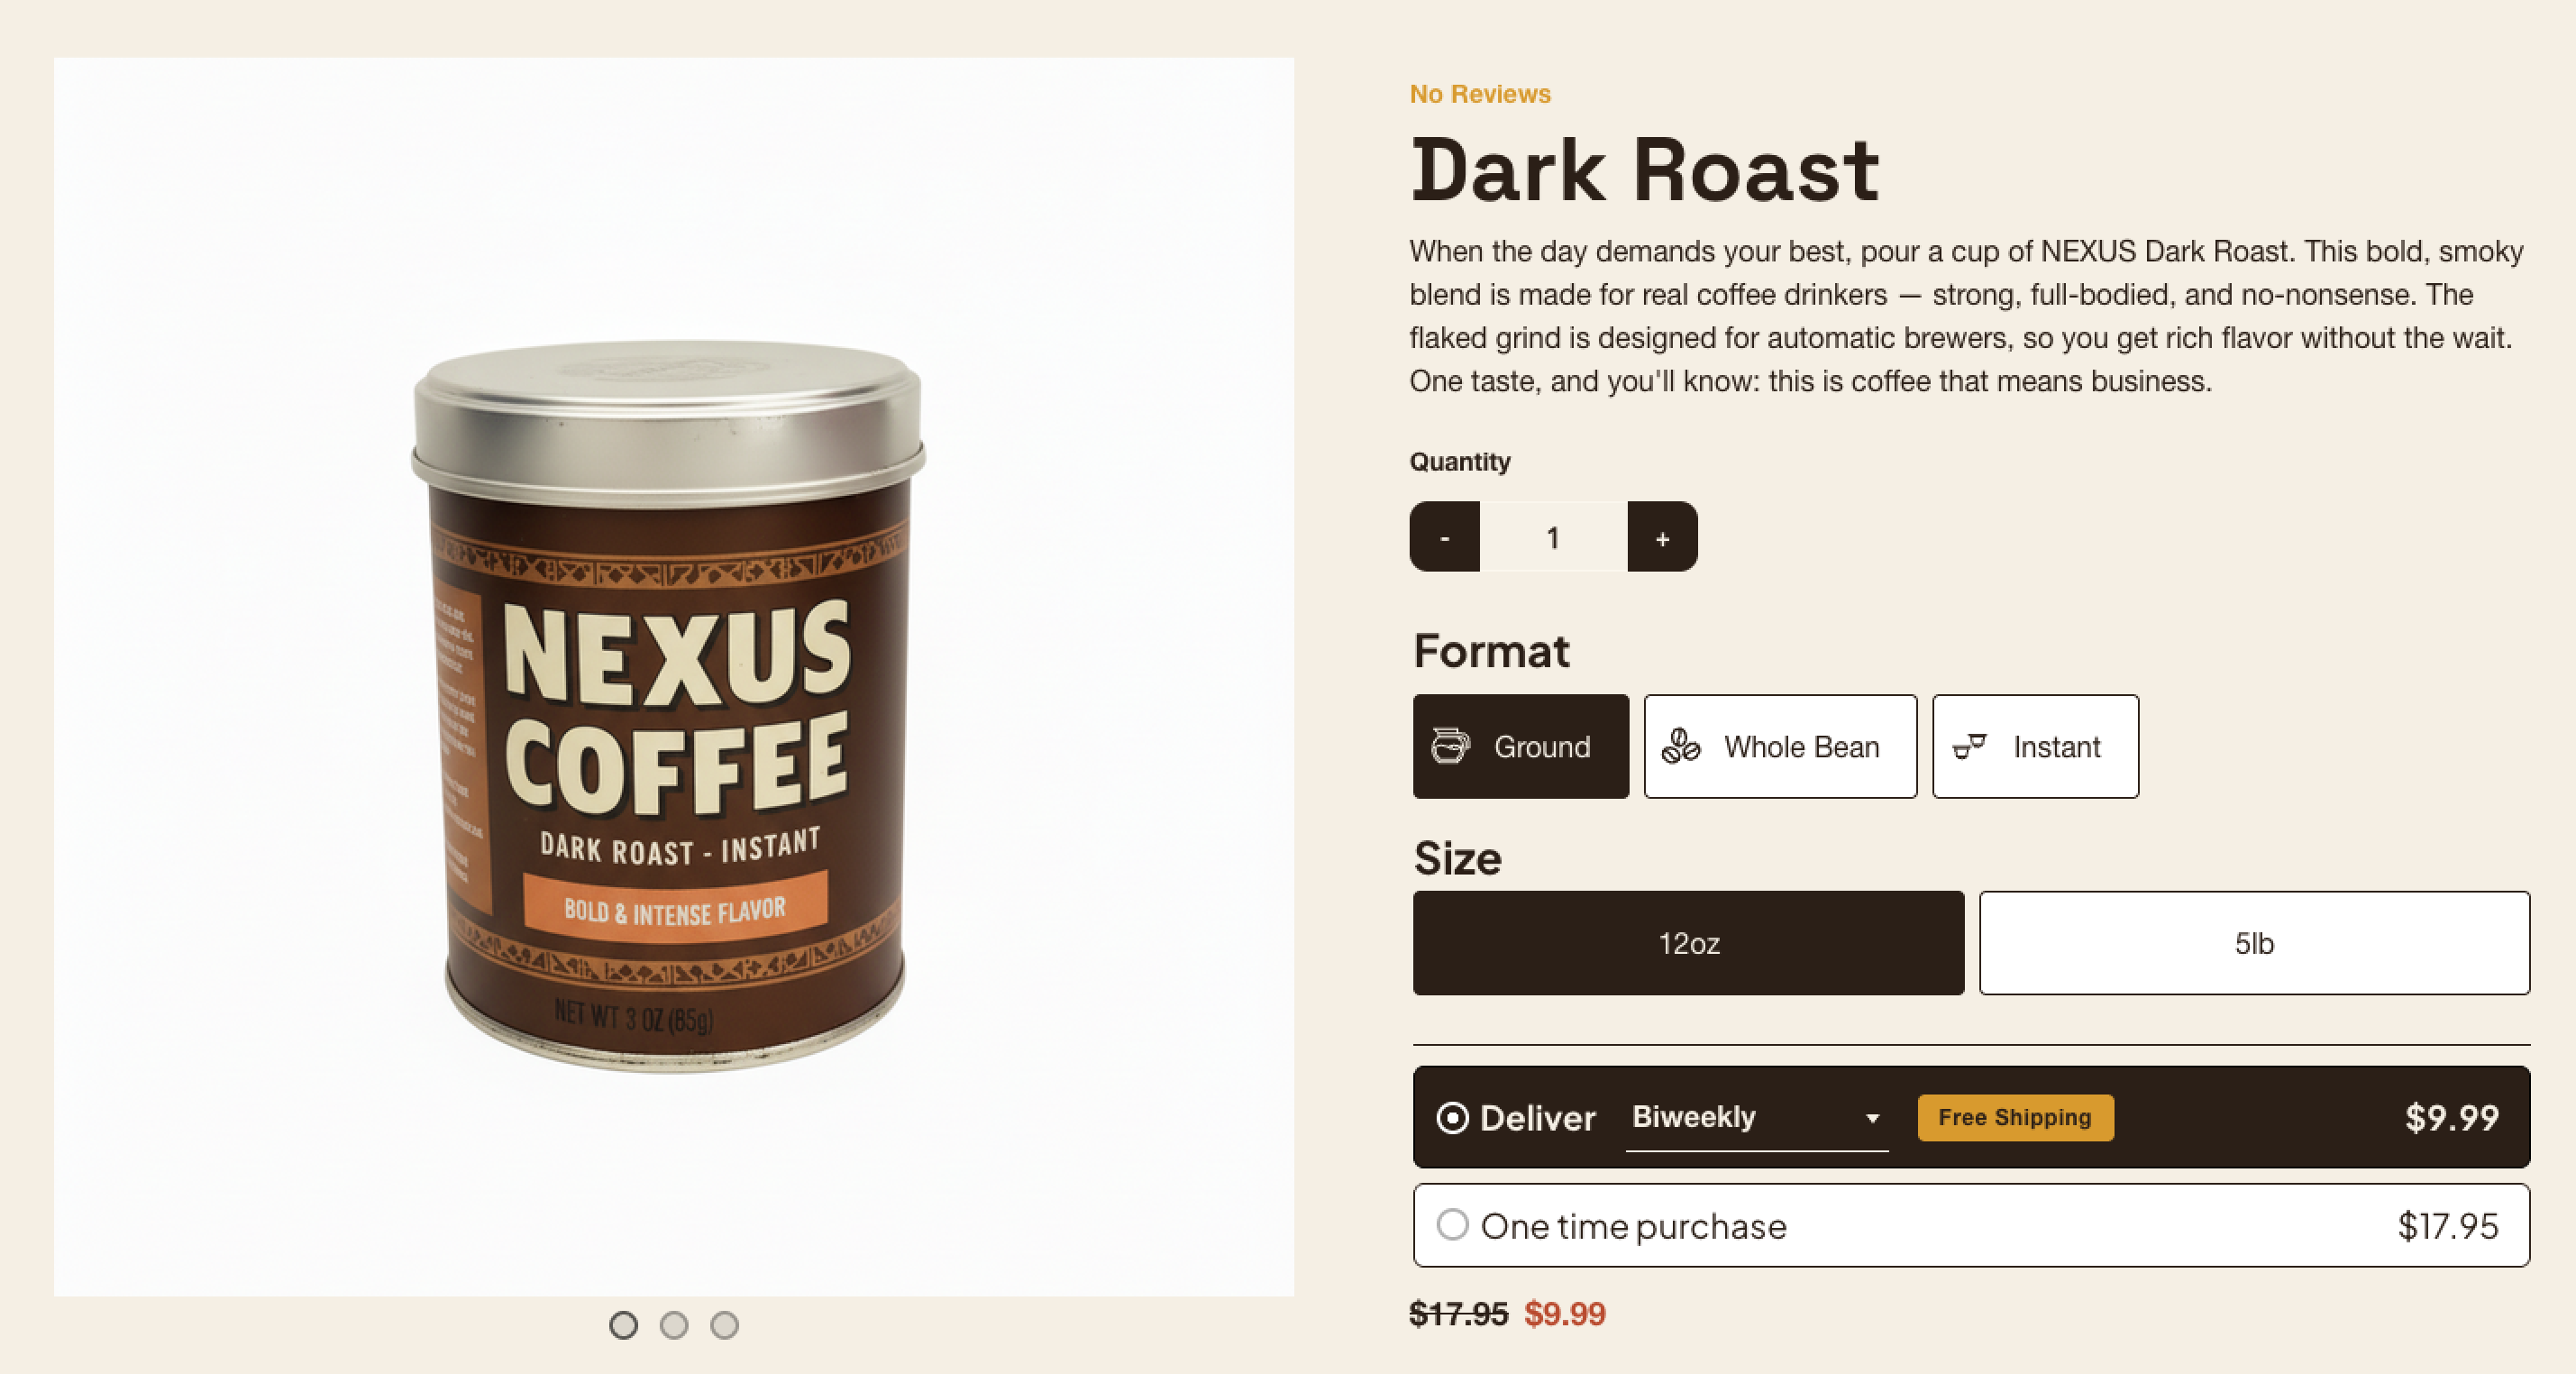
The picker above is built entirely from Item Offer elements: a Format picker (Ground / Whole Bean / Instant), a Size picker (12oz / 5lb), and a subscribe-versus-one-time delivery choice with live pricing. Together this product-page purchase module is what the direct-to-consumer world often calls a "buy box."
Item Offer is not a single widget you configure. You assemble the picker from one Item Offer container, one Item Offer Axis per choice dimension, and small slot widgets placed inside each axis. The sections below build it up one piece at a time.
How It Works
Item Offer follows a three-part model:
-
Item Offer is the container, or orchestrator. It owns the shopper's selection for the whole picker, resolves the chosen values to one concrete child SKU, and reflects that into the add-to-cart form (or, in checkout, into the live cart). It draws nothing on its own.
-
Item Offer Axis is one choice dimension, bound to a single variation (for example "Size"). It draws one cell per allowed value of that variation. An Item Offer Axis Name gives the axis a heading label.
-
Slot widgets (title, icon, price, savings, and so on) are placed inside an axis once. The axis clones them into every cell, and each clone resolves its own content for that cell's value.
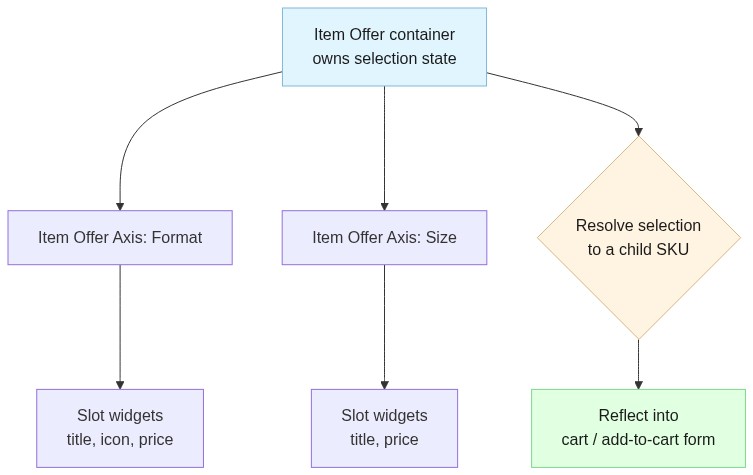
In the Storefront Visual Builder hierarchy, that structure looks like this:
itemoffer                          (the container; owns selection)
├── itemofferaxisname  "Format"    (heading for the Format axis)
├── itemofferaxis       Format      (one cell per Format value)
│   ├── itemoffericon               (per-value icon, cloned per cell)
│   └── itemoffertitle              (value label, cloned per cell)
├── itemofferaxisname  "Size"       (heading for the Size axis)
├── divider
└── itemofferaxis       Size         (one cell per Size value)
    └── itemoffertitle
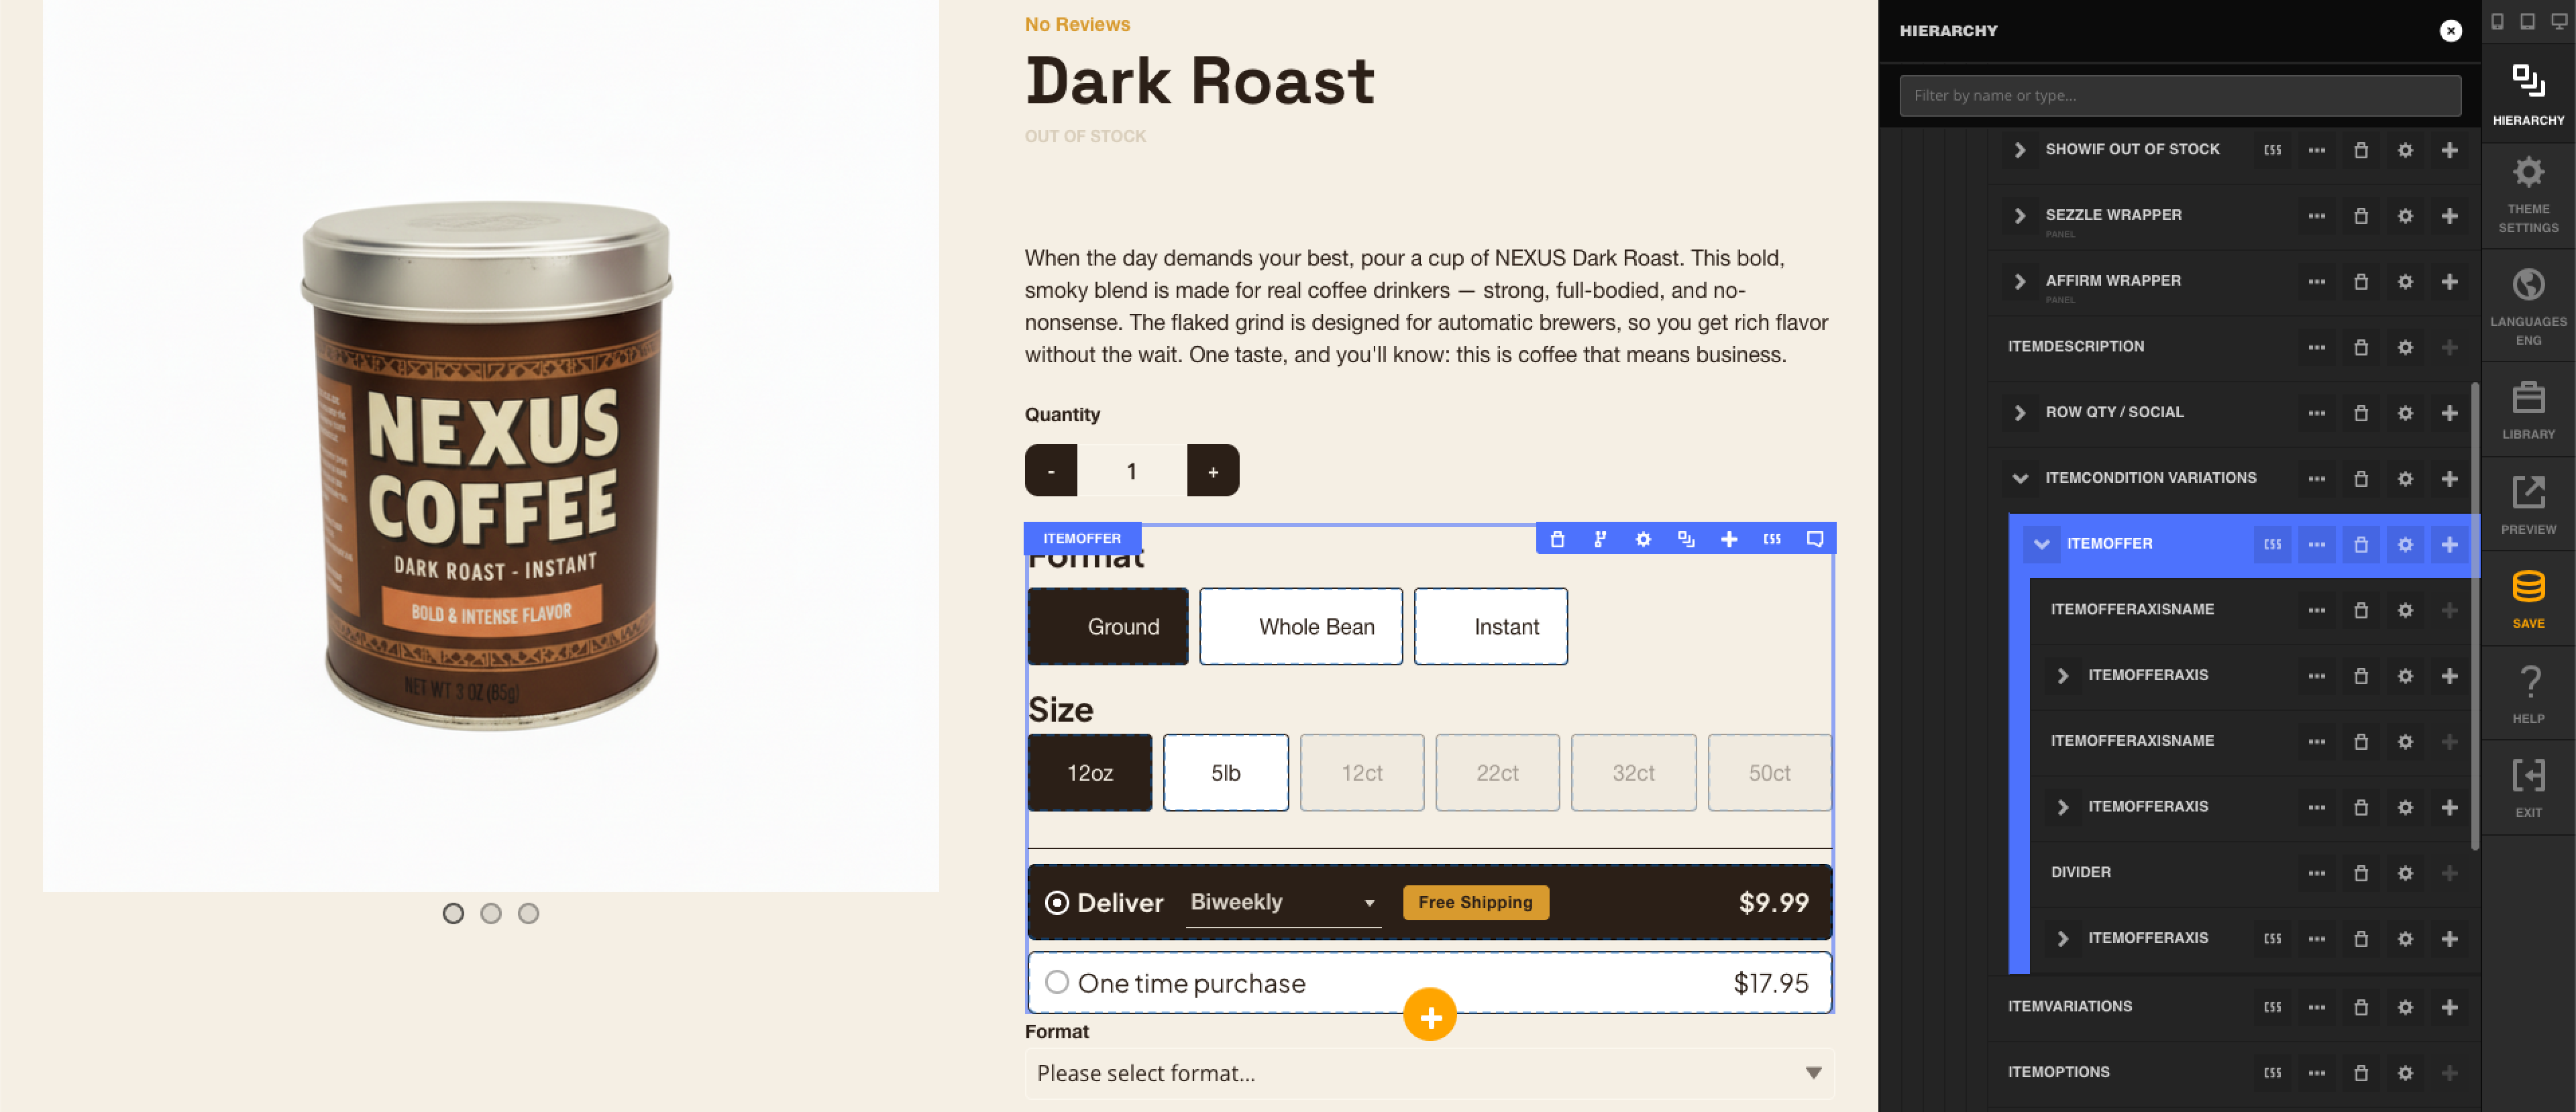
The key idea: the axis loops, the slots ride along. You style one cell's worth of widgets, and every value gets the same treatment, with its own resolved data.
Prerequisites
Before you place a single element, make sure you have:
-
StoreFront administrator access to the StoreFront Visual Builder.
-
An item with variations defined, and Variation Item Assignments mapping each combination of values to a child item (SKU).
Item Offer reads the item's real variation matrix, so the variations have to exist on the item first. You configure them in the item editor under Items, then Options / Variations.
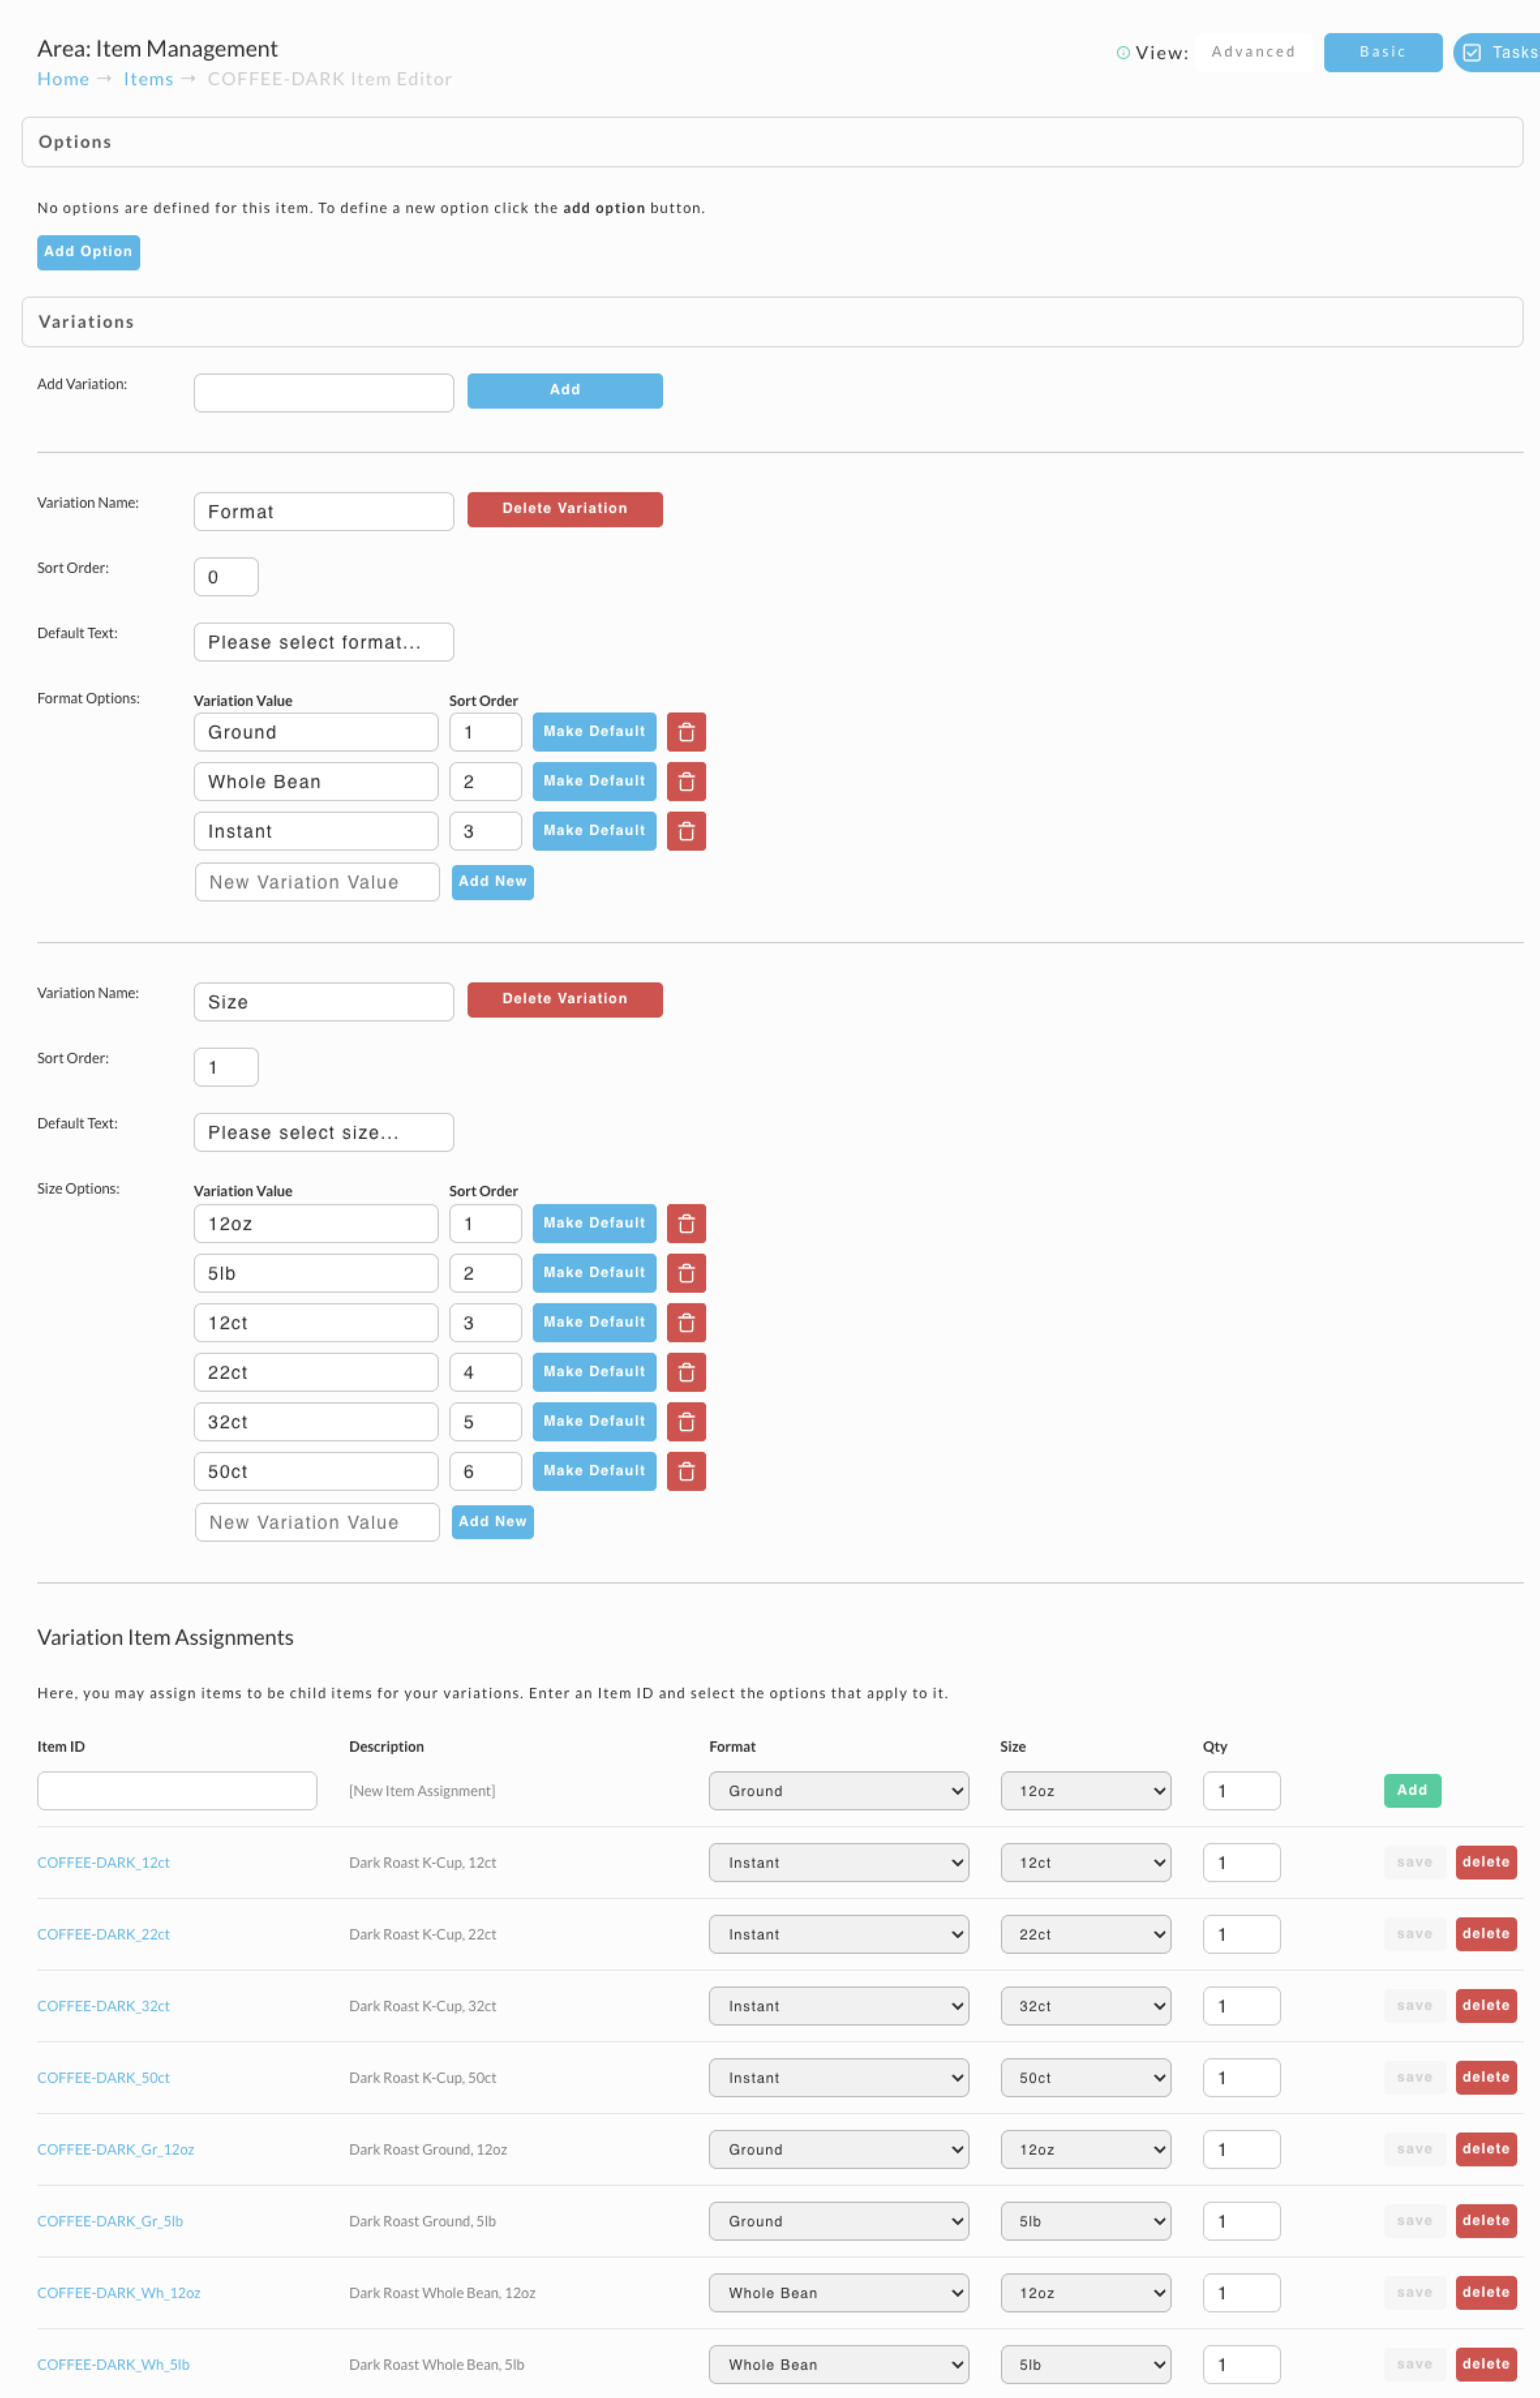
On this screen you define:
-
Variations and their Variation Values. In the example above, Format has the values Ground, Whole Bean, Instant, and Size has 12oz, 5lb, 12ct, 22ct, 32ct, 50ct. The Sort Order here is the order the cells appear in the picker.
-
Variation Item Assignments, which map each Format-plus-Size combination to a specific child Item ID (for example
COFFEE-DARK_Gr_12ozis Ground / 12oz). This is how the picker resolves a selection to a real SKU and price.
Important: When you bind an axis later, its Variation Name must match the variation name on the item exactly, including capitalization and spacing. A mismatch is the most common reason an axis shows up empty. See Troubleshooting.
Building the Variation Picker
The steps below build the Format-and-Size picker from the screenshots. Add one axis first, get it rendering, then repeat for the next variation.
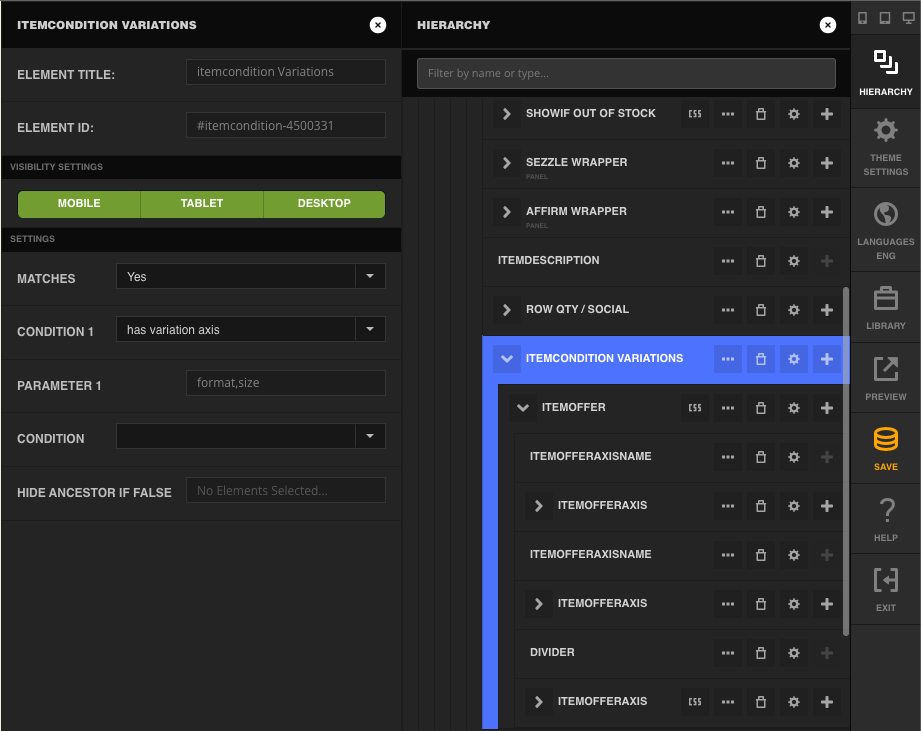
Step 1: Add the Item Variation Condition
On the product page, inside the item form, add an ItemCondition Variations element so this logic only runs if the item has variations.
Step 2: Add the Item Offer Element
On the product page, inside the item form, add an Item Offer element where you want the picker to appear. It establishes the picker and the item context that everything else reads from.
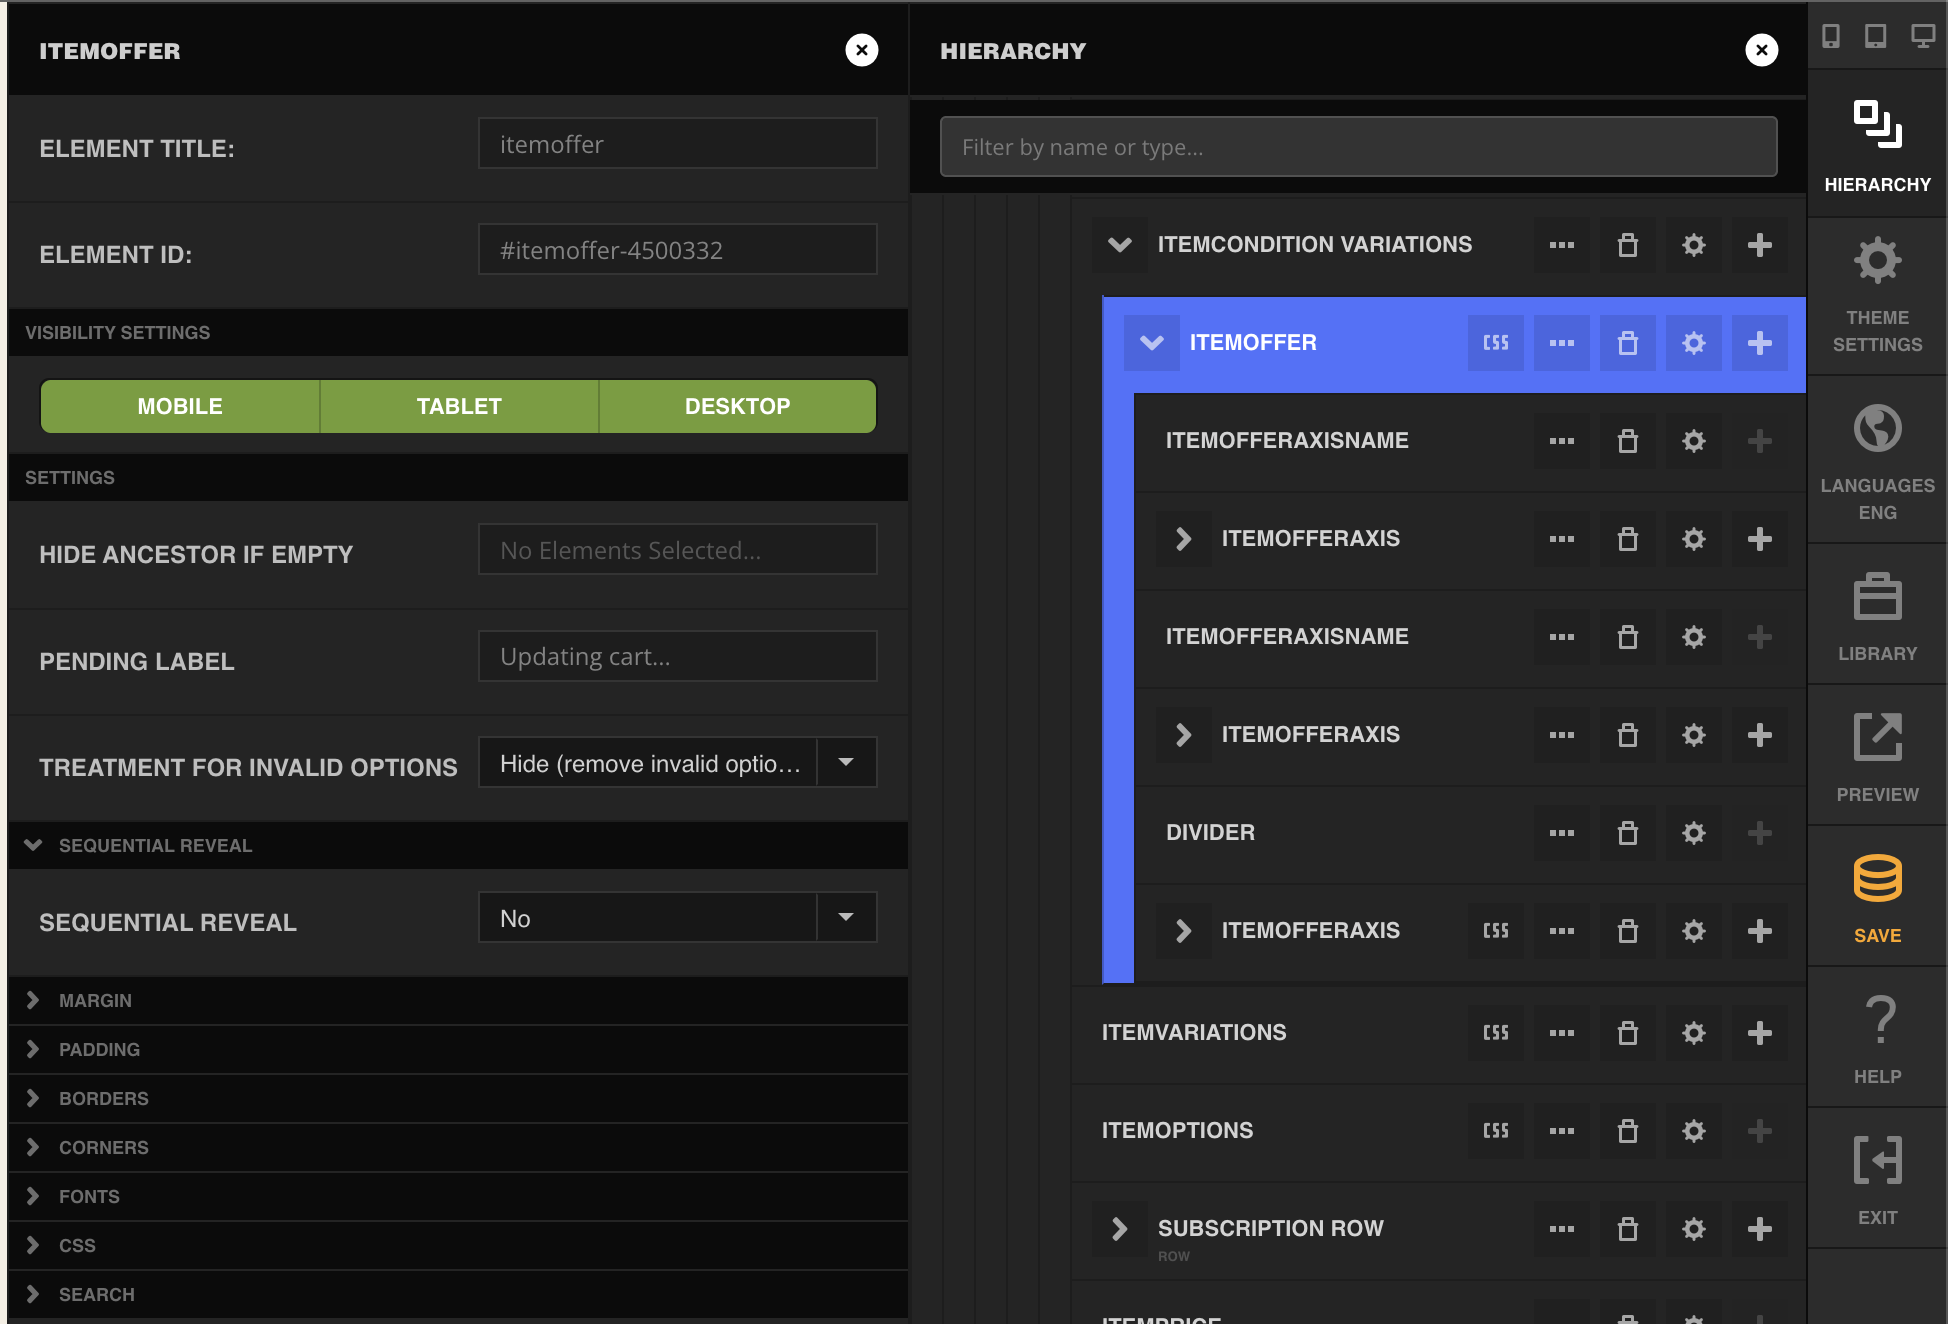
At this point Item Offer renders nothing visible. Its own settings (pending label, invalid-option behavior, sequential reveal) are covered in Item Offer Container Settings. Leave them at their defaults for now.
Step 2: Add an Axis and Its Label
For each variation, add two elements inside the Item Offer:
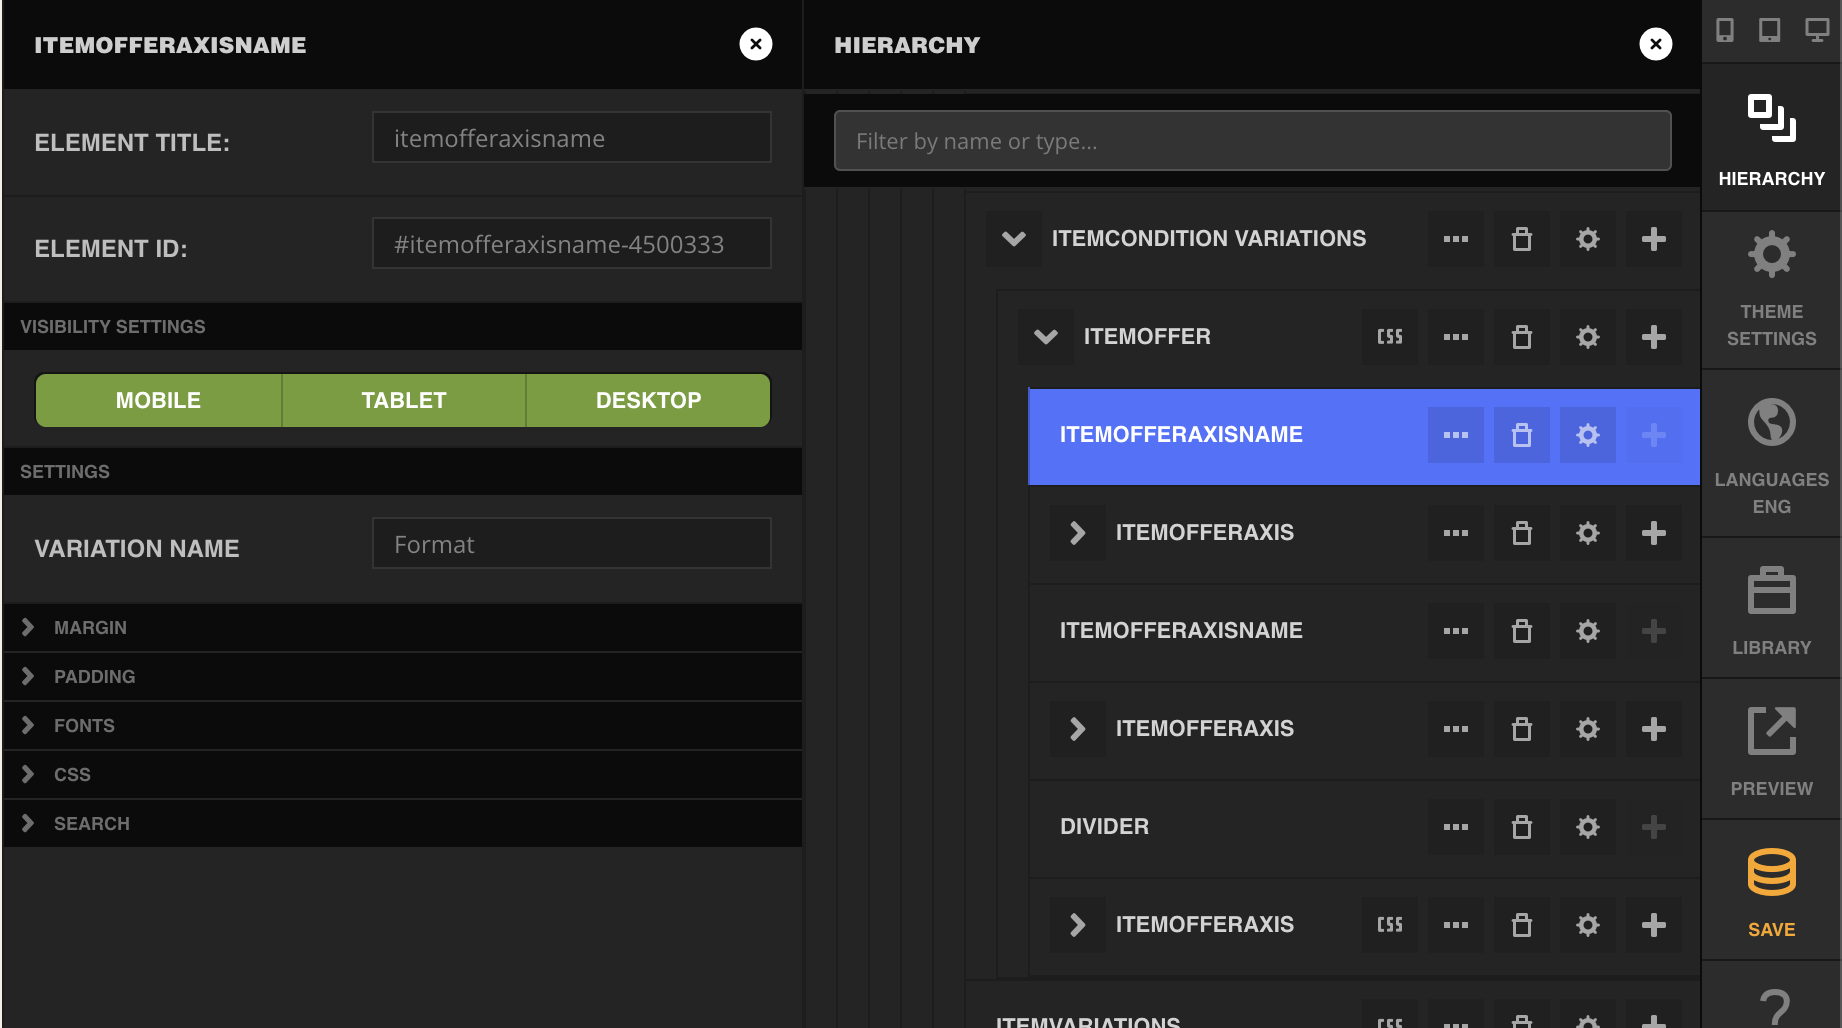
-
An Item Offer Axis Name to label the choice. Set its Variation Name to the variation it heads, for example
Format. -
-
An Item Offer Axis to draw the choices. Configure:
| Setting | What to enter |
|---|---|
| Axis Source | Variation matrix for a normal variation. (Use Auto order for a subscribe-versus-one-time axis, covered in Step 7.) |
| Variation Name | The variation to bind, for example Format. Must match the item exactly. |
| Setting | What it does |
|---|---|
| Selected Cell Background / Border / Text Color | The look of the active cell. |
| Selected Cell Bold | Yes to bold the selected cell's text. |
| Unselected Cell Background / Border / Text Color | The look of the inactive cells. |
| Show Sale Indicator | Yes draws a small dot on any cell whose variant is discounted. |
| Sale Indicator Colour | The color of that dot (default #a4453d). |
Step 5: Set Per-Value Configuration (Axis Value Map)
Some details belong to individual values rather than the whole axis: a specific icon for "Ground," a group heading, a custom label, or a per-value color. These live in the axis's Per-Value Configuration, opened with the Edit Per-Value Configuration button on the Item Offer Axis.
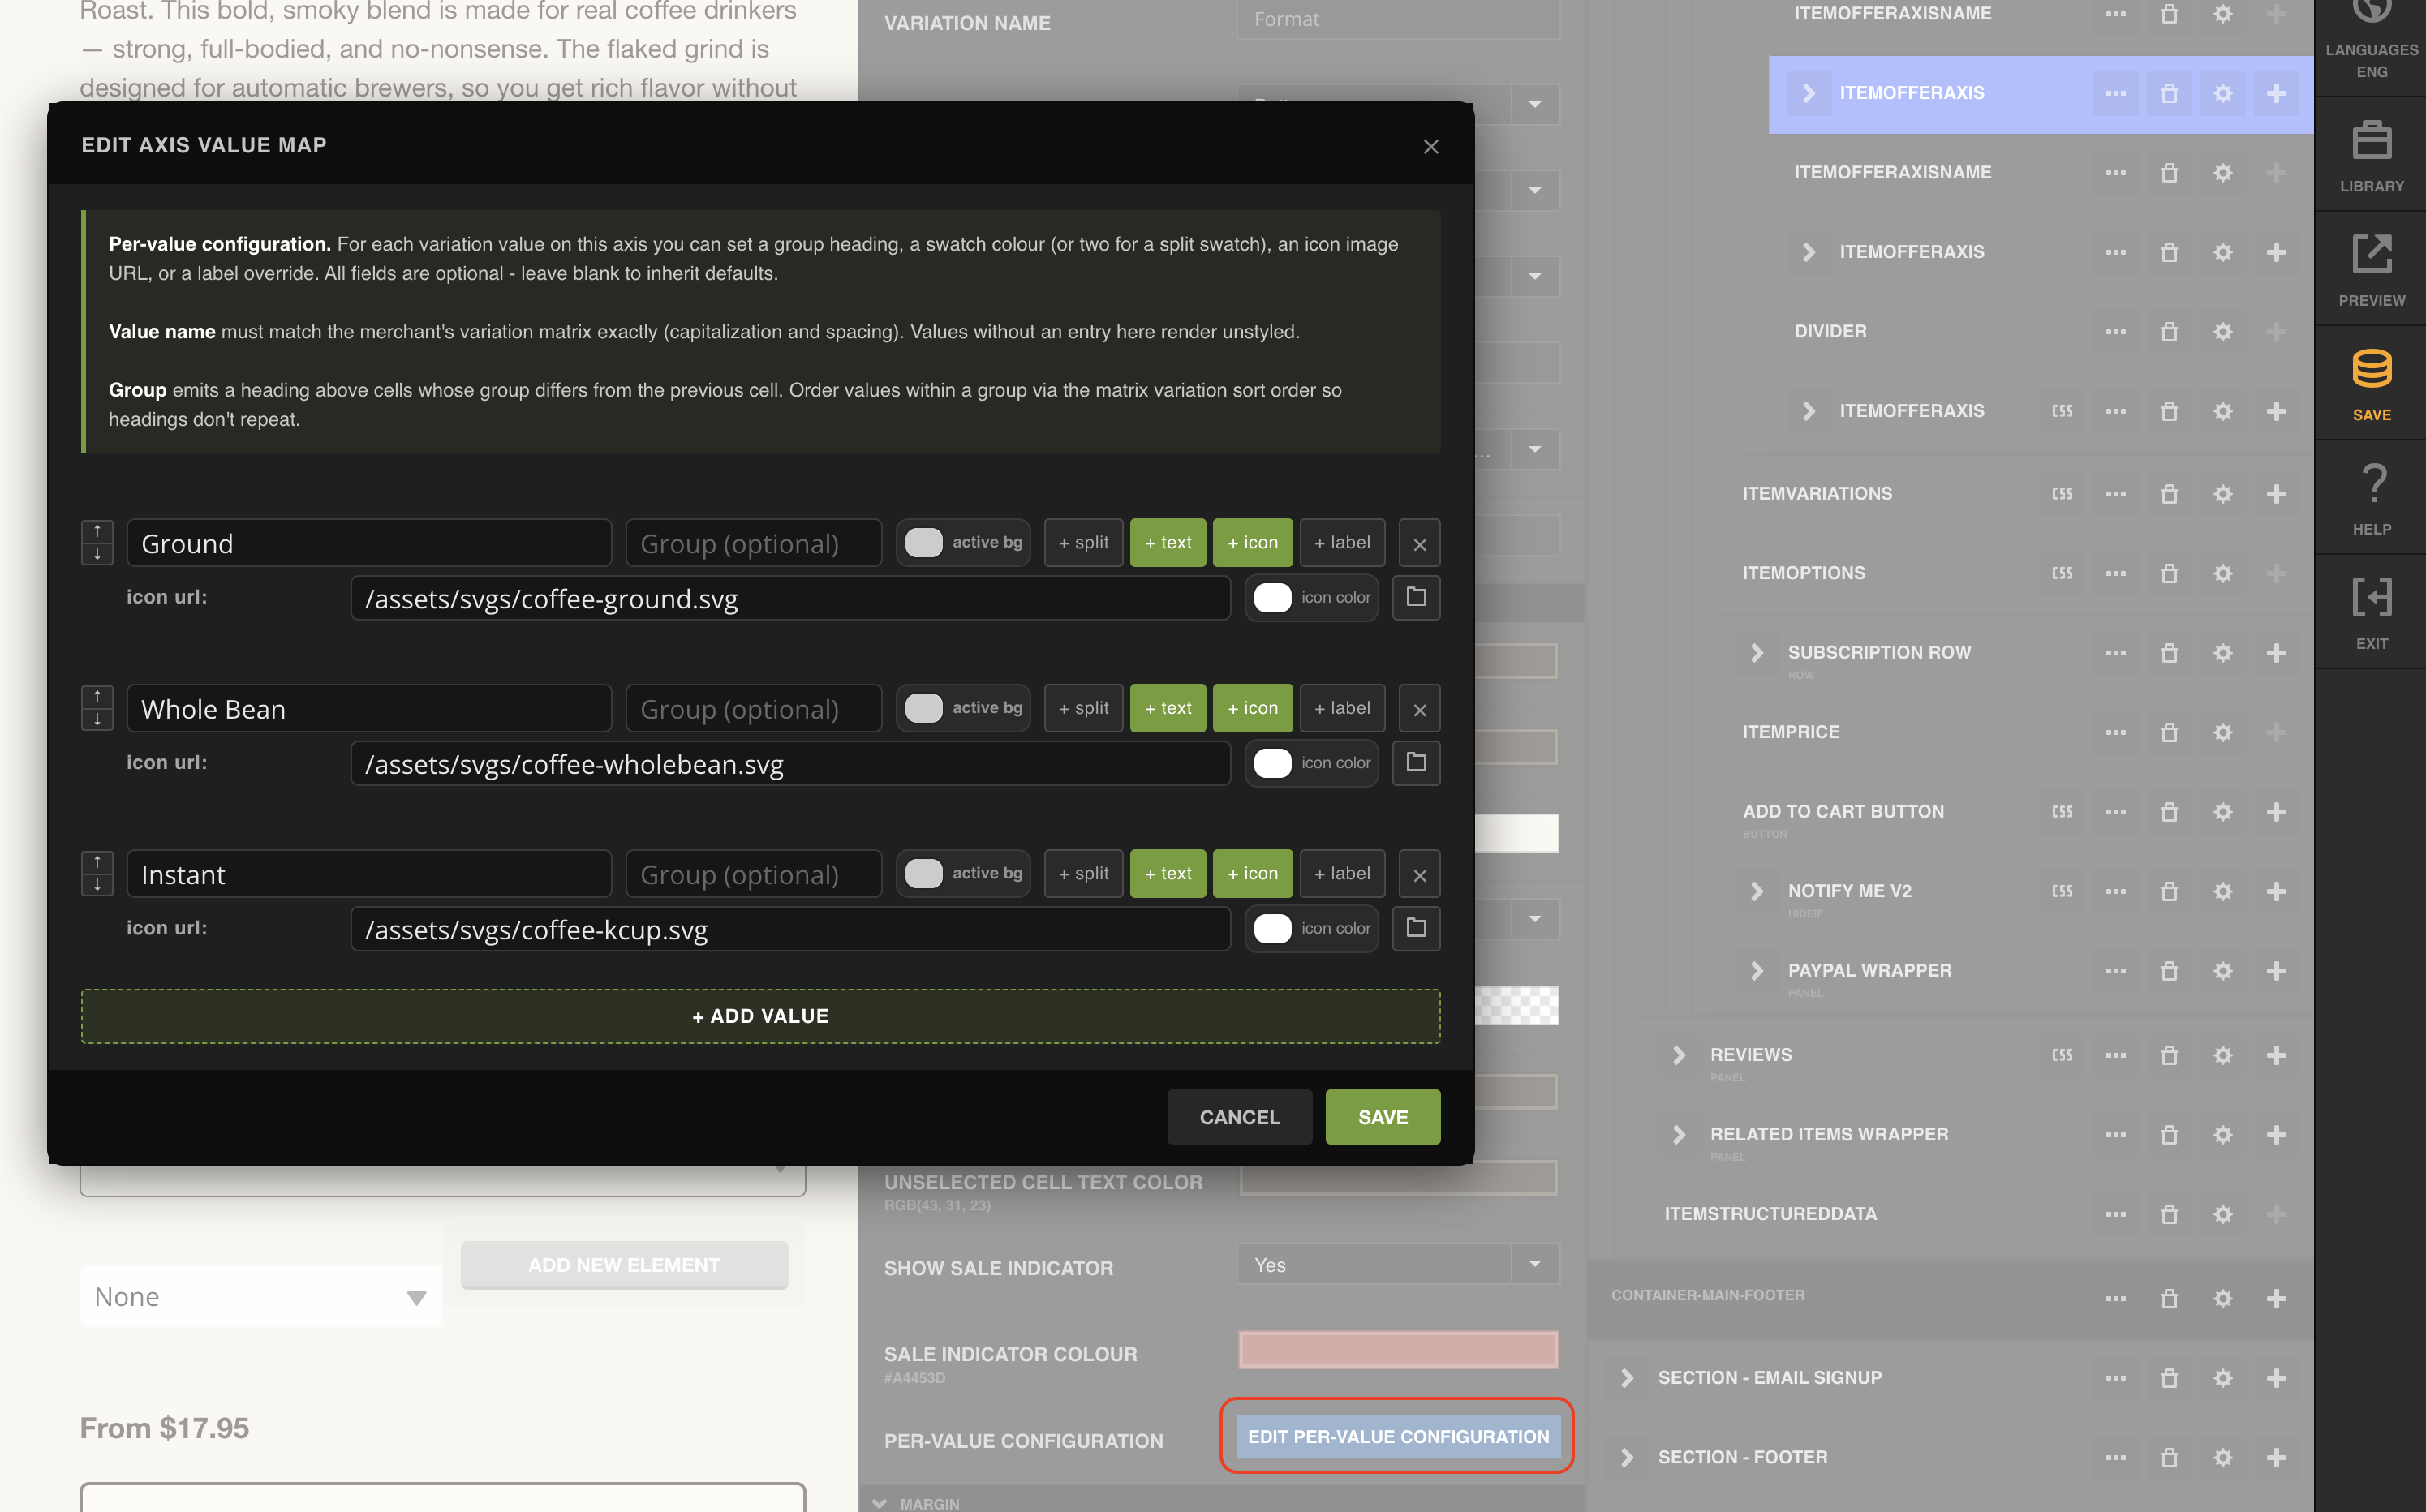
For each value you can set:
-
A swatch colour (or two for a split swatch) and a text colour.
-
An icon URL (for example
/assets/svgs/coffee-ground.svg). This is the per-value icon the Item Offer Icon slot renders. -
A group heading, which emits a heading above the first cell whose group differs from the previous one.
-
A label override, to display something other than the raw variation value.
The Value name in each row must match the merchant's variation matrix exactly. Values without an entry here simply render with the axis defaults.
Step 6: Mark the Selected Cell
Add an Item Offer Selected Icon inside the axis to put a single indicator (a checkmark by default) on whichever cell is currently selected. It is cloned into every cell but only shows on the active one. Set its Position to overlay a corner (overlay-tr by default) or sit inline.
This is distinct from Item Offer Icon: the selected icon is the same on every cell and only its visibility changes, while Item Offer Icon shows a different per-value glyph on each cell.
Step 7: Add a Subscription Option (Optional)
To offer subscribe-and-save, you have two complementary tools:
-
An Item Offer Axis with Axis Source set to
Auto order. This renders a one-time-versus-subscribe choice as its own axis. Its Subscription Labels group sets the One Time Label (defaultOne time purchase) and Subscribe Label (defaultSubscribe), and Auto Order Primary picks which side is primary. -
An Item Offer Auto Order Schedule, a cadence picker (Biweekly, Every 4 Weeks, and so on). Place it as a sibling of the axes, not inside one. Pick its Render Mode (
radios,buttons,cards, ordropdown). It reads the resolved item's auto-order configuration and shows the allowed frequencies, and it hides itself when the resolved variant is one-time only.
itemoffer
├── itemofferaxis   Format
│   └── itemoffertitle
├── itemofferaxis   (Axis Source: Auto order)
│   └── itemoffertitle
└── itemofferautoorderschedule   (render mode: dropdown)
| Setting | Default | Values |
|---|---|---|
| Pending Label | (none) | free text |
| Treatment for Invalid Options | hide | hide, disable |
| Sequential Reveal | No | Yes, No |
| Sequential Visibility Mode | disable | disable, hide |
| Sequential Auto Advance | Yes | Yes, No |
Item Offer Axis
| Setting | Default | Values |
|---|---|---|
| Axis Source | matrix | matrix, autoOrder |
| Variation Name | (none) | must match the item's variation exactly |
| Render Mode | cards | buttons, radios, pills, cards, dropdown, swatches |
| Layout | horizontal | horizontal, vertical, grid |
| Setting | Default | Values |
|---|---|---|
| Variation Name | (none) | must match the axis it labels |
Core slot widgets
| Element | Key settings |
|---|---|
| Item Offer Title | text color, background, alignment (label comes from the variation value) |
| Item Offer Icon | width (24), height (24), tint color, fallback library icon (icon URL set per value in the Axis Value Map) |
| Item Offer Price | optional leading label, divisor axis for unit pricing, hide-when-one |
| Item Offer Selected Icon | source (library / urlOrPath), library name (check), width (16), height (16), position (overlay-tr) |
Item Offer Auto Order Schedule
| Setting | Default | Values |
|---|---|---|
| Render Mode | radios | dropdown, radios, buttons, cards |
| Hide Ancestor | Yes | Yes, No |
Verification
Once the picker is assembled, preview the product page and confirm:
-
Each axis shows one cell per variation value, in the sort order set in the item editor.
-
Selecting a different value moves the selected indicator and updates the price. Changing one axis re-prices the cells on the other axis, because the resolved child SKU changed. This re-hydration on every click is expected.
-
The per-value icons, colors, and labels from the Axis Value Map appear on the right cells.
-
If you added a subscription option, the cadence picker appears for subscribe-eligible variants and disappears for one-time-only ones.
-
Add To Cart adds the correct child item for the current selection. On a product page nothing is added to the cart until Add To Cart; in checkout, selections change the live cart immediately.
Troubleshooting
An axis renders empty (no cells)
Cause: The axis's Variation Name does not match a variation on the item, or the item lacks that variation.
Fix: Confirm the name matches the item editor exactly, including capitalization and spacing. An empty axis collapses, and its paired Item Offer Axis Name collapses with it, so you will not see an orphaned heading.
A conditional reveal never shows the target
Cause: Widgets named in an Item Offer Conditional's show list were not authored Hidden, or the watched axis is not on the item.
Fix: Author show-target widgets as Hidden by default so they only appear when the rule matches. A rule watching an axis the item does not have never matches, so show-targets stay hidden.
Prices flash or recalculate on every click
This is expected. A cell's price is the price of the fully resolved variant given the other axes' current choices, so a click re-hydrates every cell's price, not just the one clicked.
The subscription cadence picker is missing
Cause: The resolved variant is one-time only, or auto-order is disabled for it.
Fix: This is by design. Item Offer Auto Order Schedule hides itself (and, with Hide Ancestor on, its surrounding section) when there are no selectable cadences.
Related Documentation
-
Item Options and Variations - Defining variations and Variation Item Assignments in the item editor (the prerequisite for any variation picker).
-
Storefront Visual Builder - The page builder where Item Offer elements are placed.
-
Item Variations - The classic variation dropdown that Item Offer can replace, and which can defer to a visible Item Offer.