Overview
The Ultracart WordPress plugin provides a quick and easy integration of your UltraCart account with your WordPress hosted website.
This document will detail the steps to installing the UltraCart WordPress Plugin.
Installation
Getting Started
-
Install The plugin and Activate the plugin
-
Connect your site to UltraCart via Settings **→ **UltraCart
-
Add eCommerce components to your site
NOTE: You can Install UltraCart eCommerce - Shopping Cart via the WordPress plugin directory, or by uploading the files manually to your server.
After becoming an UltraCart merchant, use the plugin to connect your accounts and authorize your site to use UltraCart via Settings → UltraCart in the WordPress admin menu.
Installing the plugin
The UltraCart WordPress plugin is located at the following URL:
https://wordpress.org/plugins/ultracart-ecommerce-shopping-cart/
Click Download to begin the installation
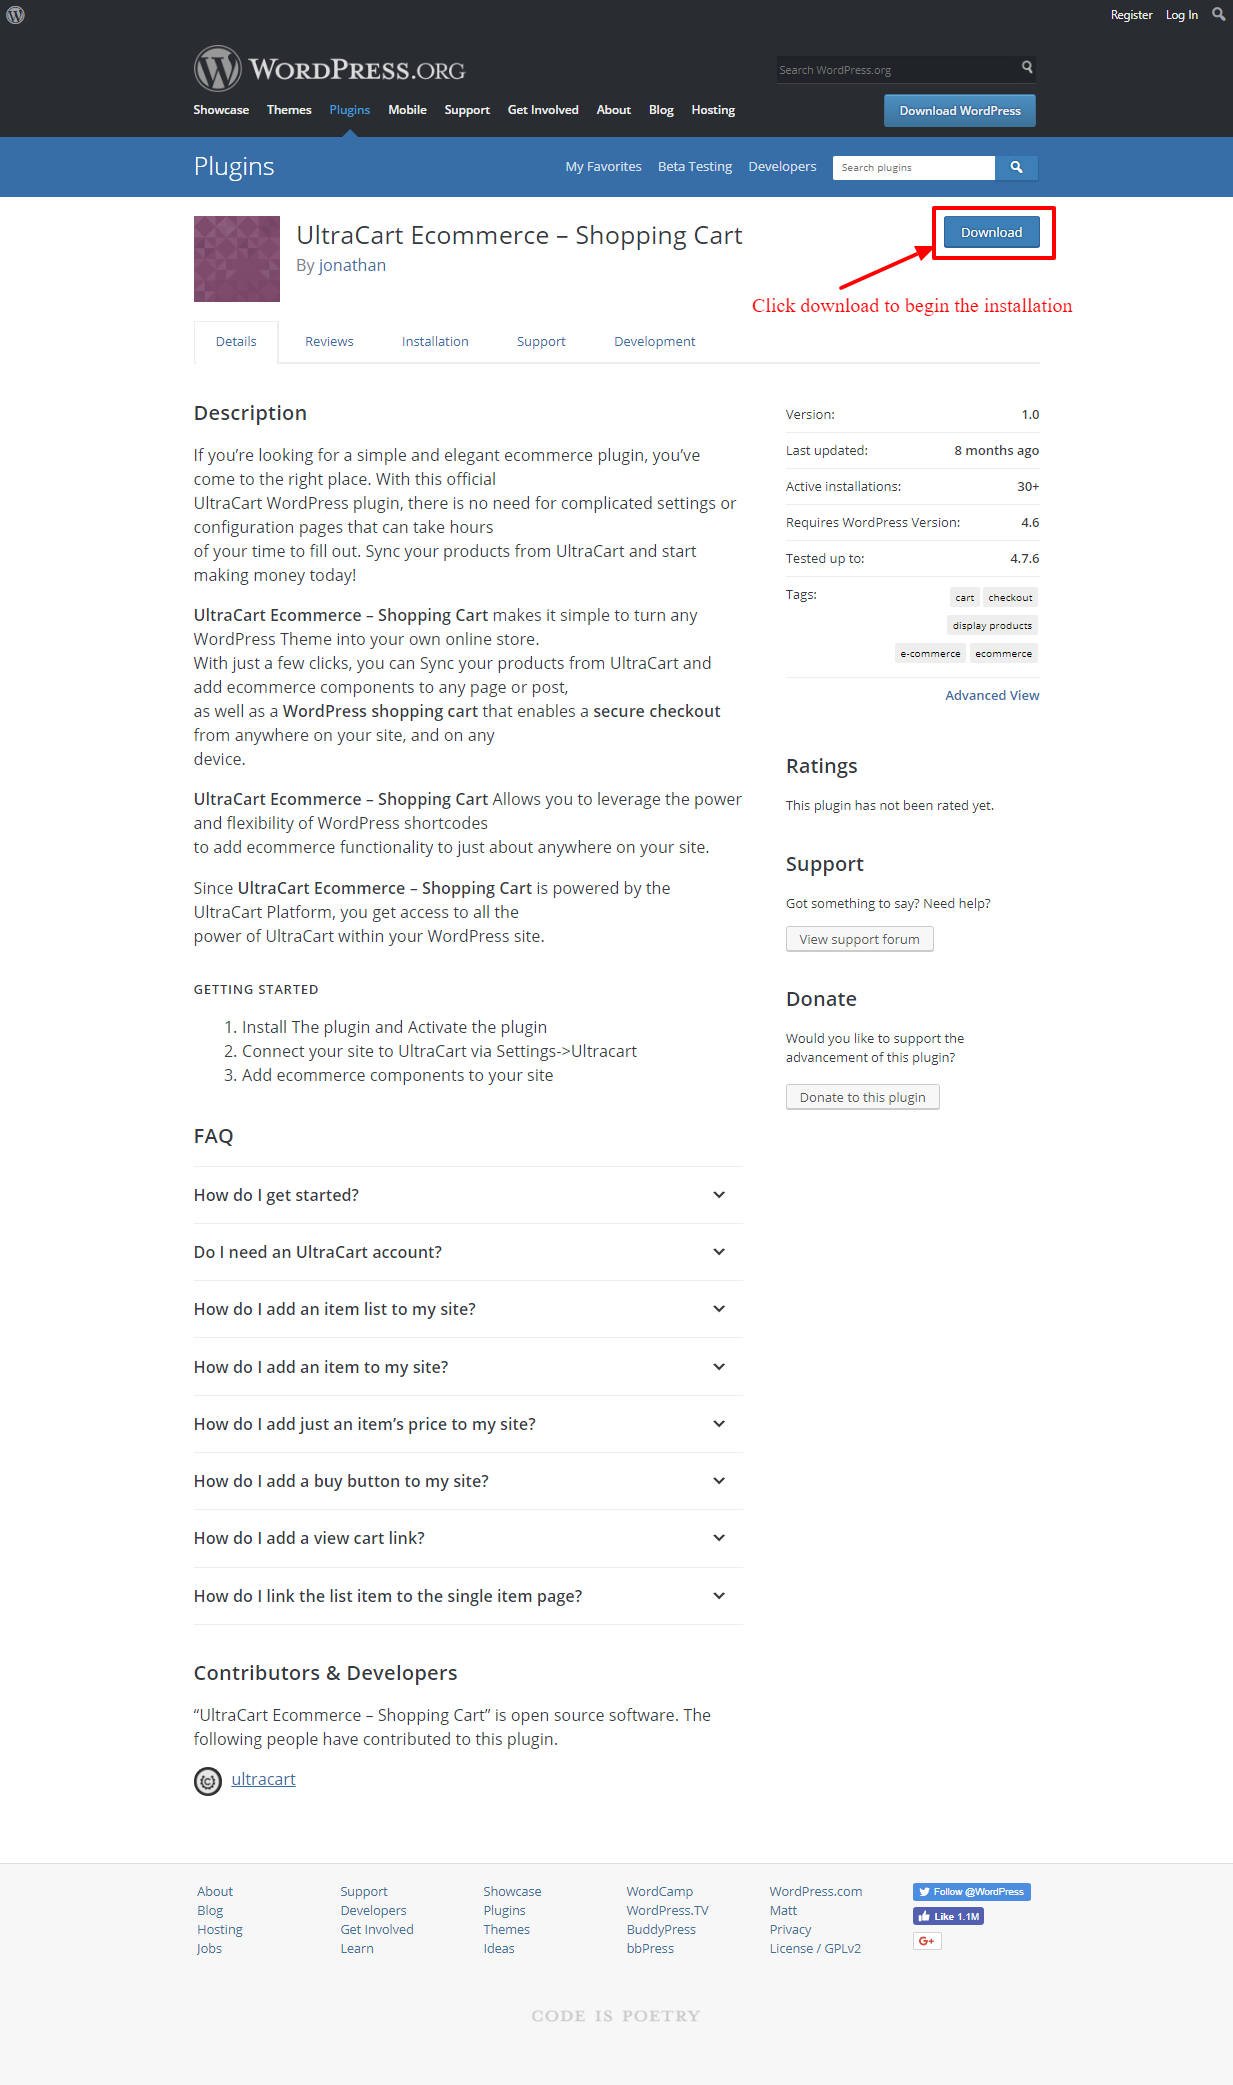
Installing the UltraCart Wordpress Plugin
-
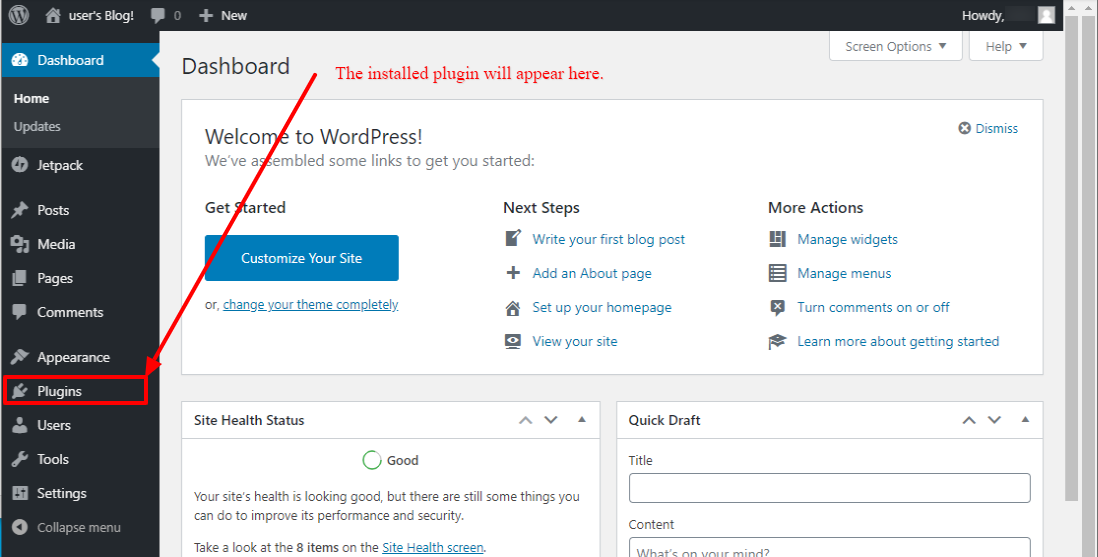
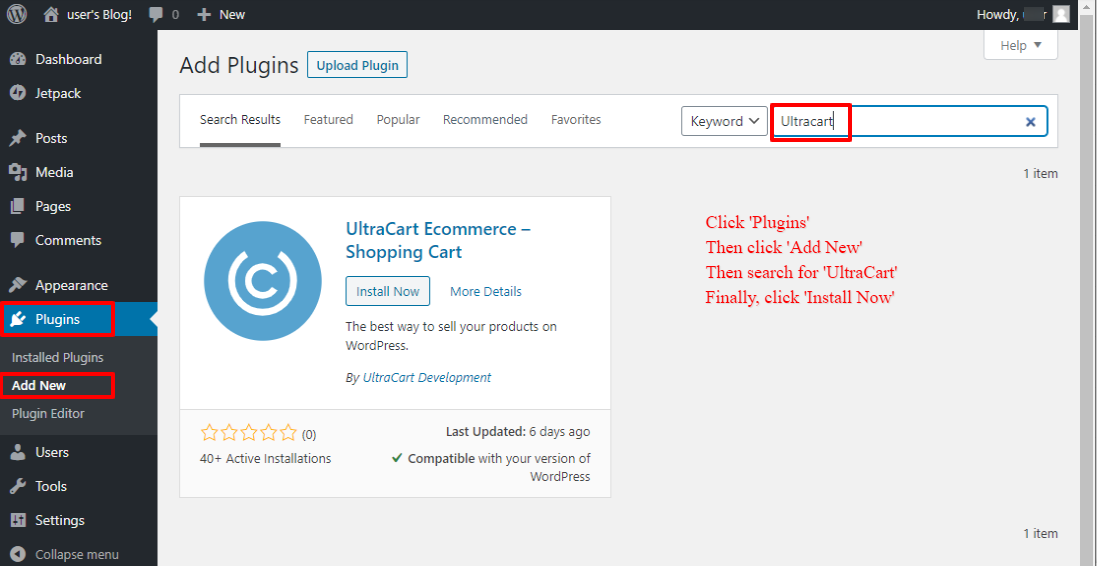
Log into your Wordpress account, then from the main menu, click Plugins, then click Add New
-
Search the Plugins for Ultracart
-
Click Install Now button for the UltraCart Plugin
-
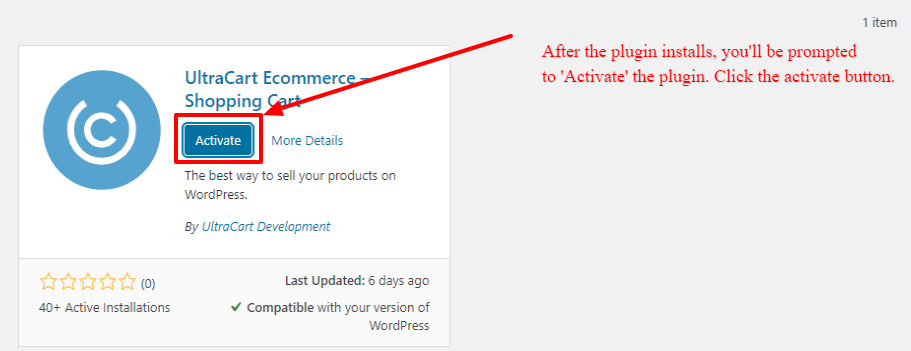
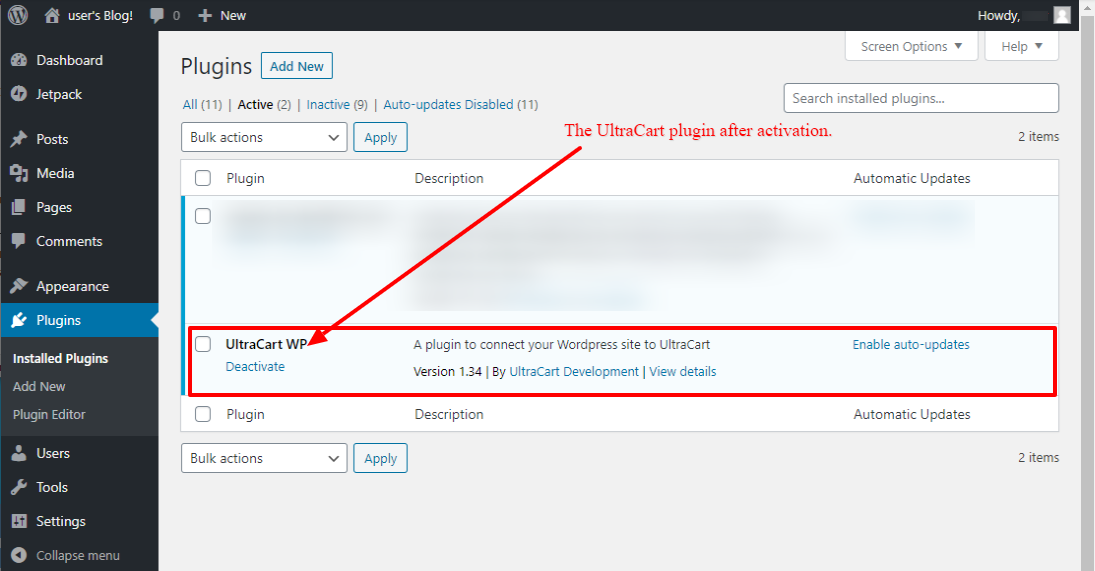
After the plugin installs, you'll be prompted to 'Activate' the plugin. Click the activate button.
-
The UltraCart Wordpress plugin is now installed:
UltraCart Wordpress Plugin Settings
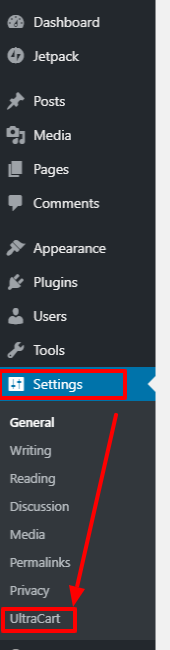
After the Plugin has been installed and activated, you can access the plugin settings by
clicking the 'Settings' from the Wordpress main menu, then clicking UltraCart in the submenu that appears:
You'll be presented with the UC Wordpress settings:
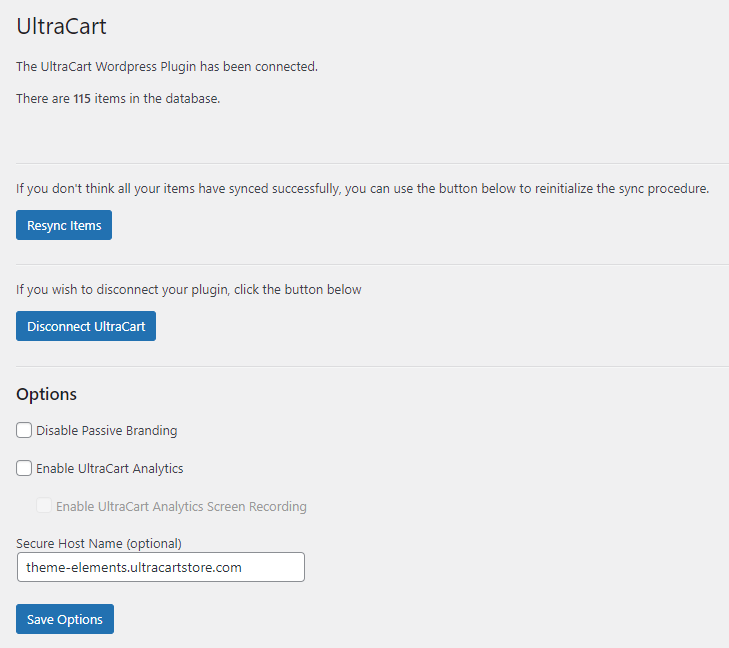
Upon installation of the UltraCart Wordpress plugin, item synching will be triggered. This will take a few moments to complete.
There are a few options that can be configured:
| Option | Description | Recommended |
|---|---|---|
| Disable Passive Branding | When enabled, the UltraCart Passive Branding will be disabled. | |
| Enable UltraCart Analytics | When enabled, the UltraCart Analytics script will be inserted into the Wordpress pages. | Yes |
| Enable UltraCart Analytics Screen Recording | When enabled, the UltraCart Analytics script will load with an optional flag set to instruct it to also capture screen recording data. This can only be enabled if "Enable UltraCart Analytics" is also enabled. To learn more about UltraCart Screen Recordings and Heatmaps, read more about it at StoreFront Recordings | |
| Secure Host Name (Optional) | The wordpress plugin makes the assignment automatically by looking at the host address of the URL when adding an item to the cart. If the domain of the wordpress site matches a domain assigned to one of your storefront hosts, it will will use that one (i.e. - www.yourdomain.com and you have secure.yourdomain.com then it will use that storefront when the customer checks out). Alternatively, if the wordpress website domain matches the subdomain portion of your storefront using the Ultracart built in host addresses, it will use that storefront: www.yourdomain.com, yourdomain.ultracartstore.com or yourdomain.ultracartdev.com if the storefront host does not exist. |
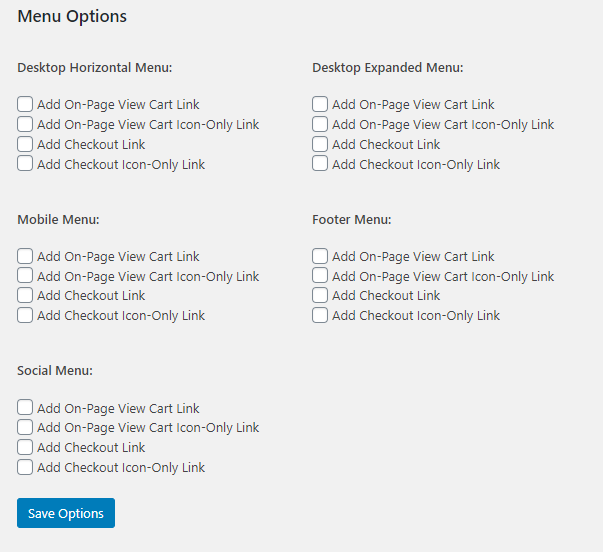
The 'Menu Options' section of the UltraCart Wordpress plugin settings allow you to customize the Wordpress menus
with "View cart/Checkout" links.
Shortcodes and Blocks
We recommend using the UltraCart blocks whenever you are working in the WordPress block editor. Blocks let you pick products, set options with toggles, and preview changes without writing code. Shortcodes are still available and work anywhere shortcodes are supported.
[uc_buy_button] shortcode and Buy Button block
-
What it does: shows an “Add to Cart”/“Buy” button for a single item.
-
Key arguments:
-
itemid(required): the item’s ID from UltraCart. -
currency_conversion(optional): show the price in a different currency (e.g., AUD, EUR). -
immediate_checkout(optional): set to"true"to send shoppers straight to checkout after clicking; defaults to"false".
-
-
Example:
[uc_buy_button itemid="Hat" currency_conversion="AUD" immediate_checkout="true"] -
Block version: use the Buy Button block, select the item, choose currency, and toggle “Immediate checkout” if desired.
[ucitem] shortcode and Item block
-
What it does: displays a full product block (title, gallery, price, quantity, options, descriptions, etc.).
-
Key arguments:
-
itemid(required): the item’s ID from UltraCart. -
Section toggles (optional, default to showing): set to
"false"to hidetitle,gallery,extended_description,extended_description_esc,price,quantity,auto_order_schedules, oroptions. -
immediate_checkout(optional):"true"to skip the cart and go to checkout on add; defaults to"false". -
currency_conversion(optional): show pricing in a specific currency code.
-
-
Example:
[ucitem itemid="Hat" gallery="false" options="false" currency_conversion="EUR"] -
Block version: use the Item block to pick the product, toggle which sections to show, choose currency, and optionally enable immediate checkout—no shortcode editing needed.
[uc_price] shortcode and Price block
-
What it does: shows only the price of a single item.
-
Key arguments:
-
itemid(required): the item’s ID from UltraCart. -
currency_conversion(optional): display the price in another currency.
-
-
Example:
[uc_price itemid="Hat" currency_conversion="GBP"] -
Block version: use the Price block to select the item and currency.
[ucitem_list] shortcode and Item List block
-
What it does: shows a list of items in the order you provide.
-
Key arguments:
-
itemids(required): comma-separated list of item IDs (e.g.,"hat,scarf,gloves"). -
currency_conversion(optional): display prices in another currency.
-
-
Example:
[ucitem_list itemids="hat,scarf,gloves" currency_conversion="CAD"] -
Block version: use the Item List block, pick products from the dialog, and choose currency; the list keeps the order you select.
[uc_if] shortcode (conditional content)
-
What it does: conditionally shows content based on item properties.
-
Key arguments:
-
itemid(required): the item’s ID from UltraCart. -
kit(flag): include this word to check if the item is a kit. -
orderable(flag): include this word to check if the item is currently orderable. -
not(flag): include this word to invert the condition.
-
-
Examples:
-
Show content only if the item is a kit:
[uc_if itemid="bundle123" kit]Your content here[/uc_if] -
Show content if the item is not orderable:
[uc_if itemid="hat" not orderable]Sorry, this item is unavailable[/uc_if] -
You can nest other shortcodes inside the content, e.g.
[uc_if itemid="hat" orderable][uc_price itemid="hat"][/uc_if].
-
Configuring items to display in the Wordpress site.
Import Note About Item Configuration
Please make sure to configure our items in the UltraCart Item Management area prior to assigning them to your Wordpress site.
**Specifically, make sure that your items have the following required minimum fields configured: **
-
Item ID
-
Item Image
-
Title
-
Cost
-
Weight (0.00 for non-shippable items, and a accurate weight for shippable items.)
Q: Adding an Item list to my site?
A: Go to a page or post editor and click the button to add an item list. Search for the item and add it to the page. Simply add the shortcode:
[ucitem_list itemids="blonderoast,darkroast,mediumroast"]
Q: Add a single item to my site?
A: Go to a page or post editor, and click the button to add the item. Search for the item and add it to the page. Simply add the shortcode:
[ucitem itemid="Hat"]
Q: Add just an items price to the site?
A: Go to a page or post editor, and click the button to add the price. Search for the item and add it to the page. Simply add the shortcode:
[uc_price itemid="Hat"]
Example: 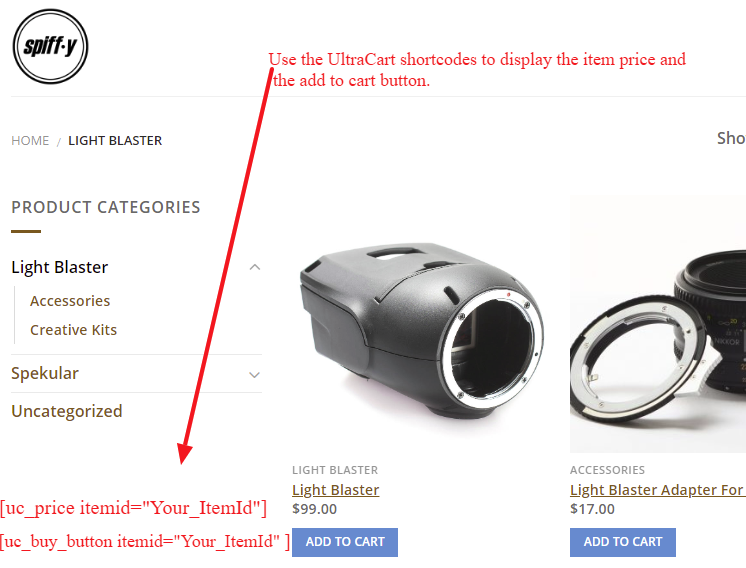
Q: Add a buy button to my site?
A: Go to a page or post editor, and click the button to add a buy button. Search for the item and add it to the page. Simply add the shortcode:
[uc_buy_button itemid="Hat" ]
Example:
Q: Add a view cart link to my site?
A: You can configure which menu to add view cart link to in Settings -> UltraCart in the WordPress settings page. Additionally, you can add any link with the href value of "#viewcart", or a class of "js-view-cart-snapshot" as a view cart link.
Special Note
The plugin will no longer automatically add a view cart link to the menu registered as "primary", and the merchant must configure the Menu Options in Settings -> UltraCart for it to appear in the menu.
Q: How do I add a product thumbnail to the "mini cart" (shopping cart snapshot that pops out of the right side of page after the item is added)?
A: The shopping cart snapshot is comprised of a set of hard coded in the PHP scripts and these scripts aren't presently customizable.
Q: How do I add a direct checkout link?
A: You can configure which menu to add the direct checkout link to in Settings -> UltraCart in the WordPress settings page. Additionally, you can add any link with the href value of "#checkout", or any tag with a class of "js-view-checkout". When clicked, it will transfer the user to begin the checkout process. This way, you can use it with any custom button you wish.
Q: How do I add a cart icon to a checkout or view cart link?
A: You can configure which menu to add the icon-only link to in Settings -> UltraCart in the WordPress settings page. Similar to the normal view cart or direct checkout links described above, you can add any link with the href value of "#checkout-icon", "#checkout-icon-left", "#viewcart-icon", or "#view-cart-icon-left", or any tag with a class of "js-view-checkout-icon", "js-checkout-icon-left", "js-view-cart-icon", or "js-view-cart-icon-left". These will have the same, respective functionality as the links described above, but also will either append or prepend a cart icon into the element.
Q: Link the list item to the single item page?
A: It does so automatically. It should find a link to the most recently added single item once the item's page is visited.
Q: I upgraded to the latest version of the plugin and my main menu no longer has a view cart link. What happened, and how to I fix it?
A: We added a Menu Options section in the settings page. For each registered menu location in a theme, merchants can select whether to "Add On-Page View Cart Link", "Add On-Page View Cart Icon-Only Link", "Add Checkout Link", or "Add Checkout Icon Only Link".
The plugin will no longer automatically add a view cart link to the menu registered as "primary". The merchant must configure the Menu Options in Settings -> UltraCart for it to appear in the menu. This will be more convenient and grant increased flexibility going forward.
Q: Does the plugin support multiple currencies?
A: Yes! Just select which currency you wish to use with your item, item list, price or buy button when you insert the shortcode by selecting the desired currency code in the currency conversion dropdown. An example of a shortcode with a currency conversion looks like:
[uc_price itemid="necklace" currency_conversion="AUD"]
Q: What are the tracking scripts associated with the WordPress plugin integration?
A: There two potential tracking scripts, here's how to access them:
Affiliate tracking: http://secure.ultracart.com/cgi-bin/UCInvisibleLink?merchantId={merchant_id_here}&advanced=true
Analytics script: https://d9i5ve8f04qxt.cloudfront.net/UC/62/uca/0.1.0/js/collect.js
The analytics script requires jQuery to be included on the page, and it also requires specific attributes.
For example:
<script async defer src="'. $src .'" data-mid="'. $mid .'" data-channel="'. $host_name .'"></script>
Inspecting and the Log
If you are having an issue with the plugin, there are two areas in which to inspect the plugin API logs.
-
Authorized Applications Logs
-
Webhooks Logs
In general, the webhook logs will have the logs for the communication initiating from UC to the server where Wordpress is hosted, while the application logs will contain the REST http requests and responses initiating from the Wordpress application to UC
Authorized Applications
To view the REST API logs for issue regarding the communication from Wordpress to UltraCart, log into UltraCart, then navigate
Main Menu → Advanced → Developer Tools → REST APIs → API Logs > Authorized Applications (tab)
To view the log click the "Log" button:

The Wordpress logged events will appear like this:
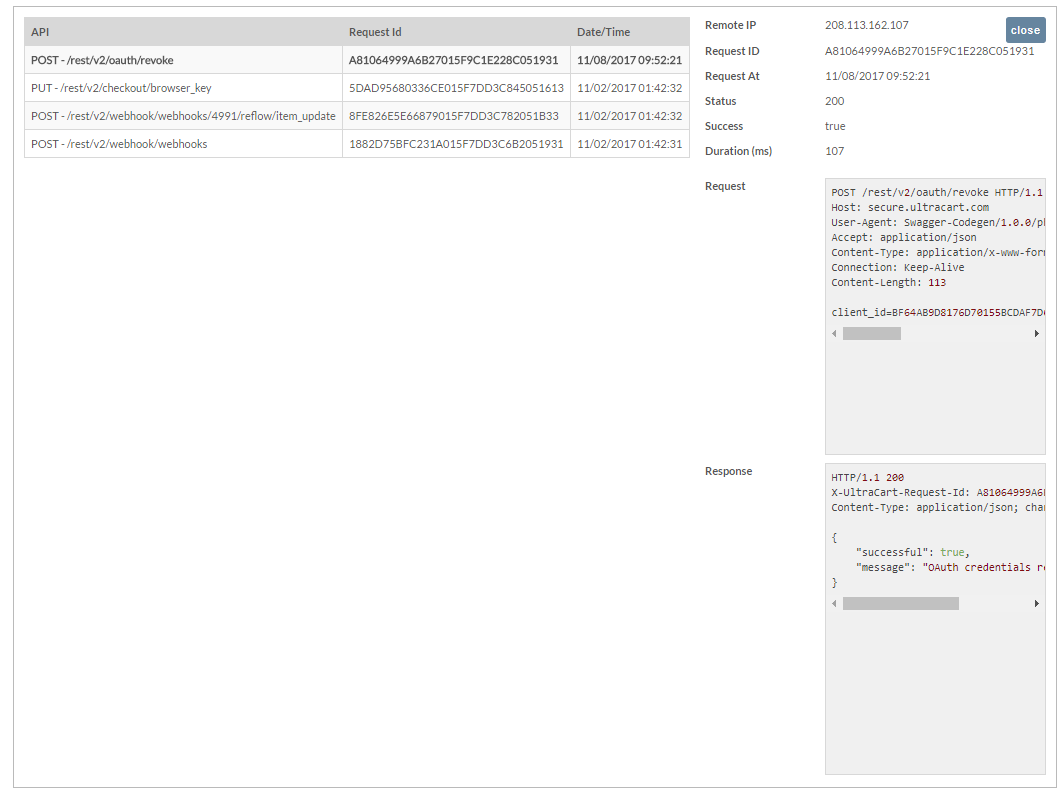
Webhook Log
After you have successfully installed the wordpress plugin and are working with it, if you encounter and issue with either items syncing or item assignment, you can review the wordpress webhook logs for issue related to the activity of the plugin.
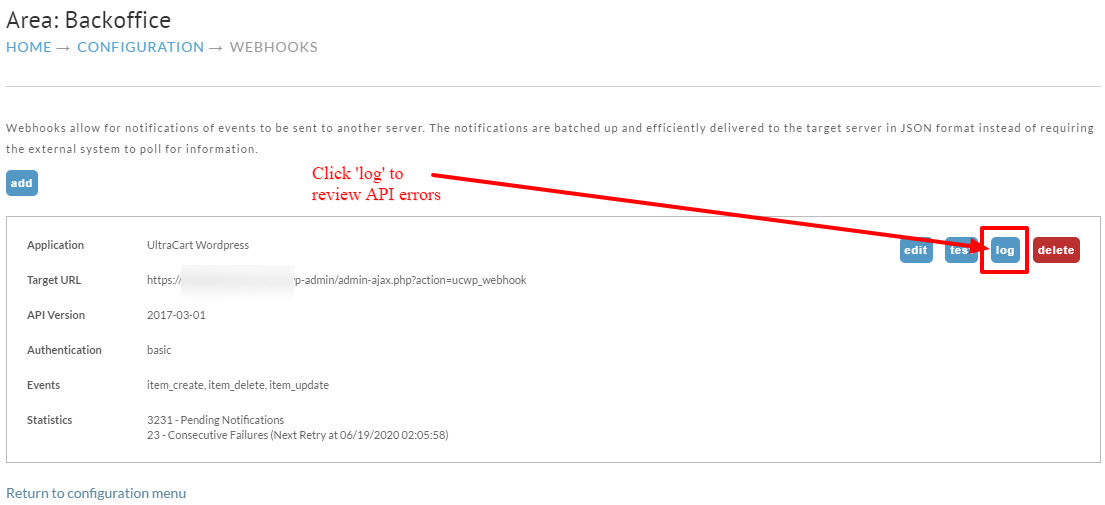
Main Menu → Advanced → Developer Tools → Webhooks → Webhook Logs > "Log" button
When reviewing the webhooks logs for errors, click the Request ID of the API call then inspect the Request & Response sections that are display along the right side of the page. The response will contain the error message:
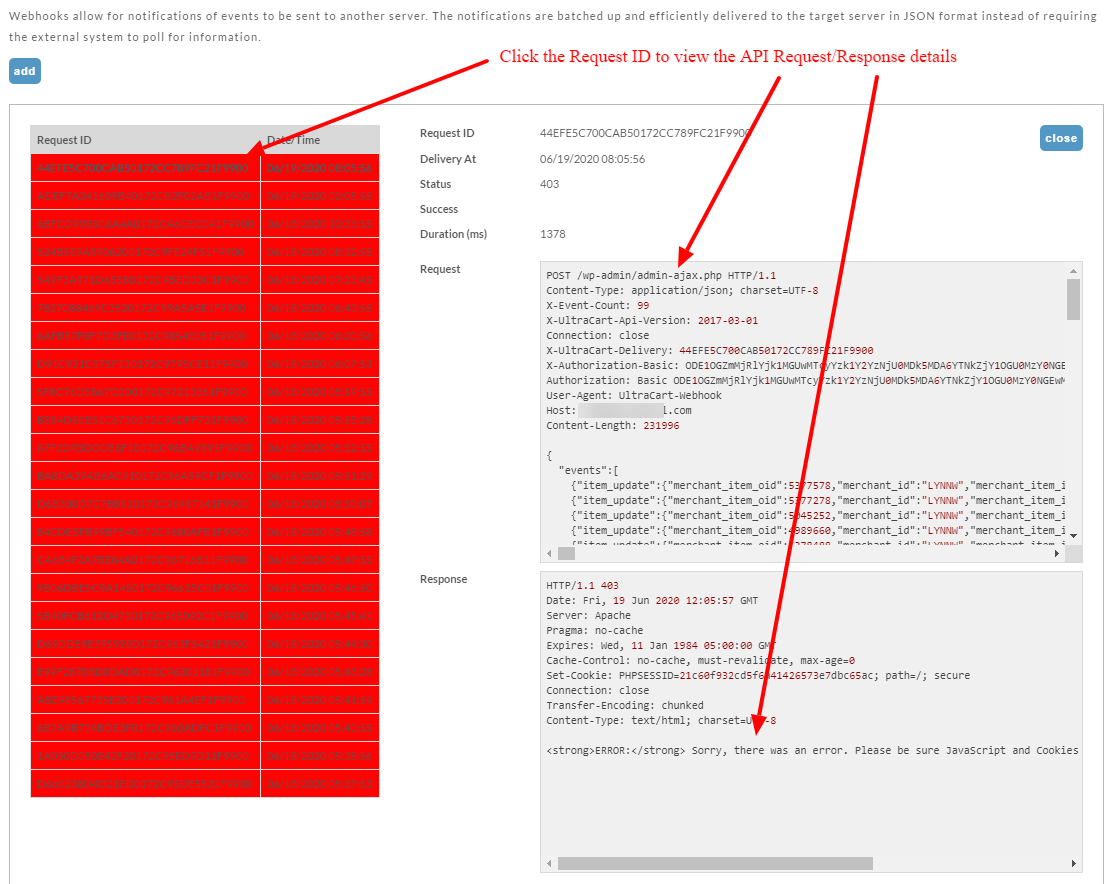
If you encounter a problem with the plugin and are unable to resolve it after reviewing the logs for errors, please email support@ultracart.com, providing your UltraCart Merchant ID, and the URL to your Wordpress website, along with a description of the issue you are encountering.
Disconnecting and Reconnecting the Wordpress Plugin to Resolve Credentials Errors Issues
If the WordPress plugin requires updating to the newest version of the plugin, or in cases where the plugin become unresponsive with credentials errors, you may need to disconnect the plugin and then reconnect it.
Inside of Wordpress Administration
-
Log into WordPress, then click **Plugins **in the left-hand menu
-
Next, click Settings
-
Scroll down and click the Disconnect UltraCart button
.png)
-
Next click the Connect to UltraCart button that appears in the Ultracart plugin settings page
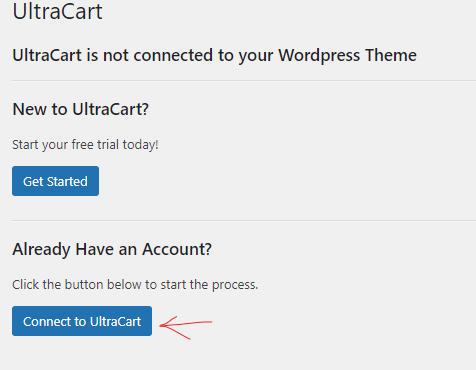
UPDATE: As of 08/11/2021 when you perform the Disconnect/Reconnect steps above, UltraCart will automatically remove all stales API application instances.
Please email support@ultracart.com if plugin errors continue after performing the disconnect/reconnect with the plugin.
Troubleshooting FAQ
Q: I received an error on the back-end of my Wordpress site when trying to sync my items because new items weren't pulling in to Wordpress from UltraCart. I disconnected and reconnected UltraCart and now my items aren't syncing at all. I see a 403 error in the UltraCart Wordpress Webhook Logs. What could be the issue?
A: If you have multiple WordPress plugins installed, it could be caused by another plugin. In this case the merchant did end up identifying a SPAM plugin as the culprit. So, if you have multiple plugins installed in addition to the UltraCart Wordpress plugin, try temporarily disabling the other installed plugins to see if that resolves the issue.